
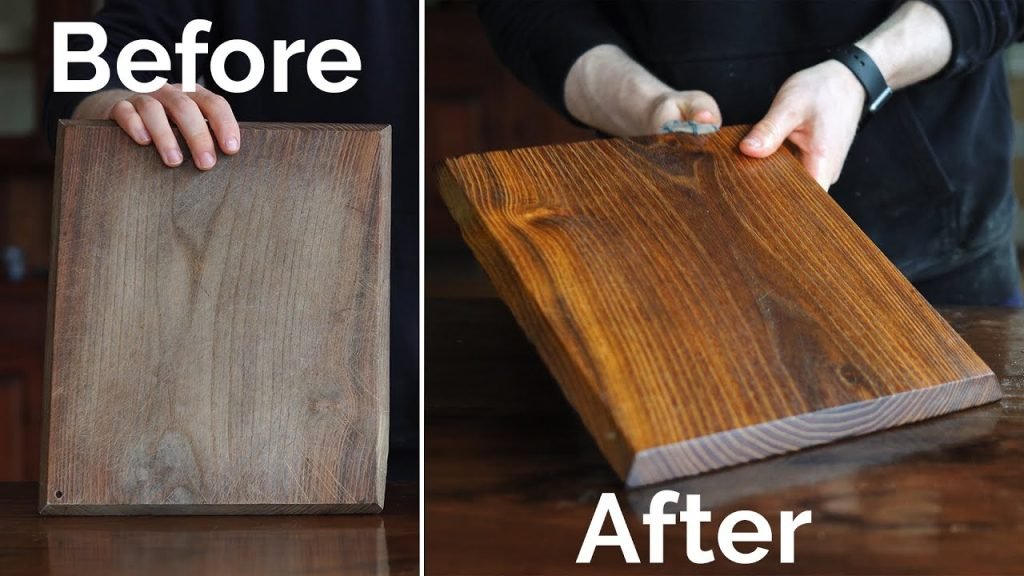
A well-seasoned wooden cutting board lasts years, resists stains, and feels great under your knife. This guide gives step-by-step instructions, practical troubleshooting, and proven product choices so you can season, maintain, and restore any hardwood board — end-grain, edge-grain, or face-grain — safely and effectively.

Credit: www.youtube.com
Quick overview — what "seasoning" means and why it matters
Seasoning a cutting board means replenishing the wood’s surface with a food-safe oil or oil/wax finish so the wood stays hydrated, resists liquid penetration, and reduces the risk of staining, warping, and bacterial entrapment. In practice, a properly seasoned board:
- Repels water and prevents deep moisture penetration
- Makes cleanup easier and reduces odor absorption
- Restores color and grain contrast
- Extends the usable life of the board, delaying cracks and splits
A common mistake is to think a one-time coat is enough. Regular, light maintenance prevents bigger repairs later.
Which boards need seasoning and how often
- Heavy-use, professional or daily home boards: oil once a week.
- Regular home cooks: oil monthly (every 3–4 weeks).
- Occasional / display boards: oil every 3–6 months.
End-grain boards (the “checkerboard” look) absorb oil faster and will often need more frequent light coats than edge- or face-grain boards.
Best oils and conditioners — what to use and what to avoid
Recommended
- Food-grade mineral oil (USP or “food-grade” label): odorless, stable, inexpensive — the safest baseline choice.
- Commercial butcher-block conditioners: usually mineral oil + beeswax or carnauba wax; convenient and long-lasting.
- Food-grade beeswax + mineral oil blend (DIY): seals surface more than oil alone.
Use cautiously
- Food-grade tung oil (fully polymerized, labeled food-safe): can be used if explicitly food-grade; follow manufacturer guidance.
- Polymerized finishing oils marketed for cutting boards (confirm food-safe on label).
Avoid
- Vegetable oils (olive, sunflower, walnut unless explicitly food-safe): they can oxidize and go rancid, leaving sticky residue and smells.
- Finishes not labeled food-safe (many furniture varnishes, polyurethane, shellac not intended for cutting surfaces).
DIY beeswax + mineral oil conditioner recipe
Ingredients and ratio:
- 4 parts food-grade mineral oil
- 1 part beeswax (by weight)
Method:
- Gently melt beeswax in a double boiler.
- Stir in mineral oil until blended and remove from heat.
- Pour into jars and let cool.
- Apply thinly with a cloth; buff after absorption.
This creates a paste that gives extra surface protection and a pleasant sheen.
Step-by-step: how to season a clean board
Clean and dry
- Wash with hot water and mild dish soap; scrub with a sponge and rinse. Avoid soaking or the dishwasher — prolonged water exposure warps wood.
- Dry upright in a ventilated area until fully dry (several hours).
Optional sanitizing (for heavy contamination)
- Wipe with white vinegar or a 3% hydrogen peroxide spray, then rinse. For stubborn contamination, follow labeled guidance for diluted bleach solutions and rinse thoroughly; follow USDA food-safety recommendations for sanitizing kitchen surfaces for safety practices (USDA food-safety guidance).
Sand (only if needed)
- If surface is rough or has deep cuts, sand along the grain: start with 120–150 grit to level, then 220–320 grit to finish.
- Clean sanding dust with a vacuum and a tack cloth.
Apply oil
- Room temperature board. Pour a modest amount (roughly 1–2 tablespoons for a medium board) onto the surface.
- Spread evenly using a lint-free cloth, brush, or paper towel. Rub along the grain and cover edges and end grain.
- For thicker conditioners (beeswax blends), warm slightly for easier spreading.
Let it absorb
- Let the oil sit for at least 2–4 hours; overnight (8–12 hours) is ideal for thorough penetration.
- For dense or new boards, repeat application until the wood stops soaking up oil quickly.
Remove excess and buff
- Wipe off surface oil until it feels dry to the touch.
- Buff with a clean cloth for a smooth finish.
Optional protective top coat
- If you used a beeswax blend, apply a thin extra layer and buff to a satin sheen.
Practical notes on amounts and timing
- Start with less oil — you can always add more. Excess pooled oil leads to a sticky surface.
- New or very dry boards may take 2–3 applications on the first treatment, spaced a few hours apart.
- End-grain absorbs much faster: expect to use more oil but apply in thin layers.
Cleaning vs. sanitizing: safe routines
Daily cleaning
- Warm water + dish soap, scrub, rinse, dry. Do not soak or put in the dishwasher.
Sanitizing after raw meat contact or cuts
- Wipe with vinegar or a 3% hydrogen peroxide solution; rinse and dry. For stronger sanitizing follow USDA label instructions if using bleach; always rinse after sanitizing.
For detailed safety practices about cleaning and sanitizing kitchen surfaces, consult university-extension resources such as the University of Minnesota Extension for food-safety tips (university extension guidance).
Repairing and refinishing: when sanding or replacing is necessary
Minor scratches
- Sand lightly with 220 grit and re-oil.
Deep gouges or knife cuts
- Sand starting at 120 grit, then 220–320 grit to smooth. If cuts are very deep or the board splits, consider replacing; deep cracks can harbor bacteria.
Cracks
- Small hairline cracks can sometimes be glued with food-safe wood glue and clamped; large splits justify replacement for hygiene.
Warping
- Slight cupping can sometimes be reduced by even sanding and reconditioning. Severe warping usually means replacement.
Troubleshooting: common problems and fixes
- Sticky or greasy surface: wipe down with a clean cloth and a tiny amount of mineral oil, then buff. If persistent, lightly sand the surface and re-oil.
- White water spots: dry the board, then sand lightly and recondition.
- Lingering odors: scrub with coarse salt and half a lemon, rinse, dry, and oil.
- Rancid smell: if vegetable oil was used and board smells rancid, deep-sand to remove surface and re-treat with mineral oil.
:max_bytes(150000):strip_icc()/__opt__aboutcom__coeus__resources__content_migration__seriouseats__seriouseats.com__images__2015__09__20150824-wooden-cutting-board-how-to-maintain-composite-kenji-8-5239b1c5d724431ea72e66fd4939bb1d.jpg)
Credit: www.seriouseats.com
Long-term storage and handling tips
- Store boards upright to allow airflow and prevent moisture pooling.
- Rotate sides occasionally (if both sides are used) to avoid uneven wear.
- Keep away from direct heat sources and sunlight which dry and warp wood.
- Use separate boards for raw meats and produce or sanitize thoroughly between uses.
When to replace a wooden cutting board
Consider replacement when:
- Deep grooves remain after sanding.
- Board splits or warps significantly.
- Persistent odors or stains won’t come out.
- Structural integrity is compromised (e.g., loose glued joints).
A well-cared-for board can last years; judged by functionality and hygiene, not just appearance.
:max_bytes(150000):strip_icc()/__opt__aboutcom__coeus__resources__content_migration__seriouseats__seriouseats.com__images__2015__09__20150824-wooden-cutting-board-how-to-maintain-kenji-6-a190c2d2238b41a9aada3248296a82e1.jpg)
Credit: www.seriouseats.com
FAQ — quick answers
Q: What is the single best product to season with? A: Food-grade mineral oil or a butcher-block conditioner (mineral oil + beeswax). They are safe, stable, and easy to use.
Q: Can I use olive oil or coconut oil? A: Avoid olive and most vegetable oils; they can oxidize and go rancid. Coconut oil can also solidify at room temperature and create uneven surfaces.
Q: How long should oil sit before wiping? A: At least 2–4 hours; overnight is best for full absorption, especially on dense or new boards.
Q: Is it OK to put a wooden cutting board in the dishwasher? A: No — dishwasher heat and water will warp, crack, and delaminate wood boards.
Q: How do I sanitize a wooden cutting board after raw meat? A: Clean with hot, soapy water, rinse and dry. Use white vinegar or 3% hydrogen peroxide for extra sanitation. For stronger disinfecting follow USDA or product label instructions and rinse well.
Expert takeaways — practical rules to remember
- Use food-grade mineral oil as your baseline; add beeswax for extra protection.
- Oil thinly and regularly — small amounts more often beat heavy oilings infrequently.
- Clean promptly, never soak, never dishwasher.
- Sand and recondition to restore neglected boards.
- When in doubt about contamination or structural damage, replace the board.
Start tonight: give your most-used board a light coat of food-grade mineral oil and set a calendar reminder to reapply monthly — small, consistent care preserves performance and safety.
Conclusion
Seasoning is a simple habit that yields big returns: less warping, easier cleaning, stronger-looking grain, and a longer life for your cutting board. With the right products, a consistent schedule, and occasional sanding or repair, a wooden board can serve you beautifully for years. Follow the steps above, choose food-safe materials, and you’ll keep your kitchen’s workhorse in top condition.

Hi, I’m Daniel Brooks—a food lover and kitchen gear enthusiast. I enjoy testing cookware, utensils, and gadgets to see what really works in everyday cooking. At PlugChef.com, I share honest reviews, comparisons, and simple guides to help you choose the best tools for a safer, smarter, and more enjoyable kitchen.
Related posts:
 How to Make a Fruit Basket for a Gift: Easy DIY Guide
 Do You Need a Basket? Essential Guide for Air Fryers
 How to Choose Kitchen Appliances: Expert Tips Revealed
 Kitchen Cabinets With Black Stainless Steel Appliances: Modern Elegance
 White Kitchen Cabinets Stainless Steel Appliances: Timeless Elegance
 Top 10 Best Non-Toxic Cooking Utensils – Safe & Durable Choices for Healthy Homes

