
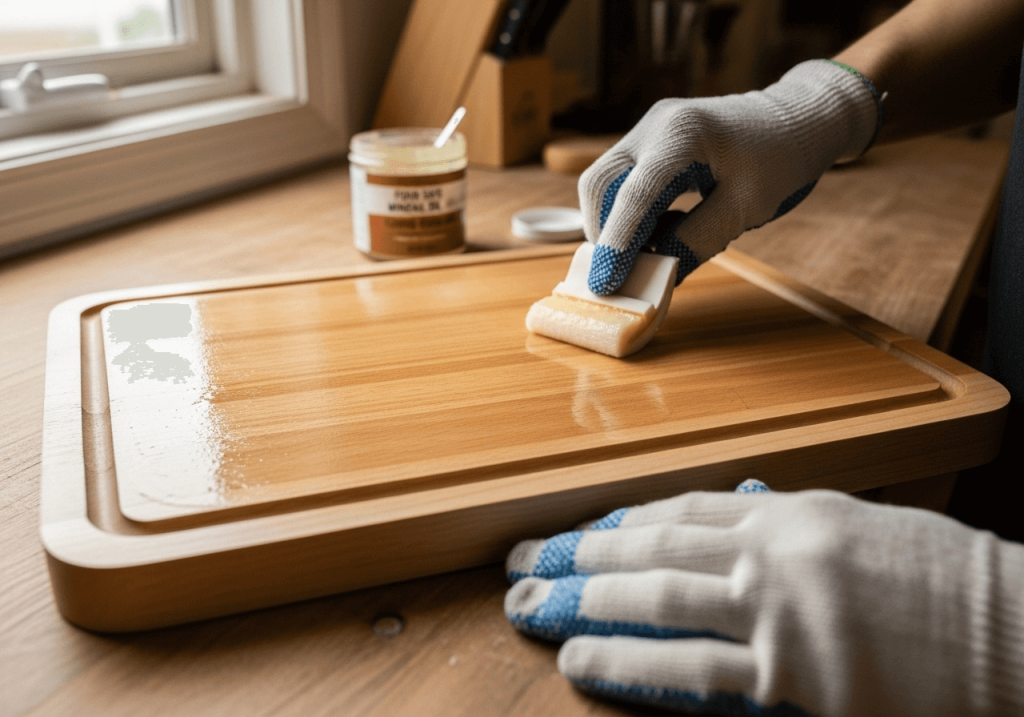
A well-sealed wood cutting board is one of the most functional, attractive tools in any kitchen — but only if it’s finished correctly. An unsealed board warps from moisture exposure, stains permanently from acidic foods, and develops micro-cracks that trap bacteria, even after washing. Whether you’re protecting a new end-grain board or restoring a well-loved heirloom, this expert-tested guide will walk you through every step of creating a durable, food-safe seal that lasts for years. Even new boards straight from the factory benefit from a custom seal to lock in moisture and boost durability: a regular oiling routine is the easiest way to keep your board in top shape.
Why Properly Finishing Your Wood Cutting Board Matters
Wood is a naturally porous material, and unsealed cutting boards absorb moisture from food, cleaning, and ambient humidity at alarming rates. End-grain boards, in particular, absorb 3x more moisture than edge-grain boards, making them prone to warping, splitting, and cracking within a year of regular use if left unfinished. Acidic foods like lemon, tomato, and vinegar leave permanent, unsightly stains on unsealed wood within minutes of contact, and the small grooves created by knife cuts trap bacteria that survive even thorough washing. According to FDA food safety guidelines, properly sealed wood cutting boards are actually more sanitary than plastic alternatives, as they don’t develop the deep, wide scratches that plastic boards accumulate over time, which harbor far more harmful bacteria. A proper seal creates a hydrophobic barrier that repels water and stains, simplifies cleanup, and can extend your board’s usable lifespan by 5–10 years with basic maintenance. Consistent proper seasoning habits can extend your board’s usable lifespan by 5–10 years, even with daily use, while a sealed surface also makes routine stain removal far simpler than scrubbing unsealed wood. A proper seal is also the first line of defense for mold prevention on wooden boards, as it blocks the moisture mold needs to grow. For more on this, see our guide on best eco friendly cutting boards.
What You’ll Need
Gather these supplies before you start to ensure a smooth, even finish:
- Sandpaper: 120-grit (for removing deep scratches and old flaking finish), 180-grit (for smoothing), and 220-grit (for a glass-smooth final finish). Opt for silicon carbide sandpaper, as it resists clogging with wood dust better than garnet alternatives.
- Tack cloth: For removing fine sanding dust without leaving lint on the board surface.
- Food-grade finish: Choose a product specifically labeled as safe for cutting boards (we break down your options below).
- Lint-free microfiber cloths: For applying and wiping off excess finish without leaving fibers behind.
- Plastic putty knife (optional): For filling deep gouges with food-grade wood filler before sanding.
- Well-ventilated workspace: To avoid inhaling fine wood dust and finish fumes during the process.
Step-by-Step Guide to a Perfect Seal
Step 1: Inspect and Sand the Board
Start by inspecting the entire board for deep gouges, old flaking finish, set-in stains, or rough spots. If you find deep cuts, fill them with food-grade wood filler, let it dry fully per the product instructions (usually 24 hours), then sand the filled area smooth before moving on. Start with 120-grit sandpaper, sanding strictly with the grain of the wood — never sand across the grain, as this creates cross-scratches that trap moisture and bacteria. For end-grain boards, sand parallel to the direction of the end wood fibers to avoid tearing. Move to 180-grit to erase the scratches left by the 120-grit paper, then finish with 220-grit for a uniformly smooth, glass-like surface. In practice, most DIYers skip the final 220-grit step, leading to a rough finish that peels within 6 months of regular use. After sanding, wipe the entire board with a tack cloth to remove all dust: any leftover grit will create a rough, uneven seal that wears down quickly.
 Apply finish in thin, even coats to avoid sticky residue
Step 2: Clean and Dry the Board
Wipe the entire surface with a damp microfiber cloth to remove any remaining fine sanding dust, then follow immediately with a dry cloth to eliminate surface moisture. For thorough pre-sanding cleaning, wipe the board down with a damp cloth to remove all food residue before you start sanding. Place the board in a well-ventilated area, away from direct sunlight or heat sources, and let it air dry for at least 30 minutes. You can use a fan to speed up drying if needed, but ensure no moisture is trapped in the wood fibers before applying finish, as this will cause the seal to bubble and peel over time. Ensure the board is a fully dry surface before moving to the finishing step, as trapped moisture will cause the seal to bubble and peel over time. For more on this, see our guide on best hair cutting shears for home use.
Step 3: Apply the First Coat of Finish
Pour a small amount of your chosen finish onto the center of the board. Using a lint-free cloth, spread the finish in thin, even strokes, following the wood grain. For mineral oil, pour a generous amount onto the board — the wood will absorb as much as it needs, so don’t hold back. For beeswax or board cream blends, warm the product slightly in your hands first to make it easier to spread, and apply a thin, even layer. Avoid pooling finish in any areas, as this will create a sticky, uneven cure that attracts dirt and takes weeks to harden fully. Let the first coat soak in for 2–4 hours for mineral oil, or 1–2 hours for beeswax blends, in a warm, dry area. You’ll know the board has absorbed enough when it no longer looks dry or pale in any spots.
Step 4: Wipe Off Excess and Apply Additional Coats
After the first coat has fully soaked in, wipe off any excess finish with a clean, dry cloth. For mineral oil, apply 2–3 more coats, letting each coat soak for 2–4 hours and wiping off excess before applying the next. For beeswax blends, 1–2 coats are usually sufficient for most home use. After the final coat, let the board cure for 24 hours in a well-ventilated area before using it for food. For more on this, see our guide on wood storage cabinets for kitchen.
Step 5: Test the Seal
Once the board is fully cured, test the effectiveness of your seal by sprinkling a few drops of water on the surface. If the water beads up and rolls off, the seal is complete and watertight. If the water soaks into the wood, apply one more thin coat of finish, let it cure for 24 hours, and test again. This simple test is the only way to confirm your finish will resist stains and moisture damage long-term.
 A properly sealed board will bead water instead of absorbing it
Choosing the Right Finish for Your Board
Not all finishes are created equal, and the best option for you depends on how often you use your board and your maintenance preferences:
Mineral Oil
USP-grade mineral oil is the most popular, affordable, and easy-to-apply finish for cutting boards. It’s odorless, tasteless, and 100% food-safe, making it ideal for boards used for raw meat, produce, and daily meal prep. The trade-off is that it does not harden or cure on the wood surface, so it requires more frequent reapplication (every 2–4 weeks for high-use boards) than wax blends. For more on this, see our guide on wood kitchen counter storage shelves under 50.
Beeswax / Board Cream Blends
A 1:1 blend of beeswax and mineral oil (often sold as pre-mixed board cream) offers longer water resistance than plain mineral oil, as the beeswax creates a harder, more water-repellent barrier on the wood surface. It’s slightly more effort to apply, as you need to rub it in thoroughly and buff off excess, but it only needs reapplication every 4–6 weeks for most home cooks.
Polymerized Tung Oil
For decorative boards or high-use professional kitchen setups, polymerized tung oil is a durable, food-safe option that hardens into a tough, scratch-resistant finish. It requires longer cure times (48–72 hours between coats) and light sanding between coats for best results, but it lasts 6–12 months between reapplication. Avoid non-polymerized tung oil, as it never fully cures and can go rancid over time. For more on this, see our guide on vacuum seal food storage containers.
Common Finishing Mistakes to Avoid
Even experienced DIYers make these errors, which lead to peeling, sticky, or unsanitary seals:
- Using non-food-safe finishes: Never use polyurethane, varnish, or non-food-grade linseed oil on cutting boards, as these contain toxic chemicals that can leach into food.
- Skipping fine-grit sanding: A rough surface will hold moisture and bacteria even with a sealant applied, so never skip the final 220-grit sanding step.
- Applying too thick a coat: Thick coats of finish take weeks to cure fully, create a sticky surface that attracts dirt, and are prone to peeling. Always apply thin, even layers.
- Using cooking oils: Olive oil, vegetable oil, and coconut oil go rancid over time, leaving an unpleasant smell and taste on your board, and can even promote bacterial growth. Always use finishes specifically labeled as safe for cutting boards.
- Skipping the water test: Even if the board looks sealed, the water test is the only way to confirm the finish is fully effective and watertight.
How to Maintain Your Sealed Cutting Board Long-Term
A properly sealed board only needs minimal upkeep to stay in great shape for years:
- Reapply finish every 2–6 weeks, depending on use: Wipe the board dry after each use, and apply a thin coat of oil or wax when the wood stops beading water, looks dull, or feels rough to the touch. For boards used daily for raw meat, reapply every 2 weeks; for occasional use, every 4–6 weeks is sufficient.
- Wash by hand only: Never put your wooden cutting board in the dishwasher, as high heat and harsh detergents will break down the seal and warp the wood. Use warm water and mild dish soap, then dry immediately with a clean cloth.
- Avoid prolonged water exposure: Never soak the board in the sink, and store it upright to ensure air circulates on both sides and prevents moisture buildup.
- Cut on one side only: This keeps one side pristine for presentation, and reduces wear on the sealed surface. If you work on a small kitchen table, a protective floor covering can prevent oil drips and sanding dust from damaging your floors.
- Store in a dry, well-ventilated area: Avoid storing the board in a damp cabinet or pressed against a wall, as trapped moisture will cause warping. For extra storage, check out these smart under-sink storage ideas to keep your board dry and out of the way. Pair your sealed board with regular sanitization to keep it safe for raw meat and produce.
 Sealed boards resist staining from acidic foods like tomato and lemon far better than unsealed ones
Frequently Asked Questions
What is the best finish for a wood cutting board?
For most home cooks, a 1:1 blend of food-grade mineral oil and beeswax (board cream) is the best all-around option: it’s easy to apply, food-safe, and offers longer water resistance than plain mineral oil. If you use your board heavily for raw meat, plain USP mineral oil is a better choice, as it’s easier to reapply frequently. For decorative boards that see light use, polymerized tung oil provides a hard, durable finish that lasts months between coats.
How often should I finish my wood cutting board?
Reapply finish every 2–6 weeks, depending on how often you use the board. You’ll know it’s time to reapply when the wood stops beading water, looks dull, or feels rough to the touch. For boards used daily for raw meat, reapply every 2 weeks; for occasional use, every 4–6 weeks is sufficient.
Can I use vegetable oil or olive oil to finish a cutting board?
No. Cooking oils like olive, vegetable, and coconut oil go rancid over time, leaving an unpleasant smell and taste on your board, and can even promote bacterial growth. Always use food-grade mineral oil, beeswax, or polymerized tung oil specifically labeled as safe for cutting boards.
Should I sand my cutting board before finishing?
Yes, always. Sanding removes old, flaking finish, smooths out rough spots and scratches, and creates a porous surface that allows the new finish to adhere properly. Skipping sanding will lead to a seal that peels within weeks, and rough surfaces will trap bacteria even with a finish applied.
Can I finish a cutting board that has existing stains or mold?
Light surface stains can be sanded out before finishing. If the board has active mold, scrub it with a solution of 1 tablespoon bleach per gallon of water, rinse thoroughly, let dry completely, then sand and finish. For deep, set-in stains that won’t sand out, you may need to plane off the top layer of the board before finishing.
Conclusion
Finishing your wood cutting board is a simple, low-cost process that will extend its lifespan by years, keep it sanitary for food prep, and maintain its natural beauty. By following the step-by-step guide above, avoiding common mistakes, and maintaining the seal regularly, you’ll have a durable, food-safe board that looks great on your kitchen counter for decades. Ready to get started? Grab food-grade mineral oil and beeswax from your local kitchen supply store, or explore our guide to sustainable kitchen tools for eco-friendly finishing product picks. If you’re setting up a new kitchen workspace, bright under-cabinet lighting will help you spot rough spots and scratches during the sanding process for an even more precise finish.

Hi, I’m Daniel Brooks—a food lover and kitchen gear enthusiast. I enjoy testing cookware, utensils, and gadgets to see what really works in everyday cooking. At PlugChef.com, I share honest reviews, comparisons, and simple guides to help you choose the best tools for a safer, smarter, and more enjoyable kitchen.
Related posts:
 How to Oil Cutting Board Bamboo: Ultimate Guide for Lasting Care
 How to Get Stain Out of Wood Cutting Board: Easy & Effective Tips
 How to Get Stains Out of Cutting Board: Easy & Effective Tips
 Best Way to Clean Plastic Cutting Boards: Easy Tips for Sparkling Results
 Navy Bean And Ham Recipes: Delicious Comfort Food Ideas
 Cherry Pistachio Chocolate Ice Cream: Irresistible Summer Delight

