
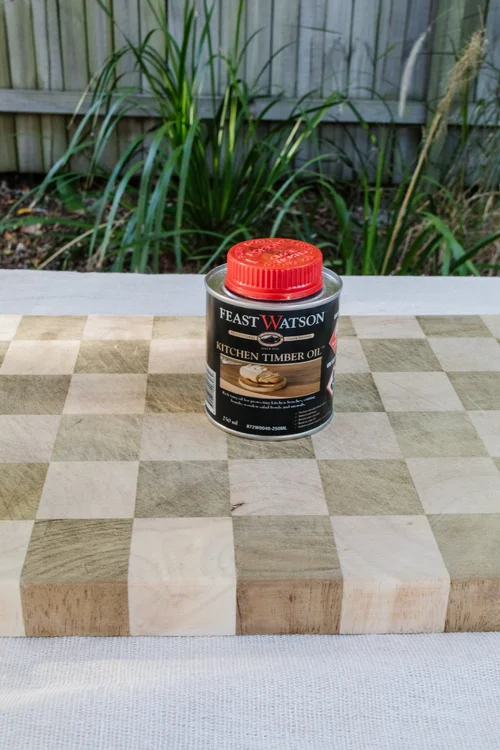
A dull, stained, or dry wooden cutting board is more than an aesthetic problem — it shortens the board’s life and increases pockets where bacteria can hide. This step‑by‑step guide shows how to clean, deodorize, sand, repair, and condition any face‑ or edge‑grain cutting board so it becomes smooth, water‑resistant, and food‑safe again. Practical tips, common mistakes, and a simple maintenance schedule make restoration reliable and repeatable.
Quick overview: When restoration is worth it
Restore if the board:
- Has surface stains, odors, or raised fibers
- Shows shallow to medium knife grooves
- Feels dry and absorbs water instead of beading
Replace if the board:
- Has deep cracks or splits that collect debris
- Is warped and won’t lie flat
- Shows odors or contamination after thorough restoration
For official food‑safety guidance on sanitizing food‑contact surfaces, consult USDA recommendations and your local extension service such as the University of Minnesota Extension for practical, science‑backed cleaning advice (USDA guidance, extension resource).
What you’ll need (materials and tools)
- Warm water, mild dish soap
- White vinegar or 3% hydrogen peroxide (optional sanitizer)
- Coarse salt (kosher or sea salt) and 1 lemon (halved)
- Baking soda for stubborn stains
- Food‑grade mineral oil (labeled “cutting board” or “food‑grade”)
- Optional: beeswax paste or commercial butcher‑block cream
- Food‑safe wood glue (for small structural repairs)
- Sandpaper: 120–150 grit (aggressive), 220 grit (smoothing), 320 grit (final)
- Clean lint‑free cloths or paper towels, nonmetallic scrub pad
- Plastic scraper or bench scraper (avoid metal blades on food surface)
- Clamps (if gluing)
Note: Avoid vegetable or olive oils — they can go rancid and create odors. For more on how many oil coats to apply, see a short guide on how many coats are appropriate: how many coats.
Understand your board: grain matters
- Face‑grain (flat‑sawn): Smoother finish, sands easily, shows scratches.
- Edge‑grain: Common, stable, sands and oils well.
- End‑grain: Toughest for knives and self‑healing; oil penetrates differently and may require more frequent finishing.
In practice, end‑grain boards often need more oil initially to saturate the exposed fibers; face‑ and edge‑grain boards generally accept finish faster.
Step‑by‑step restoration
1) Deep cleaning: remove grease, food residue, and visible soil
- Rinse the board and scrub both sides with warm water and mild dish soap using a soft brush or nonmetallic scouring pad. Work with the grain when possible.
- Rinse well and dry with a towel. Stand the board on its edge to air dry fully (prevents trapped moisture).
- For heavy grease or stuck particles, repeat washing. Allow the board to dry completely (several hours or overnight) before moving to deodorizing or sanding.
In practice: don’t soak the board — prolonged water exposure causes warping and splits.
2) Deodorize and lift surface stains (lemon + salt, baking soda)
- Lemon + salt method: Sprinkle a generous layer of coarse salt across the board. Use a lemon half as a scrubber, pressing and rotating in circular strokes for 2–5 minutes per area. Let sit 5–10 minutes, then rinse and dry. This removes many food stains and neutralizes odors.
- Baking soda paste: Mix baking soda with just enough water to make a spreadable paste. Rub into stubborn spots, let sit 5–10 minutes, scrub, then rinse.
Optional sanitizer: Wipe with white vinegar or 3% hydrogen peroxide, let sit briefly (a minute or two), then rinse and dry. Do not mix vinegar and peroxide together. For formal sanitizing protocols, refer to USDA or land‑grant extension guidance (USDA guidance, extension resource).

Stain removal using coarse salt and lemon removes surface discoloration and odors.
Image source: homewithgraceandjoy.com
Common mistake: scrubbing with metal pads — they tear wood fibers and make the surface rougher.
3) Sanding: take out deep scratches and level the surface
When to sand: if grooves or raised fibers remain after cleaning or if the surface feels rough to the hand.
How to sand correctly:
- Start with 120–150 grit to remove deep scratches. Always sand with the grain to avoid cross‑grain scratching.
- Use even pressure and keep sanding passes consistent. On a large board, sand in overlapping passes until the gouges are visually reduced.
- Move to 220 grit to smooth the surface and remove sanding marks.
- Finish with 320 grit for a silky feel and to close pores so oil penetrates evenly.
- Wipe away dust with a slightly damp cloth, then let dry fully before oiling.
Practical tips:
- Sand edges and corners carefully to avoid thinning one side more than another — keep the board’s profile even.
- Measure material removal: take light sanding passes and check frequently. It’s easy to remove too much thickness.

Final sanding evens the grain and prepares the board to accept oil efficiently.
Image source: homewithgraceandjoy.com
When not to sand: end‑grain boards can be tricky — sanding removes surface teeth that help with knife grip and may require more finishing passes. If you’re unsure, sand less and refill any remaining roughness with oil and time.
4) Repairing cracks, splits, and deep damage
- Small surface splits: Clean and dry thoroughly, then use a food‑safe wood glue to bond. Clamp until fully set, sand flush, and refinish.
- Deep cracks or delamination: Often safer to retire the board or repurpose it for non‑food uses. Large cracks trap bacteria and are hard to sanitize.
- Gouges and holes: Shallow gouges can be sanded; long‑term fixes for deep holes (fillers, non‑food‑grade epoxy) are not recommended where knives will contact the surface.
If you want to make a previously damaged board safe, see stepwise restoration notes including sealing and conditioning steps for reuse: food-safe board steps.
5) Conditioning: oil, then optional wax or cream
Why oil: food‑grade mineral oil soaks into wood pores, restores moisture, and helps water bead on the surface. Beeswax or butcher‑block creams form a surface layer that improves water resistance and sheen.
How to oil:
- Apply several tablespoons of food‑grade mineral oil to the dry board. Rub it in with a clean cloth, working with the grain until the surface no longer absorbs oil and a thin sheen remains.
- Allow the board to rest at room temperature so oil penetrates — plan for 4–24 hours depending on board thickness and porosity.
- Wipe off excess oil with a lint‑free cloth.
Beeswax or cream (optional):
- After oil has soaked in, apply a thin coat of a beeswax/mineral oil paste or commercial butcher‑block cream. Rub, let set for 30–60 minutes, then buff. This top layer helps repel water and gives a satin finish.
Tips and frequency:
- New board: oil daily for the first 3–7 days to saturate the fibers.
- Regular use: oil once a month or when wood appears dry. In practice, heavily used boards may need oil every 2–4 weeks.
- Apply multiple light coats rather than one heavy coat — the wood accepts small amounts more predictably.
If you prefer guidance on layering, review tips on how many coats to apply: how many coats.
Aftercare: daily and scheduled maintenance
Maintenance checklist:
- After each use: wash with warm soapy water, dry upright.
- Weekly: inspect for raised fibers; quick sanding (220 grit) if needed.
- Monthly: oil when the wood looks dull or water no longer beads.
- Annually: full restoration (sanding + reconditioning) for boards with many scratches.
Table — simple maintenance quick guide:
- Post‑use: wash & dry immediately
- Weekly: spot check + deodorize as needed
- Monthly: oil condition
- Yearly: sand and deep‑condition as necessary
Safety tip: Always keep separate boards for raw meat and produce to lower cross‑contamination risk. For broader food container and handling guidance, review container safety tips: container safety tips.
Common mistakes and how to avoid them
- Don’t put wood in the dishwasher — heat and water warp and crack boards.
- Don’t soak the board — prolonged moisture causes delamination.
- Avoid cooking oils (olive, vegetable) as finishes — they can go rancid.
- Don’t over‑sand edges — keep the profile even to avoid thinning one side.
- Don’t rely solely on vinegar for sterilization — follow proven sanitizing protocols from trusted authorities for food contact surfaces (USDA guidance).
Troubleshooting: persistent smells or stains
- Persistent odor after cleaning: repeat lemon + salt treatment and let board dry in sunlight for a few hours (UV helps reduce microbes and odors).
- Stubborn dark stains that remain after sanding and cleaning: they may be deep tannin stains; sanding deeper can remove them but reduces board thickness — weigh replacement vs continued sanding.
- If bacteria concerns persist after thorough restoration, retire the board and replace it.
Frequently Asked Questions
Q: How many coats of mineral oil should I apply?
A: Apply oil until the board stops absorbing it and a thin sheen remains. Multiple light coats are far better than one thick layer. See practical layering advice: how many coats.
Q: Can I disinfect a wooden cutting board with bleach?
A: Bleach will sanitize but can damage wood if overused. For routine cleaning, lemon/vinegar and heat drying are effective. For professional sanitizing guidance, follow USDA or extension recommendations (USDA guidance).
Q: Is beeswax enough to seal a board?
A: Beeswax forms a protective surface but won’t penetrate like mineral oil. Best practice: oil first, then apply beeswax or a butcher‑block cream as a top coat.
Q: How do I fix a split board?
A: Small splits can be glued with food‑safe wood glue and clamped, then sanded and oiled. Large splits or deep delamination generally mean it’s safer to replace the board.
Conclusion — restore and extend the life of your board
Restoring a wooden cutting board combines straightforward cleaning, targeted stain removal, careful sanding, and proper conditioning. With the right approach you’ll reduce bacterial hiding spots, restore water resistance, and return the board to an attractive, usable finish. Start with a good clean and one light oiling — many boards are revitalized in under a day.
Ready to restore your board? Get a bottle of food‑grade mineral oil or a butcher‑block conditioner and begin with a clean surface — your board will thank you with years of better, safer use.

I’m Abby Lu, a passionate home cook who loves simplifying everyday meals. At PlugChef.com, I share product reviews and cooking guides to help you find the best tools for your kitchen.
Related posts:
 How to Seal a Wooden Cutting Board: Easy Steps for Lasting Protection
 How to Make a Wooden Cutting Board Food Safe: Easy Expert Tips
 How to Organize a Corner Kitchen Cupboard: Expert Tips
 How to Grow Organic Kitchen Garden: Expert Tips
 How to Best Organize Kitchen Cabinets: Expert Tips
 How Can a Kitchen Renovation Boost Storage & Organization?

