

Melamine board is a go-to material for DIY furniture, custom cabinets, closet organizers, and retail fixtures thanks to its durable, scratch-resistant surface and affordable price point. But that same hard, brittle resin coating that makes it so useful is also its biggest flaw: cut it wrong, and you’ll end up with splintered, chipped edges that ruin the look of your project and make assembly far more difficult. Getting a factory-smooth, chip-free cut at home doesn’t require professional equipment—just the right tools, setup, and technique. In this guide, we’ll walk through expert, tested tips to cut melamine board without chipping every time, no prior experience required. For pre-cut planning and material layout tips, our DIY project guides help you avoid costly measurement errors before you even start cutting.
What Is Melamine Board (and Why It Chips So Easily)
Melamine board is not solid plastic, as many DIYers assume: it’s a layered sheet good made of a thin, thermosetting resin coating fused under heat and pressure to a core of particleboard, medium-density fiberboard (MDF), or plywood. The resin layer is designed to resist scratches, stains, and moisture, making it ideal for high-use surfaces like kitchen cabinets, office desks, and children’s furniture.
That same hardness, however, makes the top layer extremely brittle. Unlike solid wood, which fibers can bend slightly before splitting, the melamine coating has no give: when a saw blade tears or pulls at it during a cut, it splinters easily instead of shearing cleanly. Lower-density particleboard cores also contribute to chipping, as they lack the structural support to hold the resin coating steady during cutting. Understanding this material makeup is the first step to avoiding chips.
Core Reasons Melamine Chips During Cuts
Chipping doesn’t happen by accident—it’s almost always the result of one of four avoidable mistakes. Knowing these causes will help you adjust your technique to eliminate splintering entirely:
- Incorrect or dull blades: Standard 24-tooth framing blades are designed for rough cuts in dimensional lumber, not finished sheet goods. Their large, widely spaced teeth tear the brittle melamine coating instead of shearing it, causing massive splintering. Dull blades, even if they are fine-tooth, will also drag and tear the resin as they cut.
- Excessive feed speed: Pushing the saw through the board too quickly generates heat that softens the melamine resin, then cracks it as it cools, leaving rough, chipped edges and even burn marks on the surface.
- Poor material support: If the board is not fully clamped and supported directly under the cut line, it will vibrate as the blade passes through, causing the brittle coating to splinter. Unsupported offcuts can also sag and splinter as the blade exits the board.
- Wrong good-side orientation: For circular saws, which rotate counterclockwise, the blade splinters the top surface of the material as it exits. Cutting with the finished, visible side of the melamine face up will leave chipped edges on the front of your project. For table saws, which rotate upward, the opposite is true.
These issues are easily avoidable with the right setup, as outlined in the steps below. The University of Minnesota Extension sheet goods cutting guidelines confirm that proper blade selection and support are the two most impactful factors for reducing chipping on finished sheet materials like melamine.
Essential Tools and Materials for Chip-Free Cuts
Having the right tools on hand before you start cutting will save you time, wasted material, and frustration. Skip the cheap general-purpose blades and invest in these items for consistently clean results:
- Saw: A table saw is ideal for straight, repeat cuts (like for cabinet doors or drawer sides), as it offers the most stability and control. A circular saw works well for cutting full 4×8 melamine sheets into smaller panels, especially if you use a track saw guide for straight lines. Jigsaws can be used for curved cuts, but are not recommended for straight lines due to high chipping risk.
- Melamine-specific saw blade: Look for a carbide-tipped blade with 60-80 teeth per inch (TPI) and a triple-chip grind (TCG) design. TCG blades have alternating left- and right-facing teeth that shear the melamine coating cleanly without tearing it. Avoid general-purpose crosscut or framing blades entirely for melamine projects.
- Zero-clearance insert: For table saws, this insert fits into the saw’s table opening and eliminates the gap around the blade that causes tear-out. It supports the full surface of the melamine board as the blade cuts through, drastically reducing chipping. You can purchase pre-made inserts or make a DIY one from thin plywood to match your saw’s throat size.
- Straight edge clamp or track saw guide: For circular saws, this tool attaches to the board and acts as a guide for the saw’s base plate, ensuring perfectly straight cuts without freehand wobble.
- High-quality masking or painter’s tape: Apply 2-3 layers of tape over your cut line to hold the brittle melamine coating in place as the blade exits the board. Painter’s tape works well and leaves less residue than standard masking tape, but avoid low-tack tape that peels up mid-cut.
- Clamps and support: Use at least 4 bar clamps to secure the board to a stable workbench or sawhorses, with support directly under the cut line on both sides. For full 4×8 sheets, have a second person support the offcut side to prevent it from dropping and splintering as the blade exits.
- Safety gear: Always wear safety glasses to protect your eyes from flying chips, and an N95-rated mask when cutting melamine. Fine wood dust and melamine resin particles are respiratory irritants, and long-term exposure can cause lung damage per OSHA wood dust safety standards. After cutting, sweep up dust with a stiff-bristled cleaning brush to keep your workspace safe.
Step-by-Step Chip-Free Cutting Process
Follow these steps in order for consistently smooth, splinter-free edges, whether you’re using a circular saw or table saw:
Step 1: Measure and Mark With Precision
Start by measuring your cut dimensions twice to avoid costly errors. Use a metal straight edge and a fine-tip permanent marker or carbide scriber to mark your cut line—pencil can be hard to see on light-colored melamine and smudges easily during cutting. If you need to cut multiple identical pieces (like for cabinet doors), cut a template from thin plywood first to ensure perfect consistency.
Step 2: Apply Tape Over the Cut Line
Lay 2-3 layers of masking or painter’s tape directly over your marked cut line, extending 2-3 inches on either side of the line. Press the tape down firmly to remove any air bubbles that could cause it to peel up mid-cut. The tape holds the brittle melamine coating in place as the blade exits the board, eliminating most minor edge chipping. If only one side of the board will be visible in your final project, apply the tape directly to that side to protect it.
Step 3: Set Up Your Saw for Optimal Performance
For table saws, install a zero-clearance insert and adjust the blade height so it protrudes 3-6mm (1/8 to 1/4 inch) above the top of the melamine board. This minimizes the amount of blade contact with the top surface, reducing tear-out. For circular saws, double-check that the base plate is perfectly parallel to the blade to avoid angled cuts that cause uneven chipping. Attach your straight edge clamp or track guide to the board along the cut line, ensuring it is aligned exactly with your marked line.
Step 4: Secure the Board Fully
Use at least 4 bar clamps to fasten the board to a stable workbench or sawhorses, with a support block or sawhorse positioned directly under the cut line on both sides of the board. For full 4×8 sheets, have a second person hold the offcut side of the board to prevent it from dropping and splintering as the blade exits. The board must be completely stationary during the cut—any movement will cause chipping.
Step 5: Make the Cut Slowly and Steadily
Turn on the saw and let it reach full RPM before touching the board. For table saws, push the material through the blade at a consistent, moderate pace (about 30-60 cm per minute, or 1-2 feet per minute), using a push stick to keep your hands away from the blade. For circular saws, guide the saw along the straight edge at the same steady pace—do not force the saw, as this generates heat that melts the resin coating and causes chips as it cools. A smooth, even feed rate produces a far cleaner edge than a slow, jerky cut.
Step 6: Finish the Edge for a Perfect Result
Once the cut is complete, turn off the saw and wait for the blade to stop moving before removing the clamps. Remove the tape slowly, pulling it back on itself at a 45-degree angle to avoid peeling up any melamine coating from the edge. If there are minor chips or rough spots, smooth them with a 220-grit or higher sanding block, sanding parallel to the edge to avoid creating new scratches. For a completely seamless, chip-free finish, apply a thin layer of clear wood glue to the edge, let it dry fully, then sand smooth—this fills small gaps in the particleboard core and seals the edge. If you want to add custom labels or markings to your melamine work surface or storage unit, our guide to engraving custom cutting boards works equally well for melamine with the right engraving bit.
Pro Tips for High-Value and Tricky Cuts
These expert tips will help you get flawless results on more complex projects, like custom cabinet doors or curved cuts:
- Use a scoring blade for table saws: If your table saw has a scoring blade (a smaller, lower-RPM blade that runs ahead of the main cutting blade), set it to make a 1-2mm deep shallow cut along the cut line first. This pre-splits the melamine coating, so the main blade doesn’t tear it out as it cuts through the full depth of the board. This is the gold standard for zero-chipping cuts on high-value cabinet projects.
- Orient the good side correctly for your saw: For circular saws, place the finished, visible side of the melamine face down against the saw base plate—this ensures any chipping from the exiting blade happens on the unseen back side. For table saws, place the good side face up, supported by the zero-clearance insert.
- Use a sacrificial backer board for premium projects: For extremely high-value pieces (like custom cabinet doors or retail display panels), clamp a thin sheet of MDF or plywood to the back of the melamine board along the cut line. The backer supports the brittle coating as the blade exits, eliminating almost all chipping even on cheap, low-density melamine.
- Replace your blade regularly: Even a high-quality melamine blade will become dull after 10-15 hours of use, or if you cut through a lot of resin-coated material. Dull blades cause tearing and burning, so replace yours as soon as you notice increased chipping or brown burn marks on cut edges.
- Pair finished melamine with reliable hardware: If you’re building cabinet doors or drawers with your cut melamine, pair clean edges with reliable cabinet hardware to ensure smooth operation and long-lasting durability. For projects installed in family spaces like kitchens or playrooms, add child-safe cabinet locks to keep curious kids out of stored items. For high-traffic kitchen installations, pair your cut melamine cabinets with adjustable safety latches to prevent accidental opening of lower cabinets.
Common Costly Mistakes to Avoid
Even experienced DIYers run into these errors when cutting melamine for the first time. Avoid them to save time, material, and frustration:
- Using a standard framing or crosscut blade: 24-tooth general-purpose blades are designed for rough cuts in untreated lumber, not finished sheet goods. Their large teeth will tear massive chips out of melamine, ruining the edge in seconds.
- Cutting too fast: Forcing the saw through the board generates excessive heat, which melts the melamine resin and causes it to crack and chip as it cools. It also increases the risk of kickback with table saws.
- Skipping the tape step: Even with a perfect blade and setup, skipping the tape layer increases chipping risk by a significant margin for most DIYers, especially on low-density melamine.
- Freehand cutting: Even a slight wobble in the cut line causes uneven chipping and wasted material. Always use a straight edge guide or track saw for straight cuts.
- Cutting without supporting the offcut: As the blade exits the board, the unsupported offcut can sag and splinter, ruining the edge you just cut. Always support both sides of the cut line with sawhorses or a workbench.
Frequently Asked Questions
How do I fix chipped melamine edges after cutting?
For small, minor chips, smooth the edge with 220+ grit sandpaper, then fill any gaps with a melamine-specific wood filler and sand smooth once dry. For larger chips, you can apply iron-on melamine edge banding to seal the edge, or re-cut the piece with a fresh fine-tooth blade if you have extra material.
Can I cut melamine with a jigsaw?
Yes, for curved or irregular cuts, but use a fine-tooth blade (10+ TPI) and apply 2-3 layers of tape to both sides of the cut line to minimize chipping. Straight cuts are far better done with a circular or table saw for the cleanest results.
Should I score melamine before cutting with a circular saw?
Scoring (making a shallow shallow cut along the cut line first) is only effective with table saws that have a dedicated scoring blade. For circular saws, the tape step and proper blade selection are far more impactful for reducing chipping.
Will a laser cutter work on melamine?
Yes, laser cutters produce extremely clean, chip-free edges on melamine up to 12mm thick, but they emit strong fumes from the melamine resin. Always use a laser cutter in a well-ventilated area with a proper fume filtration system to avoid exposure to harmful particles.
Is it better to cut melamine before or after installing it?
Always cut melamine to its final size before installation. Cutting installed melamine risks chipping surrounding finished surfaces, and it is impossible to properly support the board during the cut, leading to far more splintering.
Conclusion
Cutting melamine board without chipping is completely achievable for DIYers of all skill levels, as long as you use the right tools, follow proper setup steps, and avoid common mistakes. The most impactful factors for clean edges are a 60-80 TPI fine-tooth carbide blade, 2-3 layers of tape over the cut line, full support of the board during cutting, and a slow, steady feed rate. For table saw users, a zero-clearance insert and scoring blade will take your results to a professional level, while circular saw users should always orient the good side of the board face down to hide any minor chipping on the back.
With these tips, you can get factory-smooth edges on your melamine projects without needing to outsource cutting to a professional shop. Ready to tackle your next DIY furniture or home improvement project? Browse our full library of step-by-step DIY guides for more expert tips to get professional results at home.
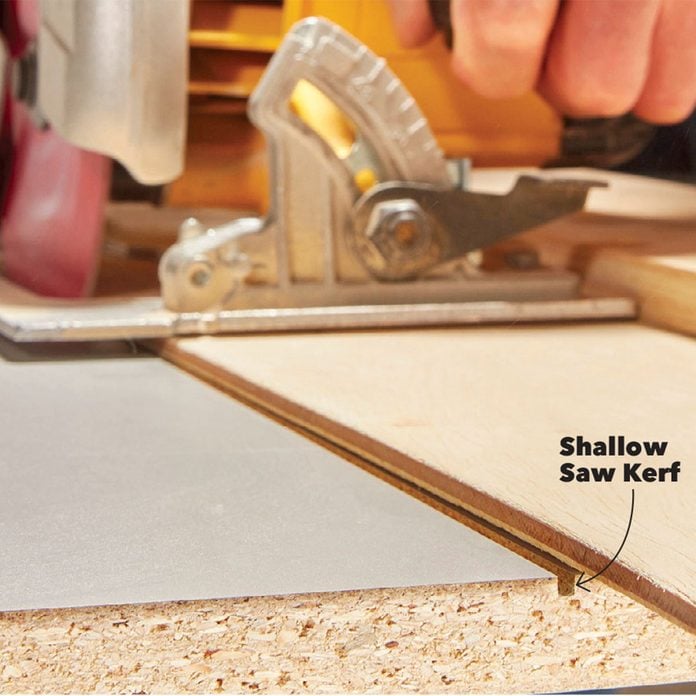 A proper circular saw setup with a fine-tooth blade produces clean, chip-free cuts on melamine sheet goods.
Credit: www.familyhandyman.com
A proper circular saw setup with a fine-tooth blade produces clean, chip-free cuts on melamine sheet goods.
Credit: www.familyhandyman.com
 A scoring blade on a table saw makes a shallow pre-cut to eliminate top-side chipping on melamine.
Credit: www.youtube.com Pro tip: After each cutting session, wipe your saw blade with a rag dampened with mineral spirits to dissolve melamine resin residue. Buildup on the blade teeth increases friction, causes burn marks on future cuts, and dulls the blade much faster than normal wood dust.
A scoring blade on a table saw makes a shallow pre-cut to eliminate top-side chipping on melamine.
Credit: www.youtube.com Pro tip: After each cutting session, wipe your saw blade with a rag dampened with mineral spirits to dissolve melamine resin residue. Buildup on the blade teeth increases friction, causes burn marks on future cuts, and dulls the blade much faster than normal wood dust.
For projects that require repeated, identical cuts (like a full set of cabinet doors), consider building a simple crosscut jig for your table saw to eliminate measurement errors and speed up workflow. If you run into stubborn edge chips that are too large to sand smooth, iron-on melamine edge banding matches the original surface finish perfectly and hides imperfections in seconds. Always test any edge finishing technique on a scrap piece of the same melamine board first to ensure the color and texture match your main project material.
When working in enclosed spaces like a garage or home workshop, pair your dust mask with a portable air purifier to capture fine melamine and MDF particles that stay airborne long after cutting is complete. For large 4×8 sheet cuts, enlisting a second person to support the offcut side of the board not only prevents splintering but also reduces the risk of the heavy board tipping and causing injury.

Hi, I’m Daniel Brooks—a food lover and kitchen gear enthusiast. I enjoy testing cookware, utensils, and gadgets to see what really works in everyday cooking. At PlugChef.com, I share honest reviews, comparisons, and simple guides to help you choose the best tools for a safer, smarter, and more enjoyable kitchen.
Related posts:
 Dried Flower Bud in a Spice Rack: Transform Your Cooking
 Coollog Waterproof under Sink Mat: Ultimate Leak Protection
 Recipe for Oven Roasted Shrimp: Easy, Quick & Delicious Delight
 Lemon Juice to Whiten Clothes: Natural Whitening Hacks That Work
 Tequila Sunrise With Cranberry Juice: Refreshing Twist to Classic Cocktail
 Can You Freeze Pudding Cups: Ultimate Guide to Safe Storage

