
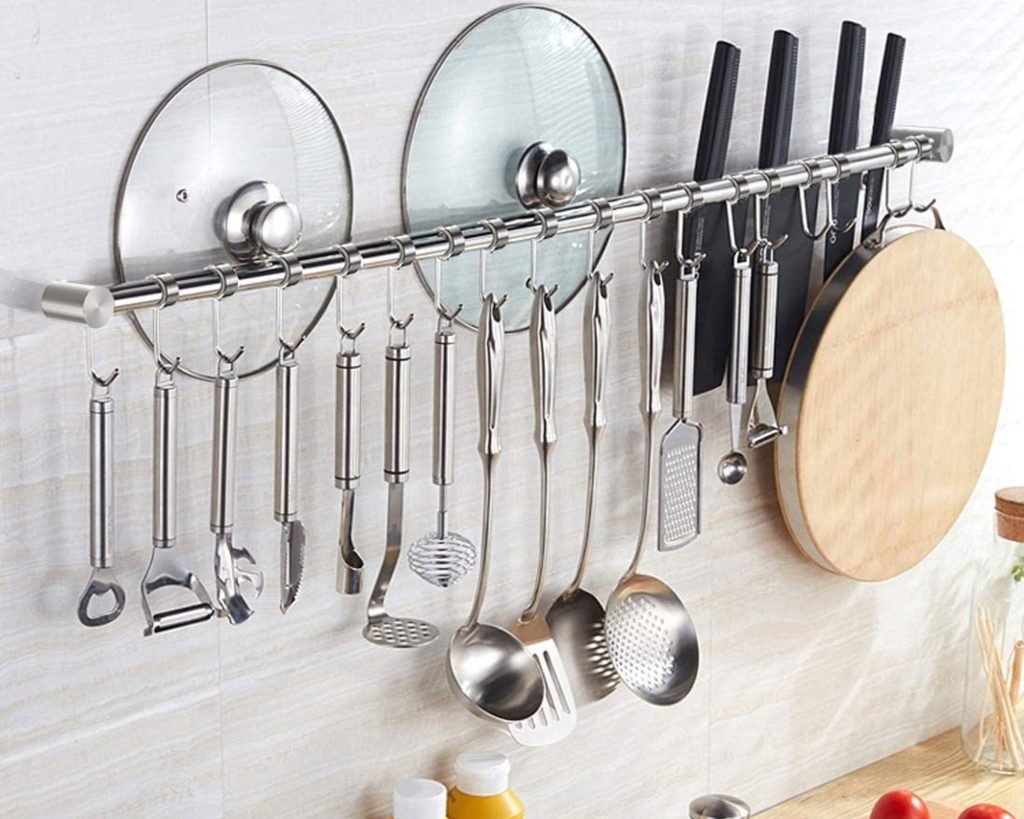
A no-drawer kitchen doesn’t have to mean cluttered counters and frantic utensil searches. This guide gives practical, tested solutions for storing every type of utensil—wooden spoons, metal tongs, chef’s knives, whisks—so they’re accessible, safe, and visually neat. Read on for layout strategies, product-agnostic buying tips, DIY builds, hygiene and safety guidance, and a quick decision table to pick the right hack for your space.
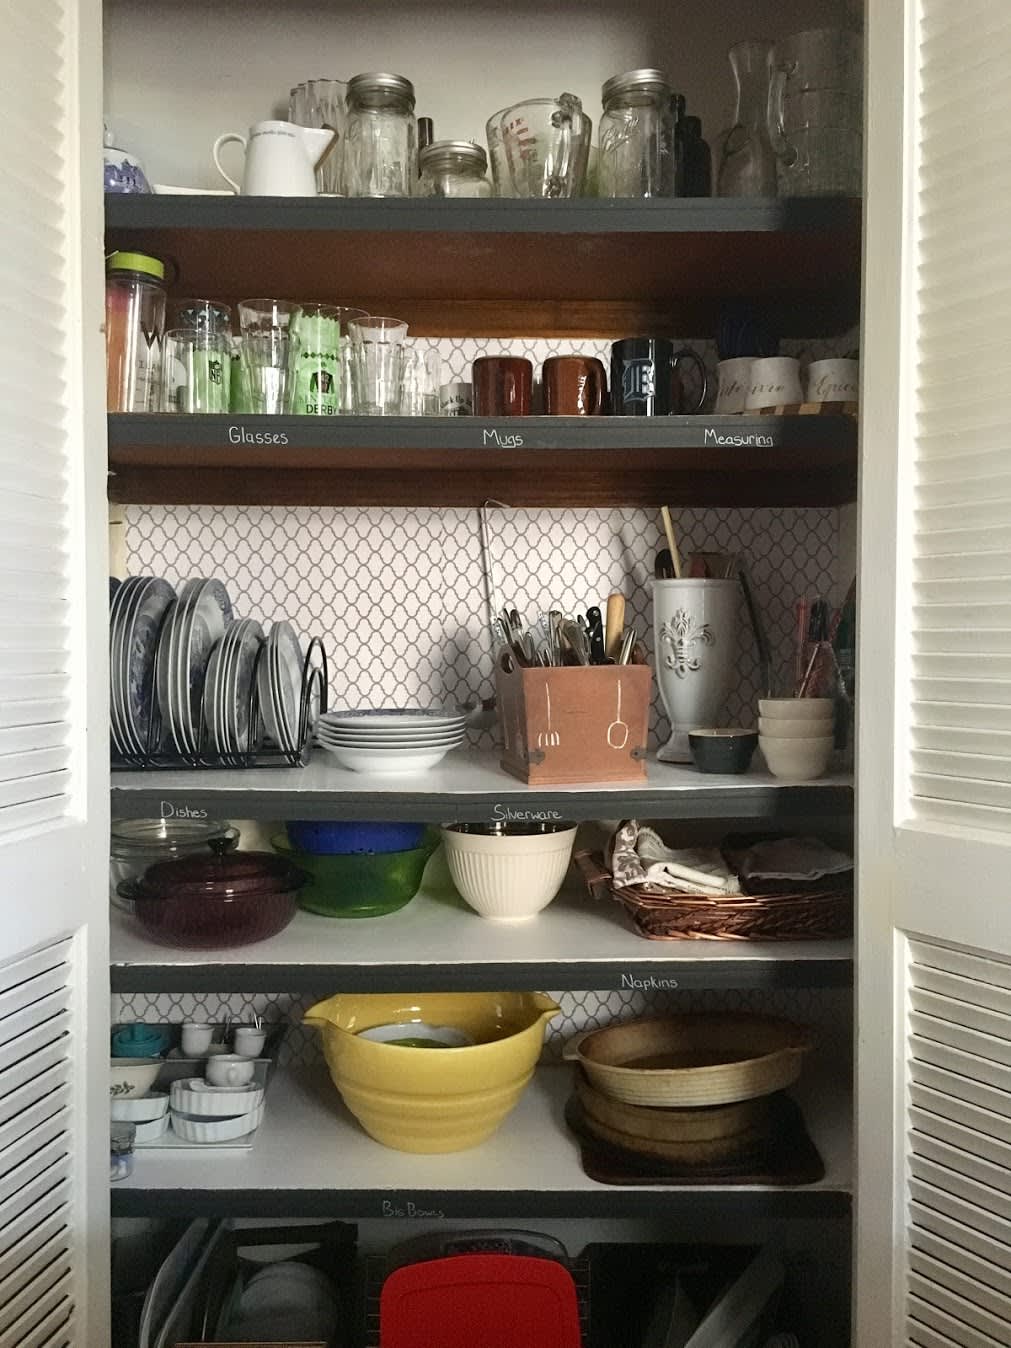
Credit: www.thekitchn.com Example of wall-mounted rail plus countertop jars for frequently used tools.
Quick principles before you start
- Group by function: keep cooking tools (spatulas, tongs) near the stove, prep tools (measuring spoons, peelers) near prep zones. In practice, grouping saves minutes each meal.
- Keep sharp items safe and visible—never loose in a container—use magnetic strips or knife blocks.
- Balance accessibility vs. aesthetics: frequently used items go on open hooks or a caddy; seldom-used items can be stored higher or in baskets.
- Sanitation matters: utensils that contact raw meat or eggs should be cleaned immediately and not stored with ready-to-eat utensils; follow food-safety guidance from the USDA.
Which solution fits your kitchen? Quick comparison
| Storage type | Best for | Pros | Cons |
|---|---|---|---|
| Countertop caddy | Everyday cooking tools | Easy access; decorative | Uses counter space |
| Magnetic strip | Knives, metal tools | Keeps blades visible and secure | Not for non-metal tools |
| Pegboard | Mixed utensils, flexible layout | Highly customizable | Requires wall space and installation |
| Over-the-door hooks | Inside cabinet doors | Uses existing cabinet area | Limited weight capacity |
| Ceiling/pot rail | Pots, heavy pans | Frees cabinet space | Needs sturdy mounting |
| Rolling cart | Mobile storage | Flexible, extra work surface | Takes floor space |
Countertop solutions (caddies, carousels, multi-compartment holders)
Countertop containers are the fastest way to organize utensils when you don’t have drawers.
- Choose the right material: stainless steel or glazed ceramic resists stains and is easy to clean; bamboo looks warm but can absorb oils and needs periodic oiling.
- Use multiple containers by group: one for spatulas/turners, one for wooden spoons, one for measuring tools. This prevents jumbled digging.
- Add a small tray under containers to catch drips from wet utensils and protect countertops.
- Rotating carousels are helpful when space is tight—use one with deep compartments for tall tools and a low rim for short implements.
Practical tip: In a busy kitchen I found dividing tools into “stove,” “prep,” and “baking” caddies reduces cross-contamination and speeds workflow.
:max_bytes(150000):strip_icc()/CE_qiGM4-e5468f83f50048f8b28053d661e64d98.jpeg)
Credit: www.allrecipes.com Desktop carousel with sections for different tool groups.
Wall-mounted solutions (rails, magnetic strips, pegboards)
Use vertical space to free counters:
- Magnetic strips: mount at eye level near the prep zone for knives and metal tools. Ensure you use strips designed for kitchen knives—cheap magnets can dent blades or allow slipping.
- Rail systems with S-hooks: ideal for spatulas, ladles, and potholders. Install a 24–36" rail above the stove or on an empty backsplash.
- Pegboards: the most flexible option. Configure hooks, baskets, and small shelves to hold whisks, measuring cups, or even spice jars. In practice, modular pegboards let you tweak layout as your toolset changes.
- Placement rule: keep hot zones in mind—avoid mounting plastic-handled tools where steam or heat will wear them quickly.
Installation tip: Mount rails/boards into studs or use high-capacity anchors—heavier pans and cast-iron require solid mounting.
Inside-cabinet and cabinet-door storage
If drawers are gone, cabinet interiors are an underused goldmine.
- Over-the-door racks and adhesive hooks: use the inside of cabinet doors for measuring spoons, small lids, or spatulas. For renters, choose heavy-duty adhesive hooks rated for kitchen weight.
- Attach slim, low-profile trays to cabinet bottoms to create an internal “shelf” for flat tools and one-use items.
- Use a tension rod inside a tall cabinet to hang long utensils or skimmers horizontally.
- Common mistake: overloading adhesive hooks—group lightweight items together and reserve thicker cabinet-mounted racks for heavier tools.
Vertical and ceiling storage (pot rails and overhead racks)
For kitchens with limited wall space but higher ceilings:
- Ceiling-mounted pot rails can store heavy pans and free cabinets—ensure joists support the load. If unsure, consult a professional.
- Use S-hooks sized appropriately for pot handles to prevent slippage.
- Keep the heaviest items closest to the ceiling support point and balance weight across multiple anchors.
Safety note: avoid hanging glass or fragile tools overhead where they could fall onto a cooking surface.
Repurposing household items and low-cost DIY
You don’t need to buy special products—everyday items work well.
- Mason jars: wide-mouth jars are perfect for wooden spoons and silicone spatulas. Place them on a tray to catch drips. Label jars by use for quick retrieval.
- Tension rods: install beneath a cabinet to hang mugs or light utensils with hooks.
- Baskets and crates: line with silicone mats and use for towels, cutting boards, or oversized utensils. Hang baskets on a wall for a rustic look.
- Simple shelf add-ons: add a shallow shelf above the stove to store seldom-used tools in baskets.
Credit: www.reddit.com Wide-mouth jars repurposed to store wooden spoons and spatulas.
DIY caution: seal and finish any raw wood used for utensils to avoid splintering and to make cleaning easier.
Portable and flexible options (rolling carts, caddies, trays)
When you need mobility or a temporary workspace:
- Narrow rolling carts can be dedicated utensil stations—use labeled bins for quick sorting.
- Collapsible caddies are useful for outdoor cooking or for stowing away when guests arrive.
- Use stackable, breathable bins in open shelving to keep tools tidy but accessible.
Trade-off: mobile solutions add floor footprint but provide extra prep surface and storage versatility.
Cleaning, sanitation and safety (what to keep in mind)
- Wash utensil containers and hooks regularly—grease collects quickly. Non-porous materials clean easier.
- Never store dirty utensils; hands-on kitchens need a routine “spot clean” after cooking sessions.
- Separate raw-food tools from ready-to-eat tools; sanitize surfaces and utensils that touched raw meat per official food-safety guidance from the USDA.
- Knife safety: magnetic strips should fully support the blade and leave handles accessible to avoid accidental contact.
How to choose: buying checklist
- Material: stainless steel or glazed ceramic for easy cleaning; plastic only for light items; wood for aesthetics but needs care.
- Capacity: measure the tallest tools and the number you own—choose containers slightly taller than your longest utensil.
- Stability: wide base or non-slip feet reduce tipping.
- Mounting: check wall material and anchor type; heavy items need studs or toggle anchors.
- Heat exposure: avoid plastic or wood too close to stove steam or direct heat.
Common mistakes and how to avoid them
- Piling mixed tools into one deep container—result: digging and clutter. Solution: use separate holders by function.
- Mounting magnetic strips too low—risk of children reaching blades. Mount knives out of easy reach if you have young children.
- Ignoring weight ratings—install anchors appropriate for the expected load to avoid wall damage.
Frequently Asked Questions
Q: What’s the most space-efficient option if I have one small countertop?
A: Mount a slim rail with hooks over your stove or install a pegboard on a free backsplash. Combine one small countertop caddy for the most-used items.
Q: Can I put knives on a magnetic strip?
A: Yes—magnetic strips designed for kitchen knives are safe and hygienic, provided blades are clean and the strip is fully secured to studs or heavy-duty anchors.
Q: How do I prevent wood utensils from getting dirty or smelly when stored open?
A: Air-dry them completely before storing; keep them upright in a breathable container and periodically oil unfinished wood to protect it.
Q: Are adhesive hooks reliable long-term?
A: Good adhesive hooks work well for lightweight items and for renters, but check the weight rating and re-stick periodically. For heavier utensils, use screw-mounted hooks inside cabinets.
Action plan (simple 3-step start this weekend)
- Audit: gather all utensils and sort into “stove,” “prep,” “baking,” and “rarely used.”
- Install one fixed system: choose a 24–36" rail or pegboard near your main work zone and mount securely.
- Set up two countertop containers for daily items and one basket for overflow. Test for one week and tweak placement.
Try one change this weekend—install a rail or repurpose two jars—and you’ll likely notice faster meal prep and a calmer countertop.
Conclusion
Storing kitchen utensils without drawers is a practical exercise in workflow, safety, and small-space design. Use vertical walls, cabinet interiors, repurposed containers, and mobile carts to create a system that fits how you cook. Start with function—grouping and accessibility—and layer in aesthetics. Take one small step (a rail, a caddy, or a set of jars) and refine from there; the improvement is usually immediate.
Ready to get organized? Pick a zone, pick one hack, and make the change today.

Hi, I’m Daniel Brooks—a food lover and kitchen gear enthusiast. I enjoy testing cookware, utensils, and gadgets to see what really works in everyday cooking. At PlugChef.com, I share honest reviews, comparisons, and simple guides to help you choose the best tools for a safer, smarter, and more enjoyable kitchen.
Related posts:
 How to Make a Fruit Basket for a Gift: Easy DIY Guide
 Do You Need a Basket? Essential Guide for Air Fryers
 How to Choose Kitchen Appliances: Expert Tips Revealed
 Kitchen Cabinets With Black Stainless Steel Appliances: Modern Elegance
 White Kitchen Cabinets Stainless Steel Appliances: Timeless Elegance
 Top 10 Best Non-Toxic Cooking Utensils – Safe & Durable Choices for Healthy Homes

