
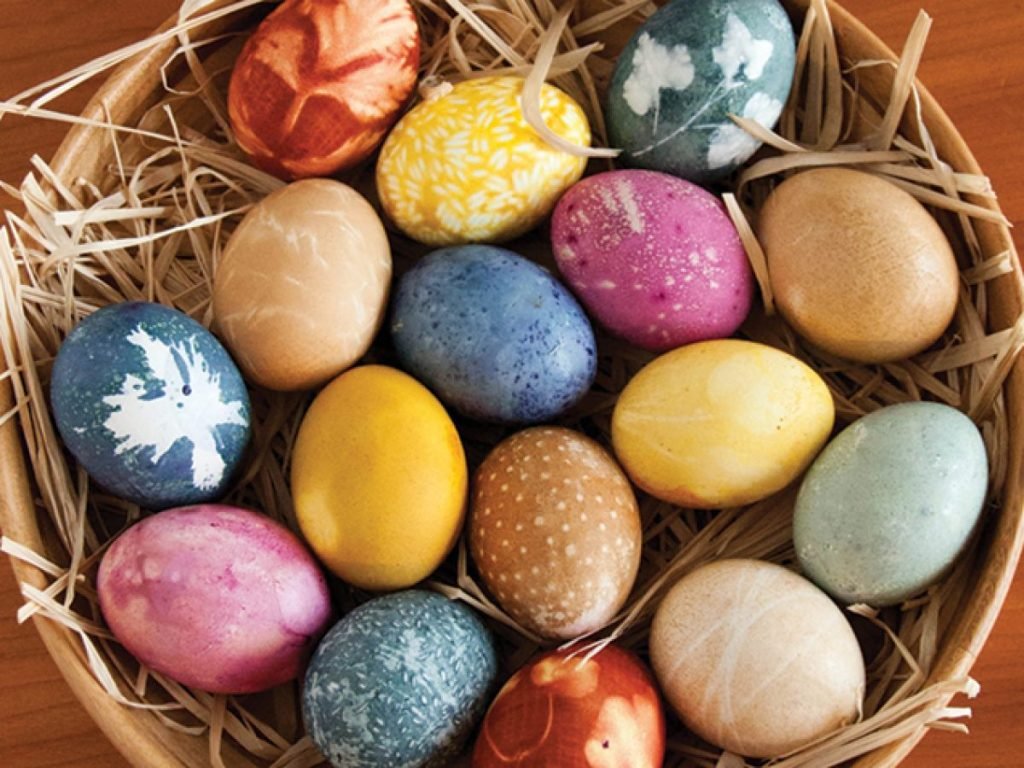
Spring celebrations, Easter egg hunts, and family craft days call for colorful, festive eggs—but most commercial dye kits rely on synthetic food dyes and single-use plastic packaging that many families prefer to avoid. Natural egg dyeing uses common kitchen staples to create soft, vibrant hues without harsh chemicals, works for both edible decorated eggs and keepsake blown shells, and produces one-of-a-kind results that mass-produced kits can’t match. In this guide, we’ll walk through tested, foolproof methods for mixing dyes, prepping eggs, and creating custom designs, plus tips for avoiding common mistakes like faded colors or uneven coverage. All methods are food-safe, compostable, and suitable for kids and adults alike.
Why Choose Natural Egg Dyes?
Natural dyes offer benefits that go far beyond pretty colors, making them a better choice for families, crafters, and anyone looking to reduce their environmental impact.
Eco-Friendly Advantage
Commercial synthetic dye kits typically come in hard plastic shells with individual dye tablets wrapped in non-recyclable foil, generating unnecessary waste that ends up in landfills. The dyes themselves often contain FD&C synthetic colorants that, when rinsed off eggs and washed down the drain, can contribute to chemical runoff in wastewater systems. Natural dyes, by contrast, are made from 100% plant-based matter: leftover onion skins, beet pulp, turmeric scraps, and other ingredients are fully compostable, so you can toss leftover dye solids straight into your backyard compost bin. Even the dye liquid can be diluted and poured down the drain without harming local water systems. For families looking to reduce single-use plastic waste during spring celebrations, swapping a $3 dye kit for pantry staples is a simple, high-impact change.
Health & Safety Perks
Many synthetic food dyes have been linked to mild skin irritation, allergic reactions, and, in some research, hyperactivity in sensitive children. Natural dyes, by contrast, are made from ingredients you already use in cooking, so they’re non-toxic even if kids get them on their hands or accidentally ingest small amounts. If you’re planning to eat your decorated eggs after the celebration, natural dyes leave no artificial residues on the shell, and the dyeing process doesn’t affect the egg’s flavor or safety when handled properly. For families with food sensitivities or young children, this peace of mind is a huge perk over store-bought kits. For families dyeing with young children, secure child safety locks for kitchen cabinets to keep cleaning supplies and raw eggs out of reach during the craft.
Unique, One-of-a-Kind Color Results
Synthetic dyes produce perfectly uniform, consistent shades every time, but natural dyes have a soft, organic depth that’s impossible to replicate with mass-produced products. The exact hue of a turmeric dye will shift based on how long you simmer it, the freshness of the spice, and the type of eggshell you use (white eggs produce the brightest shades, while brown eggs yield warm, muted tones). You can also layer dyes to create custom gradients, or use resist techniques to create unique patterns. No two batches of natural dyed eggs will ever be exactly the same, which makes each set feel special and personal.
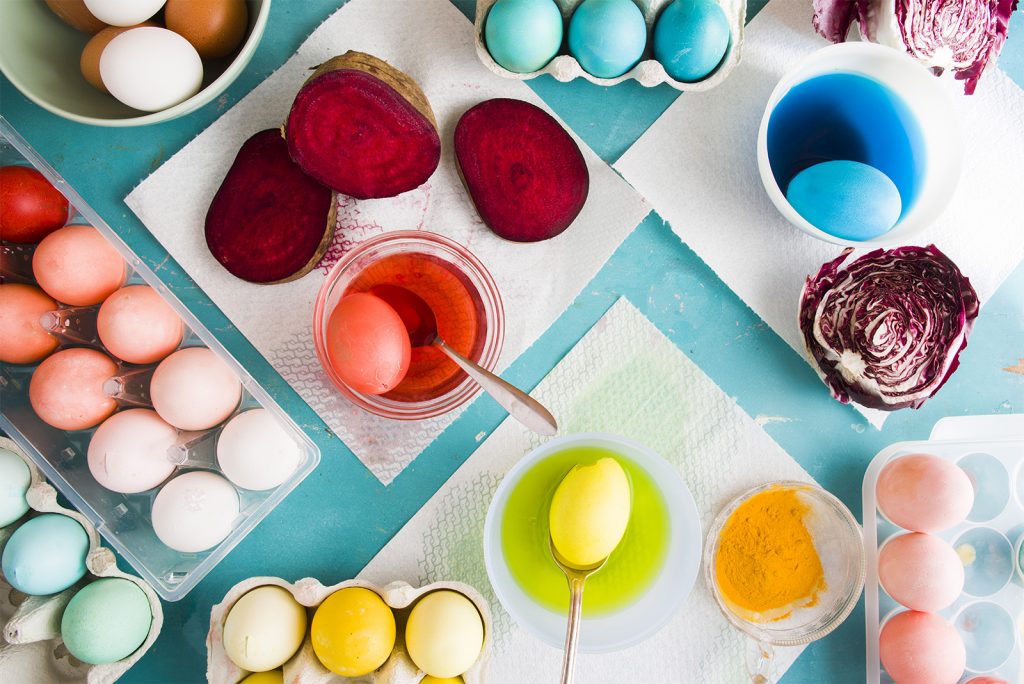 Naturally dyed eggs using kitchen staples like beets, turmeric, and red cabbage, displayed on a wooden surface.
Credit: vincesmarket.ca
Naturally dyed eggs using kitchen staples like beets, turmeric, and red cabbage, displayed on a wooden surface.
Credit: vincesmarket.ca
What You’ll Need
Gathering the right supplies ahead of time will make the dyeing process smooth and stress-free, and help you get consistent, vibrant results every time.
Natural Dye Ingredients by Color
All ingredients below are food-safe and easy to find at most grocery stores, and can be adjusted to produce lighter or darker shades:
- Pink to deep magenta: 2 cups of chopped raw beets, or 1 cup of dried hibiscus flowers. Simmer for 30-60 minutes for lighter pink, up to 2 hours for deep magenta.
- Yellow to golden orange: 2 tablespoons of ground turmeric, or 1 cup of packed yellow onion skins. Turmeric produces a bright, sunny yellow; onion skins yield a warmer, muted gold.
- Blue to periwinkle: 1 small head of chopped red cabbage (this produces a blue hue when the pH is adjusted with a tiny pinch of baking soda; omit the baking soda for a soft purple). 1 cup of frozen blueberries for a softer, grayish-blue.
- Green to olive: 2 cups of packed fresh spinach, or 1 cup of dried parsley. Add a pinch of turmeric for a brighter lime green.
- Brown to rust: 1/2 cup of ground coffee, or 2 black tea bags. Brew for 1-2 hours for a deep chocolate brown, 30 minutes for a light tan.
Essential Tools
- 6-8 medium white or light brown eggs (white eggs produce the most vibrant natural hues; brown eggs yield warm, earthy tones)
- 2-3 medium stainless steel or glass pots (avoid aluminum, which can react with natural dyes and alter hues)
- Fine-mesh strainer or cheesecloth to remove solid dye particles
- 1 tablespoon of distilled white vinegar per 2 cups of dye (this acts as a fixative to help color adhere to the eggshell)
- Tongs or a slotted spoon to handle hot eggs
- Paper towels or a wire cooling rack for drying
- Small glass jars or mugs for individual dye baths
- Rubber bands, leaves, lace, or twine for resist patterns (optional)
Egg Prep Best Practices
Proper egg prep is the key to even, long-lasting color:
- Start with fresh, uncracked eggs. If you plan to eat the dyed eggs, use eggs that are less than 1 week old for best quality, and store them in the refrigerator after dyeing.
- Gently scrub eggs with a soft kitchen cleaning brush to remove any dirt, debris, or natural oils from the shell that can repel dye. Rinse thoroughly with warm water.
- For hard-boiled edible eggs: Place eggs in a pot of cold water, bring to a rolling boil, then reduce heat and simmer for 10 minutes. Immediately transfer to an ice bath to stop cooking and prevent a green ring from forming around the yolk. Let cool completely before dyeing. Follow USDA food safety guidelines for egg decorating to avoid bacterial contamination if you plan to consume the eggs.
- For keepsake blown eggs: Use a small needle to pierce a hole in the narrow and wide ends of the raw egg, blow out the contents into a bowl, then rinse the shell thoroughly with warm water and let dry completely before dyeing to avoid mold.
How to Make Natural Egg Dyes from Scratch
Making natural dye at home is simple, and you can adjust the intensity of the color by changing the simmer time and ingredient ratio. Follow these steps for consistent, vibrant results every time:
- Combine ingredients and water: Add 2 cups of chopped fresh produce, 1-2 tablespoons of dried spices, or 1/2 cup of dried organic matter (like onion skins or flower petals) to 2 cups of cold water in a small stainless steel pot. Avoid aluminum pots, as they can react with plant pigments and alter the final hue.
- Simmer to extract color: Bring the mixture to a gentle boil, then reduce heat to low and let simmer uncovered for 30 minutes to 2 hours, depending on how deep you want the color. The longer you simmer, the more concentrated the dye will be. For reference: turmeric only needs 15-20 minutes to reach maximum intensity, while red cabbage or onion skins benefit from a full 1-2 hour simmer for deep shades. Natural plant pigments shift hue based on pH, a well-documented property of botanical dyes noted by University of Minnesota Extension.
- Strain the dye: Pour the mixture through a fine-mesh strainer or cheesecloth into a heat-proof bowl or jar to remove all solid particles. Leftover solids can be added to your compost pile.
- Add fixative: Stir in 1 tablespoon of distilled white vinegar per 2 cups of strained dye. For extra color adhesion, especially on brown eggs, you can add 1 teaspoon of food-grade alum (available at most grocery stores) to the dye bath.
- Cool before use: Let the dye cool to room temperature before adding eggs. Hot dye can cause eggs to crack, and cool dye absorbs more evenly into the shell.
Pro tip: If you want a true bright blue from red cabbage, add a tiny pinch of baking soda to the cooled dye bath to raise the pH. For purple hues, skip the baking soda and add a splash of lemon juice to lower the pH. This small adjustment makes a huge difference in final color.
Step-by-Step Natural Egg Dyeing Process
Once your dyes are prepped and cooled, follow these steps for even, vibrant coverage:
- Prepare your workspace: Cover your counter or table with newspaper or a disposable tablecloth to protect surfaces from stains. If you’re dyeing with kids, secure safety first cabinet and drawer latches on lower cabinets to keep cleaning supplies and raw ingredients out of reach.
- Add dye to containers: Pour each cooled dye bath into a separate small jar or mug. If you’re using multiple colors, label each container to avoid mix-ups.
- Submerge eggs: Use tongs to gently lower eggs into the dye bath, making sure they’re fully submerged. If eggs float, you can place a small spoon on top to keep them under the dye.
- Soak for desired intensity: Check the color every 10-15 minutes. For pastel shades, 15-30 minutes of soaking is enough. For deep, rich hues, soak for 1-3 hours, or leave eggs in the dye bath overnight in the refrigerator (this works for both hard-boiled and blown eggs).
- Remove and dry: Use tongs to lift eggs out of the dye, letting excess liquid drip off. Place eggs on a wire rack or paper towels to dry completely, about 30 minutes. Avoid touching wet eggs, as this can leave fingerprints or streaks.
- Seal the color (optional): For extra longevity, especially for keepsake blown eggs, rub a thin layer of mineral oil or beeswax on the dry eggshell to seal the color and add a subtle sheen.
 Using tongs to gently submerge eggs in dye baths to avoid cracks and ensure even coverage.
Credit: cedarhouseliving.com
Using tongs to gently submerge eggs in dye baths to avoid cracks and ensure even coverage.
Credit: cedarhouseliving.com
Pro Tips for Vibrant, Long-Lasting Colors
Even if you’re new to natural dyeing, these small adjustments will help you get professional-level results:
- Use white vinegar as a fixative: The acetic acid in vinegar helps break down the eggshell’s porous surface slightly, allowing plant pigments to bind more effectively. Skip the vinegar, and you’ll end up with faded, patchy color that rubs off easily.
- Adjust soaking temperature: For deeper color, warm the dye bath to 120°F (49°C) before adding eggs (use a food thermometer if you want precision). Do not boil the dye with eggs in it, as high heat can cause eggs to crack and create uneven color.
- Layer dyes for custom shades: Dip eggs in a light yellow dye first, let dry completely, then dip in a light blue dye for a soft green. You can also dip half the egg in one color, let dry, then dip the other half in a second color for a two-tone effect.
- Store dyed eggs properly: Hard-boiled dyed eggs should be stored in the refrigerator and consumed within 1 week. Blown egg shells can be stored in a cool, dry place for years if sealed with mineral oil after dyeing to prevent fading.
Fun Design Ideas & Creative Uses
Natural dyes work beautifully with resist techniques to create custom patterns, and the finished eggs are perfect for far more than just Easter egg hunts:
- Leaf and flower stamping: Place fresh leaves (like ferns, mint, or rose petals) or small flowers on the eggshell, then wrap tightly with a piece of breathable cotton cloth or cheesecloth before submerging in dye. Remove the fabric and leaf after soaking to reveal a crisp, white pattern of the leaf. For a more subtle effect, wrap the egg in the leaf alone and secure with rubber bands before dyeing.
- Speckled effect: Dip a clean toothbrush into a concentrated dye bath, then flick the bristles over the eggshell to create a natural speckled pattern. Layer multiple colors for a multi-toned speckled effect.
- Tie-dye eggs: Wrap sections of the egg with rubber bands before submerging in dye. Remove the bands after soaking to reveal white stripes or geometric patterns. You can also dip different sections of the egg in different dyes for a full tie-dye effect.
- Spring decor and gifting: Arrange dyed eggs in a wooden bowl with fresh greenery for a simple spring centerpiece. Place 2-3 eggs in a small muslin bag tied with jute twine for a thoughtful, eco-friendly hostess gift. You can also use dyed eggs as part of a spring charcuterie board alongside fresh cheeses, fruits, and crackers for a festive spread. If you’re cleaning up after your craft day, a professional kitchen cleaning brush makes quick work of any dye stains on countertops or utensils.
 Leaf stamping technique using fresh fern leaves to create a white pattern on a blue cabbage-dyed egg.
Credit: cedarhouseliving.com
Leaf stamping technique using fresh fern leaves to create a white pattern on a blue cabbage-dyed egg.
Credit: cedarhouseliving.com
Troubleshooting Common Natural Dye Issues
Even experienced crafters run into issues with natural dyes sometimes. Here’s how to fix the most common problems:
- Faded or patchy color: This is almost always caused by skipping the vinegar fixative, not simmering the dye long enough to extract maximum pigment, or having oil or dirt on the eggshell before dyeing. Fix it by scrubbing eggs with a soft brush before dyeing, adding 1 tablespoon of vinegar per 2 cups of dye, and simmering dye for at least 1 hour for deep shades.
- Dye won’t adhere to the egg: If color rubs off when the egg is dry, you didn’t add enough vinegar, or the egg was still warm when you removed it from the dye (heat can cause the pigment to set unevenly). Let the dye cool completely before use, and add an extra teaspoon of alum to the dye bath for extra adhesion.
- Unexpected color shifts: Red cabbage dye turns blue when you add baking soda, and purple when you add lemon juice—this is normal, and a result of natural plant pigments shifting with pH. If you want a specific shade, test a small amount of dye on a white paper towel first to check the hue before submerging your eggs.
- Cracked eggs during dyeing: This happens when eggs are cold and placed in hot dye, or when they’re bumped roughly in the pot. Always use room-temperature eggs, and handle them gently with tongs to avoid bumps.
Frequently Asked Questions
What natural ingredients work best for beginners?
Start with easy-to-find ingredients that produce reliable, vibrant colors: turmeric for bright yellow, beets for pink, red cabbage for blue/purple, and coffee for brown. These ingredients are cheap, easy to find at any grocery store, and produce consistent results even for first-time dyers. Avoid ingredients like spinach for green, as it produces a very muted, faint hue that’s hard to see on white eggs.
How long do naturally dyed eggs last?
Hard-boiled eggs dyed with natural dyes and stored in the refrigerator will last 1 week, same as regular hard-boiled eggs. Blown egg shells (with the yolk and white removed) can last for years if stored in a cool, dry place, especially if you seal the shell with a thin layer of mineral oil after dyeing to prevent fading.
Can I use natural dyes on non-egg items?
Yes! Natural dyes work on any porous surface, including wooden eggs, ceramic ornaments, fabric, and even paper. Adjust the simmer time based on the material: for fabric, simmer the dye for 1-2 hours and add 1/2 cup of salt as a fixative for cotton or linen.
Are natural dyes safe for kids?
Absolutely. All the ingredients listed in this guide are food-safe and non-toxic, so even if kids get dye on their hands or accidentally ingest a small amount, there’s no risk of harm. Just supervise young children to avoid staining clothing or surfaces, and make sure they wash their hands after handling dyed eggs.
Why is my red cabbage dye blue instead of purple?
Red cabbage contains a natural pigment called anthocyanin, which shifts from red/purple in acidic environments to blue in alkaline environments. If your dye is blue, you accidentally added a tiny amount of baking soda or are using hard water (which is alkaline). To get purple, add a splash of lemon juice or white vinegar to lower the pH.
Final Thoughts
Natural egg dyeing is a simple, rewarding craft that lets you avoid unnecessary plastic waste and synthetic chemicals while creating colorful, personalized decorations for spring celebrations. Whether you’re dyeing eggs with kids for an Easter egg hunt, making keepsake ornaments, or adding a pop of color to a spring spread, natural dyes produce soft, unique hues that mass-produced kits can’t match. The best part? You likely have most of the ingredients you need already in your kitchen, so you can get started today with no extra shopping required.
If you’re looking for more eco-friendly spring craft and cooking ideas, check out our guide to engraving a cutting board for a personalized, reusable gift, or browse our selection of easy-to-clean kitchen brushes with handles to make cleanup after your craft day quick and easy.

I’m Abby Lu, a passionate home cook who loves simplifying everyday meals. At PlugChef.com, I share product reviews and cooking guides to help you find the best tools for your kitchen.
Related posts:
 Oven Cleaner on a Grill: Ultimate Guide for Sparkling Results
 Cooking Spaghetti in Pressure Cooker: Quick, Easy & Delicious Tips
 Pancake in Cast Iron Skillet: Perfect Fluffy Breakfast Every Time
 Beef Tenderloin Size Per Person: Perfect Portions for Every Guest
 Apple Pie Using Frozen Crust: Quick, Easy, and Delicious Recipe
 Sides to Go With Tenderloin: Perfect Pairings for Flavor Bliss

