
There’s a reason roasted garlic is a secret weapon in home cooks’ arsenals: it transforms the sharp, pungent bite of raw garlic into a soft, sweet, caramelized ingredient that elevates everything from weeknight pasta to gourmet charcuterie boards. While there are dozens of ways to roast garlic, wrapping whole bulbs in aluminum foil is the most foolproof, low-mess method for getting perfectly tender, evenly cooked results every time, no fancy equipment required. In this guide, we’ll walk through exactly how to make oven roasted garlic in foil, share pro tips to avoid common mistakes, and give you creative ways to use this versatile staple in your cooking.
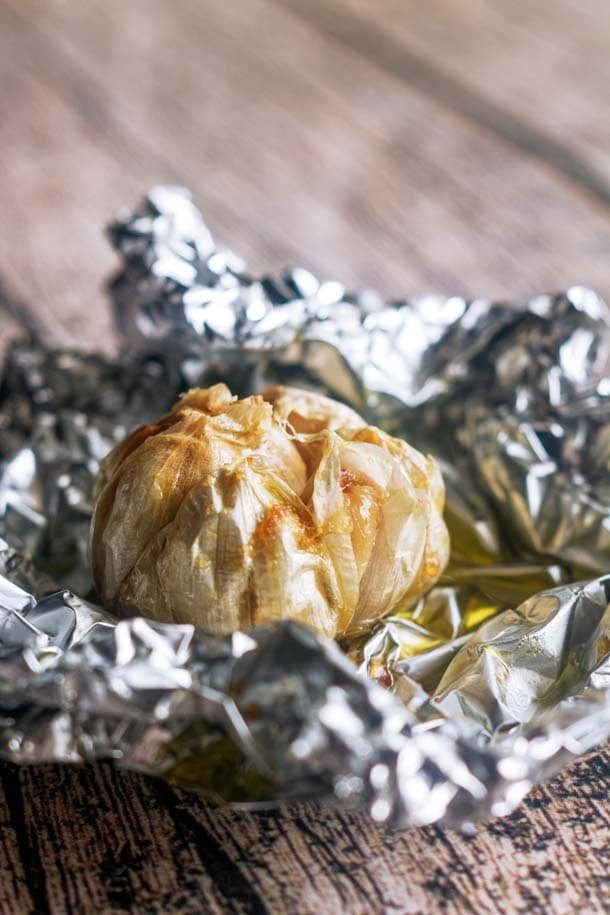
 A perfectly roasted foil-wrapped garlic bulb, golden and soft to the touch
Credit: www.budgetbytes.com
A perfectly roasted foil-wrapped garlic bulb, golden and soft to the touch
Credit: www.budgetbytes.com
Why Oven Roasted Garlic in Foil Is a Kitchen Staple
Roasting garlic in foil isn’t just a convenient hack – it’s the best method for getting consistent, restaurant-quality results at home, even if you’re a beginner cook. The aluminum foil creates a sealed, steam-filled environment that cooks the cloves evenly from the outside in, locking in moisture to prevent drying out or burning. Unlike roasting garlic uncovered on a baking sheet, the foil packet contains all the garlic’s natural juices, so you won’t have to scrub stuck-on caramelized residue off your bakeware after cooking.
The flavor transformation is just as impressive: raw garlic’s signature sharp, spicy bite comes from allicin, a sulfur compound that breaks down when exposed to low, steady heat. As the garlic roasts, its natural sugars caramelize in a Maillard reaction, creating a rich, sweet, umami-forward flavor with none of the harshness of raw cloves. The result is a creamy, spreadable ingredient that adds depth to almost any dish without overpowering other flavors. According to University of Minnesota Extension food safety specialists, low-and-slow roasting breaks down the sharp allicin compounds in raw garlic while caramelizing its natural sugars for a sweet, mellow flavor University of Minnesota Extension Roasting Guide.
Choosing the Best Garlic for Foil Roasting
The quality of your garlic will make or break the final flavor and texture of your roasted cloves, so it’s worth taking a minute to pick the right bulbs for your needs.
Fresh vs. Pre-Peeled Garlic
Fresh, whole garlic bulbs are the best choice for foil roasting, as their intact, papery skins protect the cloves during cooking and lock in moisture for an extra creamy final texture. Pre-peeled cloves, while convenient for quick prep, often dry out during roasting and lack the deep, complex flavor of fresh bulbs, since their protective skins are removed. If you do use pre-peeled cloves, add an extra teaspoon of oil to the foil packet to prevent them from sticking and drying out.
Selecting Quality Bulbs
When shopping for garlic, look for bulbs that feel firm and heavy for their size, with dry, papery white or purple-tinged skins. Avoid bulbs with soft spots, green sprouts (a sign of age), or visible mold, as these will have a bitter, off flavor. Sprouted garlic is still safe to eat, but you can remove the green sprouts before roasting to avoid bitter notes.
For extra mild, creamy results, try Elephant garlic: despite its name, it’s actually a type of leek, with huge, mild cloves that roast up extra soft and sweet, perfect for people who find regular garlic too strong. If you’re short on time, pick smaller bulbs, which roast 5-10 minutes faster than large ones. If you store whole garlic bulbs in a low, accessible kitchen cabinet, consider adding cabinet safety latches to prevent young children from pulling out bulbs and playing with the papery skins, which can be a choking hazard.
 Firm, dry-skinned fresh garlic bulbs are ideal for foil roasting
Credit: food52.com
Firm, dry-skinned fresh garlic bulbs are ideal for foil roasting
Credit: food52.com
Step-by-Step Guide to Perfect Oven Roasted Garlic in Foil
This method takes just 5 minutes of active prep, then the oven does all the work for 40 minutes of hands-off cooking. Follow these steps for perfectly tender, caramelized garlic every time.
Prep and Seasoning
Start by peeling off the loose, papery outer layers of the garlic bulb, but leave the thin inner skins on the individual cloves intact – this keeps the cloves from sticking together and protects them from drying out. Use a sharp chef’s knife to slice about ¼ inch off the top of the bulb, exposing the pointed tips of the cloves. Don’t slice too deep, or you’ll cut into the cloves themselves and cause them to dry out.
Place the trimmed bulb cut-side up on a 12-inch square of heavy-duty aluminum foil (regular foil works, but heavy-duty is less likely to tear during roasting). Drizzle 1-2 teaspoons of olive oil over the exposed cloves, making sure every tip is coated – the oil helps the cloves caramelize and prevents them from sticking to the foil. Sprinkle with a pinch of flaky sea salt, and add optional seasonings like freshly ground black pepper, chopped rosemary, thyme, a pinch of red pepper flakes, or smoked paprika for extra depth of flavor. After prepping, wipe down your cutting board and countertops with a kitchen cleaning scrub brush to remove any sticky garlic residue.
Wrapping and Roasting
Fold the foil up around the bulb, crimping the edges tightly to create a fully sealed packet with no gaps or holes. Steam escaping from the packet will cause the garlic to dry out instead of steaming tender, so be sure to seal it tightly. Preheat your oven to 400°F (200°C) – skipping preheating leads to uneven cooking and longer roast times. Place the foil packet directly on the middle oven rack, or on a small baking sheet to catch any drips. Roast for 40-45 minutes for medium bulbs, 35-40 minutes for small bulbs, and 45-50 minutes for extra-large bulbs.
Testing for Doneness
Remove the packet from the oven and let it cool for 5 minutes before opening – the garlic will be extremely hot, and letting it cool slightly makes the cloves easier to handle. Gently squeeze the bulb through the foil with a pair of oven mitts: if the cloves feel soft and mushy all the way through, with no hard spots, they’re done. If they’re still firm in the center, re-seal the packet and roast for 5-10 more minutes. To serve, squeeze the soft cloves out of their skins by pressing the bottom of the bulb with your thumb, or use a small fork to pop them out.
Creative Ways to Use Roasted Garlic
Roasted garlic’s sweet, mellow flavor makes it a versatile ingredient for almost any meal. Here are our favorite ways to use it:
Savory Main Dishes
Stir roasted garlic into pasta sauce, tomato soup, or cream of mushroom soup for a deep, savory backbone that doesn’t have the harsh bite of raw garlic. Fold it into mashed potatoes, risotto, or quinoa for a rich, umami boost that pairs perfectly with roasted chicken, steak, or tofu. Top homemade pizza with roasted garlic cloves before baking for a gourmet touch, or toss it with roasted broccoli, cauliflower, or Brussels sprouts for a sweet, savory side dish.
Appetizers and Snacks
Mash roasted garlic into softened butter for a killer garlic bread spread, or blend it into mayonnaise or Greek yogurt for a quick aioli or veggie dip. Serve whole roasted cloves on a cutting cheese for charcuterie with crusty bread, cured meats, and hard cheeses for an effortless, impressive appetizer. For a quick snack, spread roasted garlic on toasted sourdough with a sprinkle of parmesan.
Sauces and Dressings
Blend roasted garlic into vinaigrettes or creamy salad dressings for a subtle garlic flavor that coats every leaf of greens. Stir it into pan sauces for steak or chicken, or mix it into hummus or baba ganoush for an extra layer of depth.
Storage and Shelf Life
Proper storage will keep your roasted garlic fresh and flavorful for weeks. Let roasted garlic cool completely to room temperature before storing – storing it while warm can create condensation that leads to mold. Transfer the cloves to an airtight glass container, and store in the refrigerator for up to 7 days – the USDA recommends this timeline for optimal flavor and food safety USDA FoodKeeper. Don’t store roasted garlic in the foil packet it was cooked in, as the foil can react with the acidic garlic juices over time.
For long-term storage, spread the roasted cloves in a single layer on a baking sheet and freeze for 1 hour to prevent them from sticking together, then transfer to a zip-top freezer bag. They’ll keep for up to 3 months, and you can pop individual cloves directly into hot dishes without thawing. To reheat frozen roasted garlic, place it in a small foil packet and warm in a 350°F oven for 10 minutes, or microwave for 10-15 seconds. Always discard roasted garlic that develops a sour smell, slimy texture, or visible mold, and never store roasted garlic infused with oil at room temperature, as this creates a risk of botulism.
Troubleshooting Common Foil Roasting Mistakes
Even with a simple method like foil-roasted garlic, small mistakes can lead to less-than-perfect results. Here’s how to fix the most common issues:
Dry, Tough Garlic
This is almost always caused by a leaky foil packet or roasting at too high a temperature (above 425°F). Make sure to crimp the foil edges tightly, and stick to 400°F for best results. If you’re using thin, lightweight foil, double up the layers to prevent tears. If you notice steam escaping during roasting, carefully remove the packet, add a small piece of extra foil over the gap, and re-seal it.
Undercooked, Sharp Garlic
If your cloves are still firm and have a raw, spicy bite, they need more time in the oven. Small bulbs may be done in 35 minutes, but large bulbs can take up to 50 minutes – always test by squeezing the bulb through the foil before removing it from the oven.
Burnt, Bitter Garlic
This happens if the foil packet is too close to the oven heating element, or if you roasted at a temperature higher than 400°F. Place the packet on the middle rack of the oven, away from the broiler, and set a timer to check it at the 35-minute mark to avoid overcooking. If you get garlic drips on your oven rack, a professional kitchen cleaning brush makes quick work of scrubbing away stuck-on caramelized residue.
Hard to Peel Cloves
Let the roasted garlic cool for at least 5 minutes before trying to squeeze the cloves out – the skins will slip off much easier when the garlic is slightly warm, not piping hot. If the skins are still stuck, wrap the bulb in a damp paper towel for 2 minutes to loosen them.
Frequently Asked Questions
How long do you roast garlic in foil at 400°F?
Roast whole medium garlic bulbs at 400°F (200°C) for 40-45 minutes for perfectly tender, caramelized cloves. Small bulbs will be done in 35-40 minutes, while extra-large bulbs may need up to 50 minutes. Always test for doneness by gently squeezing the foil packet – the cloves should feel soft and mushy all the way through.
Can you roast garlic in foil without oil?
Yes, you can roast garlic without oil, but the results will be drier and less caramelized. Oil helps the garlic’s natural sugars caramelize and prevents the cloves from sticking to the foil. If you’re avoiding oil, you can add 1 tablespoon of water or vegetable broth to the foil packet to create steam and keep the garlic moist, though the flavor will be milder than oil-roasted garlic.
What’s the difference between foil-roasted garlic and roasted garlic cooked in a pan?
Roasting garlic in a pan (uncovered) leads to drier, more caramelized cloves, but they’re more likely to burn if you’re not careful, and you’ll have to scrub the pan afterward. Foil roasting traps steam to keep the cloves extra tender, contains all the juices for easy cleanup, and is far more forgiving for beginner cooks.
Can you roast peeled garlic cloves in foil?
Yes, you can roast individual peeled cloves in foil for a quicker result. Toss the peeled cloves with a little oil, wrap them tightly in foil, and roast for 15-20 minutes. This is great for when you only need a small amount of roasted garlic for a recipe, though whole bulbs yield a deeper, more complex flavor.
Is roasted garlic safe for kids and pets?
Yes, roasted garlic is far milder than raw garlic, but it’s still best served in small amounts to kids and pets, as large quantities can cause digestive upset. If you’re cooking with young children in the kitchen, be sure to install kitchen safety locks for kids on lower cabinets to keep them away from hot oven handles and raw ingredients.
How do you know when roasted garlic is done?
The easiest test is to gently squeeze the foil packet with a pair of oven mitts – if the cloves feel soft and mushy all the way through, with no hard spots, they’re done. You can also open the packet and poke a clove with a fork; it should slide in easily with no resistance.
 Soft, caramelized roasted garlic cloves, perfect for spreading or mixing into recipes
Credit: feelgoodfoodie.net
Soft, caramelized roasted garlic cloves, perfect for spreading or mixing into recipes
Credit: feelgoodfoodie.net
Conclusion
Oven roasted garlic in foil is one of the simplest, most rewarding kitchen hacks you can master – it turns a pungent, underutilized ingredient into a sweet, versatile staple that elevates almost any meal. With just 5 minutes of prep and 40 minutes of hands-off oven time, you’ll have a batch of creamy, caramelized garlic that keeps for up to a week in the fridge or 3 months in the freezer. Whether you spread it on crusty bread, stir it into weeknight pasta, or serve it on a charcuterie board, this method delivers perfectly tender, flavorful results every time, no special skills required.
Ready to upgrade your weeknight meals? Try this roasted garlic method tonight, and explore more easy, flavorful recipes and kitchen tips on our kitchen guides blog for fresh, tested ideas to simplify your cooking routine.

I’m Abby Lu, a passionate home cook who loves simplifying everyday meals. At PlugChef.com, I share product reviews and cooking guides to help you find the best tools for your kitchen.
Related posts:
 Lemon Pesto Pasta Trader Joe’S: Easy, Zesty, Must-Try Recipe
 Old Fashioned Buttermilk Donuts Recipe: Classic, Easy & Delicious
 Cherry Chocolate Dump Cake Recipe: Irresistibly Easy Delight
 What are the Brunch Hours: Ultimate Guide to Perfect Timing
 What Flavor is Dubai Chocolate: Discover the Unique Taste Sensation
Sea Scallops on the Grill: Perfectly Seared Seafood Delight
What Flavor is Dubai Chocolate: Discover the Unique Taste Sensation
Sea Scallops on the Grill: Perfectly Seared Seafood Delight

