

Keeping small kitchen appliances organized protects them, frees counter space, and reduces stress when cooking. This guide gives practical, field-tested strategies to plan, clean, and store appliances efficiently — whether you have one small cabinet or a tiny galley kitchen. Read on for step-by-step methods, safety reminders, and a quick reference table that lets you act today.
Quick overview: three-step approach
- Assess (what you own and how often you use it).
- Prepare (clean, dry, unplug, remove batteries).
- Store (right place, right orientation, cord and manual management).
Assess and plan your storage
- Inventory first: list each appliance, note dimensions and frequency of use (daily, weekly, monthly, seasonal). In practice, people overestimate the need for counter space because rarely-used items accumulate.
- Measure available spaces: cabinet depth/height, shelf weight limits, and clearances for door swings or slide-outs. If a shelf has no weight rating, assume 20–30 lb (9–14 kg) for standard kitchen cabinetry and keep heavier mixers or slow cookers low.
- Group by use and size: keep daily-use appliances within reach; seasonal or occasional ones go to higher cabinets, a pantry, or a nearby closet.
Tips: take a photo of inside your cabinets before reorganizing — it’s a quick before/after check and helps avoid repeated measuring.
Clean and prepare appliances before storing
Never store an appliance dirty or damp. Moisture causes corrosion and odors; food residue attracts pests.
Practical cleaning checklist
- Unplug and cool completely.
- Remove detachable parts (blenders, lids, filters) and wash per manufacturer instructions.
- Descale coffee makers and kettles with white vinegar or a manufacturer-recommended solution; run a plain-water rinse cycle afterward.
- Wipe electrical bases and vents with a dry brush; avoid soaking electrical components.
- Let everything dry fully (air-dry 24 hours when possible) before storing.
- Remove batteries from battery-powered gadgets to prevent leakage.
A common mistake is repacking a damp appliance; in practice that leads to mildew and premature failure.
Storage options and when to use them
Below are smart locations and product solutions, with pros/cons.
- Countertop: best for daily-use items (toaster, coffee maker). Keep only what you use each day to avoid clutter.
- Upper cabinets: good for lightweight, infrequently used appliances (waffle maker). Avoid heavy items above eye level.
- Lower cabinets / pull-out shelves: ideal for heavy stand mixers and slow cookers; use pull-out trays to prevent lifting injuries.
- Appliance garage (roll-up door on counter): hides appliances but keeps them accessible.
- Rolling cart / utility cart: portable storage for flexible kitchens; choose lockable wheels.
- Pantry or closet: great for boxed appliances; use clear, labeled bins and keep heavy items low.
- Garage or attic: only for truly non-electronic, durable appliances if climate-controlled. Temperature extremes and humidity damage electronics and plastics.
For electrical safety and recall information, check current guidance at the U.S. Consumer Product Safety Commission. For product-certification and electrical-safety standards, consult UL.
Appliance garages: how to make them work
- Leave a little breathing room around appliance vents to avoid trapping heat after use.
- Measure door clearance and cord routing before buying or building.
- If you install outlets inside an appliance garage, follow local electrical codes and keep cords organized to avoid pinch points.

Neatly stored counter appliances for daily use.
Credit: www.instagram.com
Specific storage tips by appliance (quick reference)
| Appliance | Best storage spot | Prep & tips |
|---|---|---|
| Coffee maker | Counter or lower cabinet | Empty water reservoir, descale monthly, wrap cord; keep carafes separate. |
| Stand mixer | Lower cabinet or pull-out shelf | Keep bowl and attachments together in a labeled bin; use a pull-out to avoid lifting. |
| Blender | Cabinet near prep area | Remove blade assembly and dry; store pitcher upside down to drain. |
| Toaster / Toaster oven | Counter or cabinet with good airflow | Empty crumb tray; avoid enclosed tight boxes for oven-style units. |
| Food processor | Lower shelf or pantry | Nest bowl and blades in a box or bin; secure blade in a sheath. |
| Immersion blender | Drawer or cabinet | Store with protective cover on shaft; keep cords wrapped. |
| Microwave | Counter or built-in | Leave plugged in if used; if storing, keep in a dry, ventilated area. |
(Adapt these suggestions to your kitchen layout — in practice you’ll find slight variations based on cabinet depth and appliance size.)
Cord, accessory, and manual management
- Cord techniques: use Velcro cable straps, reusable zip ties, or dedicated cord wraps. Avoid tight knots that crush wires.
- Keep small removable parts together: use mesh bags, zip-top bags, or labeled bins.
- Manuals and warranties: store PDFs on a cloud folder and keep physical manuals in a labeled binder or a file folder taped to the appliance box. This saves time for maintenance or warranty claims.
Use storage systems that save space
- Pull-out shelves and roll-out trays reduce bending and make heavy items safer to use.
- Vertical dividers inside cabinets are excellent for baking sheets and stand mixer bowls.
- Clear stackable bins let you see contents without rearranging. Use uniform bin sizes to maximize shelf packing.
- Pegboards or slatwall panels inside pantry doors can hold small appliances, baskets, or accessories.
Long-term storage and seasonal appliances
- Climate matters: store electronics in climate-controlled areas. Basements and attics often have wide temperature/humidity swings that degrade plastics and electronics.
- For seasonal appliances (ice cream maker, holiday waffle iron): clean thoroughly, wrap in breathable fabric or place in a box with silica gel packets to control moisture.
- Don’t wrap appliances completely in plastic for long-term storage — trapped moisture can cause corrosion.
Safety rules you must follow
- Always unplug before cleaning or storing.
- Remove batteries from any device that uses them.
- Store heavy items low to the ground to reduce tipping or injury.
- Never stack heavy appliances on top of lighter ones.
- Make sure vents are not blocked while an appliance is cooling post-use.
Regular maintenance and audit
- Every 3–6 months: wipe down stored appliances, rotate seasonal items, check for pests and moisture.
- Every year: test appliances you haven’t used, run a basic function test where safe, and consult recalls at the U.S. Consumer Product Safety Commission if you suspect issues.
Declutter and donate responsibly
If an appliance hasn’t been used in 12–18 months, consider selling or donating it. Donate working appliances to local thrift stores or community centers; many accept small kitchen items. Before donating, clean thoroughly and remove perishable components.
Frequently asked questions
How can I keep cords from tangling inside cabinets?
Use Velcro straps or reusable cable ties and wrap cords loosely. Store cords in small labeled pouches attached to the appliance or in a nearby drawer.
What’s the best way to store heavy appliances like stand mixers?
Place them on a lower shelf or on a pull-out tray that supports their weight. Avoid lifting them in and out from high cabinets to prevent strain injuries.
Can appliances be stored in their original boxes?
Yes — original boxes with molded inserts are excellent for storage because they are designed to protect the appliance. Add silica gel packets and label the box with contents and a photo.
How do I protect appliances from moisture and pests?
Keep appliances in closed cabinets or plastic bins elevated off the floor. Use silica gel packs for humidity control and clean the area regularly. Avoid airtight plastic wrap for long-term storage.
Practical checklist to get started (30–60 minutes)
- Pick one cabinet or counter area.
- Remove everything and wipe the space clean.
- Sort appliances into daily / occasional / seasonal.
- Clean and dry each appliance; remove batteries.
- Measure shelves and put heavy items low, daily items within reach.
- Label bins or shelf edges and tuck manuals into a single binder or cloud folder.
Conclusion
Smart storage for small kitchen appliances is a mix of planning, cleaning, and choosing the right hardware for your space. Start small: make an inventory, clear one shelf, and apply one storage system (pull-out tray, clear bin, or appliance garage). You’ll protect your equipment, reclaim counter space, and make everyday cooking smoother.
Ready to reclaim your kitchen counters? Measure one cabinet today and move three seldom-used appliances to a labeled box or donation pile — you’ll notice the difference immediately.
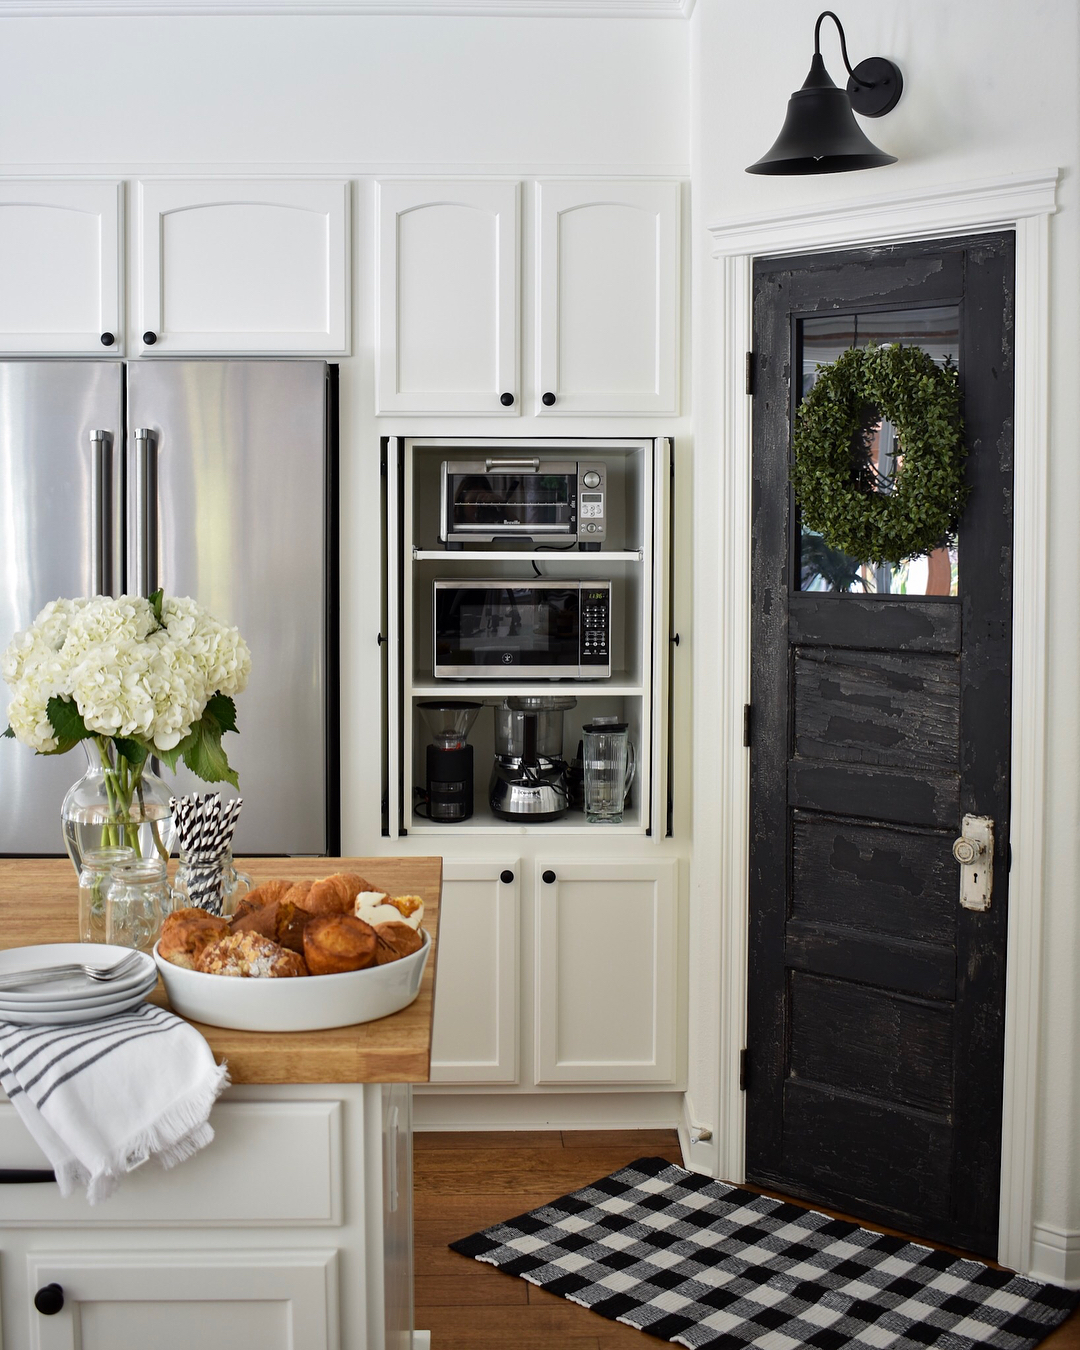
Example of an appliance garage keeping counters tidy.
Credit: www.extraspace.com
Appendix: Printable checklist (copy and print)
- Choose one zone: cabinet, counter, or pantry.
- Empty and clean the zone.
- Inventory items: name, dimension (H×W×D), weight estimate, use frequency.
- Sort into keep / donate / store / relocate.
- Clean and dry each appliance; remove batteries.
- Label cords with appliance name and wrap with a Velcro strap.
- Place heavy items on lower shelves; daily items at eye level.
- Store small parts in labeled zipper bags; manuals in folder or cloud.
- Add silica gel packets for long-term storage.
- Closeout: photograph the organized zone and note next audit date.
Quick cabinet measurement guide (do this before buying organizers)
- Remove shelf contents and a loose shelf if adjustable.
- Measure interior width, depth (back-to-front), and clear vertical height with the shelf removed — record in inches or centimeters.
- Note fixed obstacles (braces, drawer slides, outlet boxes).
- Check shelf hole spacing if adjustable (distance between peg holes). This tells you what heights you can set.
- Estimate weight capacity: if unknown, assume 20–30 lb (9–14 kg) per shelf; use pull-out hardware rated for heavier loads.
- Measure door swing and counter overhang to ensure appliance doors or handles will open freely.
In practice, taking these measurements avoids buying bins or racks that don’t fit.
Final practical tips and trade-offs
- Trade-off: keeping a coffee maker on the counter wastes space but saves 30–90 seconds per use. If you value speed, accept that visible appliance.
- Trade-off: an appliance garage looks tidy but adds cost and reduces overhead cabinet storage. Consider a compact roll-up model if counter depth is limited.
- If you rent, favor portable, non-permanent solutions: carts, bins, and tension-mounted shelving.
- When in doubt about storing an appliance in the garage or attic, default to an indoor, climate-controlled spot.
Closing note
Small changes — measuring once, pairing a pull-out shelf with a labeled bin, or clearing one countertop — compound into a calmer kitchen and longer appliance life. Pick one task from the checklist, set a 30-minute timer this weekend, and start reclaiming your space.
Save or print the checklist above and schedule that 30-minute declutter session now — you’ll have a tidier, safer kitchen by tonight.

I’m Abby Lu, a passionate home cook who loves simplifying everyday meals. At PlugChef.com, I share product reviews and cooking guides to help you find the best tools for your kitchen.
Related posts:
 How to Make a Fruit Basket for a Gift: Easy DIY Guide
 Do You Need a Basket? Essential Guide for Air Fryers
 What Blenders Do Tropical Smoothie Use: Expert Insights
Stainless Steel Vs White Kitchen Appliances: Ultimate Showdown
What Blenders Do Tropical Smoothie Use: Expert Insights
Stainless Steel Vs White Kitchen Appliances: Ultimate Showdown
 Kitchen Appliances for Wedding Registry: Must-Have Essentials
 Top 10 Best Non-Toxic Cooking Utensils – Safe & Durable Choices for Healthy Homes

