
Imagine transforming a simple kitchen tool into a captivating piece of art. A 3D cutting board isn’t just a practical item; it’s a conversation starter.
As you explore how to make one, you’ll discover a blend of creativity and functionality that will elevate your culinary space. This guide will simplify the process, breaking down each step so you can confidently craft your own masterpiece. By the end, you’ll be eager to showcase your creation, impressing friends and family with your newfound skills.
Dive in, and let’s unlock the secrets to making a stunning 3D cutting board together.
Tools And Materials Needed
Creating a 3D cutting board is a rewarding project. It combines creativity with craftsmanship. Before diving into the build, gather all necessary tools and materials. This preparation ensures a smooth and enjoyable process. Let’s explore what you’ll need to start this woodworking adventure.
Essential Woodworking Tools
A table saw is crucial for precise cuts. It shapes the wood into the desired pattern. A planer smooths the wood surface. This ensures uniform thickness. A miter saw helps with angled cuts. These cuts add visual interest. Sandpaper is needed for a fine finish. It removes rough edges and splinters.
Safety Gear
Safety goggles protect your eyes from sawdust. Ear protection is essential when using loud tools. A dust mask safeguards your lungs. It prevents inhaling fine particles. Gloves shield your hands from splinters and cuts.
Wood Selection
Selecting the right wood is vital. Hardwoods like maple, walnut, and cherry work well. These woods are durable and attractive. They provide a striking contrast in patterns. Choose pieces that are straight and free of defects.
Glue And Clamps
Wood glue bonds the pieces together. It must be strong and waterproof. Clamps hold the wood in place while the glue dries. Ensure you have enough clamps for the project size.
Measuring Tools
Accurate measurements are crucial for success. A tape measure and a square ensure precision. These tools help maintain straight lines and angles.
Finishing Supplies
Mineral oil or beeswax finishes the board. These products seal and protect the wood. They enhance the wood’s natural beauty. Apply with a clean cloth for best results.
Choosing The Right Wood
Creating a 3D cutting board starts with selecting the perfect wood. The choice of wood affects the board’s look and feel. It also impacts durability and ease of use. Different woods offer unique qualities for crafting.
Hardwood Vs. Softwood
Hardwoods are dense and durable. They resist scratches and dents well. Softwoods are lighter and easier to shape. Each type offers distinct advantages for your cutting board.
Color And Grain Patterns
Wood color can range from light to dark. Grain patterns add visual interest. Consider the board’s appearance in your kitchen. Choose patterns that enhance the 3D effect.
Wood Species
Popular choices include maple, walnut, and cherry. Maple is light and strong. Walnut has a rich, dark tone. Cherry offers a warm, reddish hue. These species are ideal for 3D designs.
Stability And Moisture Resistance
Stable wood resists warping over time. Moisture resistance is crucial for kitchen use. Look for wood with good stability. Consider its reaction to moisture exposure.
Cost Considerations
Wood varies in price based on quality. Budget-friendly options are available. High-end woods cost more but offer premium features. Choose wood that fits your budget.
Designing The Cutting Board
Designing your own 3D cutting board is a fun and creative process that opens up endless possibilities. Whether you’re a seasoned woodworker or a beginner, bringing your design ideas to life can be immensely rewarding. Imagine slicing vegetables on a board that showcases your unique style and craftsmanship. Let’s dive into how you can design a cutting board that’s both functional and visually stunning.
Choosing The Right Wood
Start by selecting the wood for your cutting board. Different types of wood have unique colors, textures, and durability. Maple, walnut, and cherry are popular choices due to their hardness and aesthetic appeal.
Consider the grain pattern and how it will look in 3D. The grain can enhance the visual depth of your board. Think about how different woods can complement each other when you’re designing a pattern.
Sketching Your Design
Sketching your design is where creativity flows. Grab a pencil and paper, and start visualizing your cutting board. You can use geometric shapes, waves, or even abstract forms.
Visualize how each piece will fit together. You might start with a simple pattern and gradually add complexity. Don’t be afraid to mix it up—sometimes the most unexpected designs turn out to be the best.
Incorporating 3d Elements
Adding 3D elements can make your cutting board stand out. Think about how different layers of wood will create depth and interest. Consider using contrasting colors to enhance the 3D effect.
Experiment with different thicknesses and angles. Ask yourself, “How can I make this design pop?” Sometimes, small adjustments make a big difference in the final look.
Considering Functionality
While creativity is important, remember that functionality is key. Your cutting board should be easy to use and clean. Think about the size and shape that will best suit your kitchen needs.
Ensure that your design doesn’t compromise the board’s practicality. A beautiful cutting board is great, but it should also make chopping, slicing, and dicing a breeze.
Getting Feedback
Once your design is complete, seek feedback from friends or fellow woodworkers. Sometimes, a fresh pair of eyes can offer insights you hadn’t considered. It’s a chance to refine your design and make it even better.
Ask yourself: “Does this design resonate with others?” Feedback can help you create a cutting board that not only you love, but others admire too.
Designing a 3D cutting board is a journey where imagination meets craftsmanship. Each decision you make adds a piece to the puzzle, culminating in a board that’s uniquely yours. So, what will your design say about you?

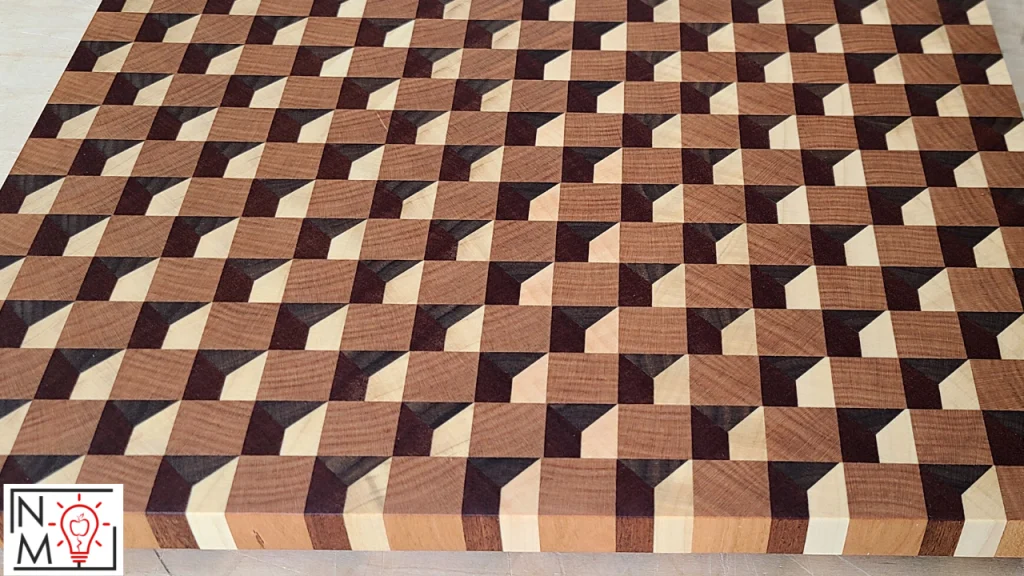
Credit: www.youtube.com
Cutting The Wood Pieces
Crafting a 3D cutting board involves cutting wood pieces precisely. Select quality wood and cut different shapes. This ensures a sturdy and eye-catching design.
Making a 3D cutting board is an exciting woodworking project that allows you to showcase your creativity and craftsmanship. The foundation of a stunning 3D cutting board lies in the careful selection and precise cutting of wood pieces. This process can seem daunting, but with the right approach, you can transform a simple piece of wood into a work of art. In this section, we’ll delve into the essential steps you need to follow to cut your wood pieces accurately and effectively.Understanding Wood Grain And Direction
Before you start cutting, it’s crucial to understand the grain of the wood. Wood grain refers to the alignment, texture, and appearance of fibers in the wood. Cutting along the grain is easier and helps prevent splintering. Always plan your cuts to follow the natural direction of the wood grain. This not only makes cutting more efficient but also enhances the visual appeal of your finished board.Measuring And Marking
Accurate measurements are key to creating a symmetrical cutting board. Use a reliable measuring tape or ruler to mark the dimensions on your wood. A pencil works well for marking, as it can be easily erased or sanded off later. Double-check your measurements to avoid any mistakes that could waste your material.Choosing The Right Saw
The saw you choose can make a huge difference in the quality of your cuts. A table saw is ideal for straight cuts and ensures consistent thickness across your pieces. If you don’t have access to a table saw, a circular saw can also work with a steady hand. Remember, the sharper the blade, the cleaner the cut. Dull blades can tear the wood fibers, leaving a rough edge.Making Your Cuts
With your wood marked and your saw ready, it’s time to make your cuts. Keep your hands steady and guide the wood smoothly through the saw. Consistency is key—aim for uniform thickness in each piece. Uneven cuts can lead to a wobbly final product. Think of it like assembling a puzzle; each piece needs to fit perfectly with the next.Safety Precautions
Woodworking can be dangerous if you’re not careful. Always wear safety goggles and a dust mask to protect your eyes and lungs. Keep your fingers clear of the blade and use push sticks if necessary. Your safety should always come first. Are you taking the necessary precautions to ensure a safe working environment? Cutting the wood pieces is a crucial step in crafting your 3D cutting board. With careful planning, precise measurements, and the right tools, you can create beautiful, intricate designs. What unique patterns will you bring to life with your cutting board project?Arranging The Pattern
Crafting a 3D cutting board involves arranging wooden pieces in a unique pattern. Choose contrasting woods for a striking design. Assemble and glue the pieces carefully to achieve a flawless 3D effect.
Arranging the pattern on your 3D cutting board is like piecing together a puzzle. It’s where creativity meets precision, allowing you to craft something truly unique. As you embark on this journey, remember that the pattern you choose will not only serve as a functional element but also as a statement piece in your kitchen.Understanding The Basics
Before you start, familiarize yourself with different wood types and their colors. Consider how contrasting shades can create a visually appealing design. Mixing light and dark woods can offer a striking effect that catches the eye.Visualizing Your Design
Sketch your pattern on paper first. This helps you visualize the final outcome and make adjustments before cutting. Think about the geometric shapes and how they will align. Are you aiming for symmetry, or do you prefer a more abstract look?Choosing Your Wood Pieces
Select wood pieces that complement each other. A blend of hardwoods like maple, cherry, and walnut can add texture and depth. These woods are durable and will withstand the wear and tear of daily use.Creating The Layout
Lay out your wood pieces on a flat surface. Experiment with different arrangements until you find one that feels right. Look for balance in your design; do the colors flow naturally?Securing The Pattern
Once satisfied, mark your layout to ensure accuracy. Use clamps to hold your pieces in place, guaranteeing they don’t shift during assembly. This step is crucial for maintaining the integrity of your design.Final Adjustments
Step back and review your pattern. Does it match your initial vision? Sometimes, small tweaks can make a big difference, so don’t hesitate to adjust as needed. Creating a 3D cutting board with an appealing pattern is both an art and a science. As you arrange your pieces, think about what story your board will tell. Are you ready to see your design come to life?
Credit: www.instructables.com
Gluing The Pieces Together
Crafting a 3D cutting board involves precision and creativity. Start by gluing wooden pieces together carefully. Ensure the grains align to form eye-catching patterns.
Gluing the pieces of your 3D cutting board is a crucial step. It ensures strength and beauty in your finished piece. Proper technique is key. This phase requires patience and precision. Following each step will help your board last longer. Let’s dive into the details of this essential process.Gather Your Materials
Collect all the necessary materials before starting. You’ll need wood glue, clamps, and a brush. A clean work surface is also essential. Prepare everything in advance to streamline the process.Arrange The Pieces
Lay out your wood pieces in the desired pattern. Check the alignment and fit. Make adjustments if needed. This step ensures a seamless look once glued.Apply The Wood Glue
Use a brush to apply glue evenly. Cover all sides that will join. Avoid excessive glue to prevent mess. Ensure each piece has enough coverage for a strong bond.Clamping The Pieces
Align the pieces carefully before clamping. Use clamps to hold the pieces tightly. Ensure there is pressure along the entire joint. Check for gaps and adjust clamps as necessary.Cleaning Excess Glue
Wipe away any glue that squeezes out. Use a damp cloth for best results. This prevents hardened glue from marring the surface. Quick action makes cleaning easier.Allowing Time To Set
Let the glue dry completely. Follow the glue manufacturer’s instructions. This usually takes several hours. Patience is vital for a solid bond.Inspecting The Glue Joints
Once dry, inspect the joints closely. Look for any weak spots or gaps. Ensure the pieces are firmly connected. This is essential for a durable cutting board.Sanding The Surface
Sanding the surface ensures a smooth finish for a 3D cutting board. Gently sand all sides to remove rough spots. This step prepares the wood for oiling and enhances the board’s appearance.
Sanding the surface of your 3D cutting board is crucial. It ensures a smooth and even finish. Proper sanding enhances the board’s appearance and usability. It prepares the wood for oiling and sealing. This step is vital for durability. Let’s explore the sanding process.Smooth Out Rough Edges
Begin by smoothing any rough edges. Use coarse-grit sandpaper for this task. It removes splinters and uneven areas. Work gently to avoid scratches. Check each corner and edge carefully.Progress To Finer Grit
Switch to medium-grit sandpaper next. This refines the board’s surface further. Sand in the direction of the wood grain. It prevents unwanted scratches. Ensure an even texture across the board.Final Sanding With Fine Grit
Finish with fine-grit sandpaper. It polishes the surface to perfection. Aim for a silky-smooth finish. Run your hand over the board. It should feel smooth and even.Inspect The Surface
Inspect the board after sanding. Look for any missed spots. Ensure the entire surface is smooth. Pay attention to the edges and corners. Repeat sanding if necessary.Applying A Finish
Applying a finish is the final step in crafting your 3D cutting board. This process ensures your board looks attractive and lasts longer. A good finish protects the wood and enhances its natural beauty. It seals the surface, making it resistant to moisture and bacteria. Let’s explore how to apply a finish effectively.
Choosing The Right Finish
Select a finish suitable for kitchen use. Food-safe finishes are essential. Mineral oil is a popular choice. It is odorless and easy to apply. Beeswax is another option. It adds shine and extra protection.
Preparing The Cutting Board
Ensure the board is clean and dry. Sand the surface gently. Use fine-grit sandpaper for a smooth texture. Remove any dust particles. A clean surface absorbs the finish better.
Applying The Finish
Use a clean cloth or brush. Apply the finish evenly over the board. Cover all areas thoroughly. Let the finish soak into the wood. Wipe off excess with a dry cloth.
Allowing The Finish To Set
Give the board time to absorb the finish. Set it aside for a few hours. This ensures the finish penetrates deeply. Repeat the process if needed. Multiple coats may enhance durability.
Final Touches
Inspect the board for any missed spots. Apply another coat if necessary. Ensure the board is completely dry. Store it in a cool, dry place. Your 3D cutting board is now ready for use.
Caring For Your Cutting Board
Crafting a 3D cutting board requires attention to detail and proper care. Regular cleaning and oiling keep it in top condition. Sanding the surface helps maintain its smoothness, ensuring longevity and beauty.
Caring for your 3D cutting board ensures it lasts for years. Proper maintenance keeps it looking new and prevents damage. Here are some easy tips to follow.Cleaning Your 3d Cutting Board
Use warm, soapy water to clean your cutting board. Avoid soaking it in water. A quick rinse and wipe is enough. Use a soft sponge for cleaning. This prevents scratches.Drying Your Cutting Board
Dry your cutting board immediately after washing. Use a clean towel for best results. Stand it upright to let it air dry completely. This stops moisture from causing warping.Oiling The Wood
Regularly oil your cutting board to keep the wood healthy. Use food-safe mineral oil for this task. Pour a small amount on the surface. Spread it evenly with a clean cloth.Dealing With Stains And Odors
Stains and odors can happen with frequent use. Use lemon juice and salt to remove them. Rub the mixture on the surface, then rinse. This helps keep your board fresh.Storing Your Cutting Board
Store your cutting board in a dry place. Avoid placing it near heat sources. This prevents the wood from cracking. Keep it away from direct sunlight too. Follow these steps to care for your 3D cutting board. Enjoy using it for many years.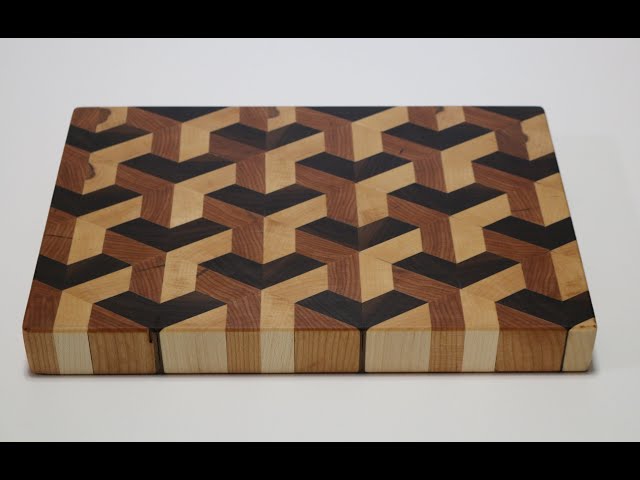
Credit: www.youtube.com
Frequently Asked Questions
What Materials Are Needed For A 3d Cutting Board?
To make a 3D cutting board, you’ll need hardwood types like maple, walnut, and cherry. These woods are durable and visually appealing. You’ll also require wood glue, clamps, a table saw, and a planer. Sandpaper is essential for a smooth finish.
Ensure all materials are of high quality for best results.
How Do I Design A 3d Cutting Board Pattern?
Designing a 3D cutting board pattern involves choosing contrasting wood types. Cut these woods into strips and arrange them creatively. Consider using design software for precise patterns. Ensure the design is not only visually appealing but also functional. A well-planned design enhances both aesthetics and usability.
How Long Does It Take To Make A 3d Cutting Board?
Creating a 3D cutting board typically takes several hours to a few days. The time depends on your experience and complexity of the design. Drying times for glue and finishing also affect duration. Plan accordingly to ensure each step is completed properly without rushing.
Can Beginners Make A 3d Cutting Board?
Yes, beginners can make a 3D cutting board with proper guidance and tools. Start with simpler designs and follow detailed tutorials. Take your time to understand each step carefully. Practice makes perfect, so don’t hesitate to ask for help or advice from experienced woodworkers.
Conclusion
Creating a 3D cutting board can be a fun project. With the right tools, it becomes easier. You now know the steps needed to build one. Start by gathering your materials. Follow the guide carefully. Each step plays a crucial role.
Remember, practice makes perfect. Enjoy the process and the end result. Your kitchen will have a unique touch. A 3D cutting board adds style and function. Share your creation with friends. Inspire others to try their hand at woodworking. Happy crafting and enjoy your beautiful new cutting board!

Hi, I’m Daniel Brooks—a food lover and kitchen gear enthusiast. I enjoy testing cookware, utensils, and gadgets to see what really works in everyday cooking. At PlugChef.com, I share honest reviews, comparisons, and simple guides to help you choose the best tools for a safer, smarter, and more enjoyable kitchen.
Related posts:
 What Type of Cooking Utensils are Safe: Expert Picks
 What Innovations Could Blenders Make: Unleashing Future Tech
 Smart Strategies to Organize a Small Kitchen: Maximize Space
 How to Organize a Kitchen Cabinet: Expert Tips & Tricks
 How to Organize Kitchen Drawers: Expert Tips and Tricks
 How to Organize a Corner Kitchen Cupboard: Expert Tips

