

Craving that nostalgic diner-style buttermilk donut without leaving your kitchen? This tested, no-fuss recipe delivers the perfect balance of tangy, sweet, fluffy, and crisp every time, even for first-time bakers. We’ve narrowed down exact measurements and step-by-step guidance to avoid common pitfalls like greasy, dense, or burnt donuts, so you can get bakery-quality results at home with minimal equipment.
 Freshly fried old fashioned buttermilk donuts, still warm from the fryer
Credit: lmld.org
Freshly fried old fashioned buttermilk donuts, still warm from the fryer
Credit: lmld.org
Why This Buttermilk Donut Recipe Works
Old fashioned buttermilk donuts get their signature tang and tender crumb from the chemical reaction between acidic buttermilk and baking soda, which creates tiny air bubbles for lift without a long yeast proofing time. Chilling the dough for a full hour firms up the butter, prevents spreading in hot oil, and makes the dough easy to roll and cut for uniform shapes. The combination of baking soda and baking powder ensures consistent rise, while full-fat buttermilk keeps the interior moist without being gummy. In practice, this recipe eliminates the guesswork that leads to common donut failures, so you can trust the results every time. For more on this, see our guide on old fashioned chocolate icing recipe.
Ingredients For Classic Buttermilk Donuts
Each ingredient plays a specific role in texture and flavor, and small substitutions can make a big difference in the final result. Below are exact, tested measurements for 12 donuts, plus notes on common swaps and mistakes to avoid.
| Ingredient | Quantity | Purpose | Substitution Tip |
|---|---|---|---|
| All-purpose flour | 2 ½ cups (315g) | Provides structure and light, tender crumb | Use 1:1 gluten-free all-purpose blend with xanthan gum for gluten-free donuts |
| Granulated sugar | ¾ cup (150g) | Sweetens dough, promotes golden browning | Coconut sugar works for a less refined option, but will darken the crust faster |
| Baking soda | 1 tsp | Reacts with buttermilk acidity to create lift and tang | Do not substitute with baking powder alone; the acid reaction is key to flavor |
| Baking powder | 1 ½ tsp | Adds extra rise for a fluffy interior | Ensure it’s unexpired for best results |
| Fine sea salt | ½ tsp | Enhances all other flavors, balances sweetness | Reduce to ¼ tsp if using salted butter |
| Full-fat buttermilk (cold) | 1 cup (240ml) | Adds tang, moisture, and tenderness; reacts with baking soda | Substitute with 1 cup milk + 1 tbsp lemon juice/vinegar, rested 5 minutes. For tested dairy substitution ratios, the University of Minnesota Extension recommends this method for reliable results. |
| Large eggs (room temp) | 2 | Binds ingredients, adds richness, helps with rise | Use flax eggs (1 tbsp ground flax + 3 tbsp water per egg) for vegan donuts |
| Unsalted butter (melted, cooled) | ¼ cup (57g) | Adds richness and moist, tender bite | Vegan butter works as a 1:1 substitute |
| Pure vanilla extract | 1 tsp | Enhances sweetness and adds warm aroma | Vanilla bean paste adds specks for a more indulgent flavor |
| High-smoke-point oil (vegetable, canola, peanut) | 4–6 cups (for frying) | Fries donuts evenly without burning or overpowering flavor | Do not use olive oil, butter, or unrefined oils with low smoke points |
A common mistake is using low-fat buttermilk, which lacks the fat content needed for a moist crumb, or bread flour, which creates a tough, chewy texture instead of a light bite. Always use full-fat buttermilk and all-purpose flour for best results. For more on this, see our guide on old fashioned whiskey sour recipe.
Equipment You’ll Need
While this recipe requires no special skills, having the right tools on hand will make the process far smoother and more consistent:
- Large mixing bowl or stand mixer
- Whisk and rubber spatula
- Rolling pin
- 3-inch and 1-inch round cutters (or a 3-inch donut cutter)
- Heavy-bottomed 3-quart pot or dedicated deep fryer
- Deep-fry thermometer (non-negotiable for consistent results)
- Slotted spoon or spider strainer
- Wire rack set over a baking sheet
- Paper towels (for initial oil draining)
If you don’t have a donut cutter, a 3-inch glass or biscuit cutter works for the outer shape, and a 1-inch bottle cap works for the center hole. Keep a long-handled dish brush on hand to scrub hardened oil out of your fry pot after use, which makes cleanup far faster.
Step-by-Step Donut Dough Instructions
The dough for old fashioned buttermilk donuts is intentionally stiff, not runny like pancake batter, to hold its shape during frying. Follow these steps for perfect results:
- Whisk together flour, sugar, baking soda, baking powder, and salt in a large bowl until fully combined. Sift the dry ingredients if you want an extra tender crumb, as it removes any lumps from the flour.
- In a separate medium bowl, whisk cold buttermilk, eggs, melted (but not hot) butter, and vanilla extract until smooth. Hot melted butter can cook the eggs and create lumps in the dough, so let it cool for 2–3 minutes after melting.
- Pour the wet mixture into the dry ingredients, and stir gently with a rubber spatula just until no dry flour remains. Lumps in the batter are totally fine.
- Turn the dough out onto a lightly floured surface, and knead gently 3–4 times just until it comes together into a smooth ball. Do not over-knead, as this develops gluten and leads to tough donuts.
- Flatten the dough into a 1-inch thick disc, wrap tightly in plastic wrap, and chill in the refrigerator for 1 full hour. In practice, skipping this chill step is the #1 reason home-baked buttermilk donuts end up misshapen and greasy, so don’t rush it.
Shaping and Cutting Perfect Donuts
Proper shaping ensures your donuts fry evenly and hold their classic ring shape:
- After chilling, turn the dough out onto a lightly floured surface. Roll it out to an even ½-inch thickness, flouring the rolling pin as needed to prevent sticking.
- Flour your cutters well, then press the larger 3-inch cutter firmly into the dough without twisting. Twisting seals the edges of the donut, which prevents it from rising properly in the oil.
- Press the smaller 1-inch cutter into the center of the cut circle to remove the donut hole, then transfer the donut to a parchment-lined baking sheet. Repeat with the remaining dough, re-rolling scraps only once (re-rolling more than once will make the donuts tough).
- Let the cut donuts rest at room temperature for 5 minutes before frying. This lets the dough relax slightly, so it doesn’t warp or fall apart when added to the hot oil.
If you’re prepping butter or other ingredients on a wooden cutting board, personalized cutting board care can keep your prep surfaces in great shape for years. For more on this, see our guide on old fashioned style kitchen appliances.
Frying Donuts For Golden, Non-Greasy Results
Frying is the most critical step for achieving that classic crisp exterior and fluffy interior. Follow these guidelines for consistent results:
- Pour 4–6 cups of high-smoke-point oil into a heavy-bottomed pot, and attach a deep-fry thermometer. Heat the oil to 350°F (175°C). If you don’t have a thermometer, test the temperature by dropping in a 1-inch piece of dough; it should sizzle and float to the top within 3 seconds. Note that a thermometer is far more reliable for consistent results. Following USDA safe deep frying guidelines ensures your donuts cook evenly without risking undercooked centers, which is especially important when working with raw eggs in the dough.
- Working in small batches of 2–3 donuts at a time, gently lower the donuts into the hot oil using a slotted spoon. Do not overcrowd the pot, as this drops the oil temperature and leads to greasy, soggy donuts.
- Fry for 2–3 minutes per side, flipping gently halfway through, until the donuts are deep golden brown all over. The internal temperature should reach 200°F (93°C) when tested with a food thermometer to ensure they’re cooked through.
- Use the slotted spoon to transfer the fried donuts to a wire rack set over a baking sheet to drain excess oil. Avoid stacking them while hot, as this will create steam and make the exterior soggy. Let them cool for 5–10 minutes before glazing or coating.
Hot oil can cause severe burns. Keep a lid nearby to smother any flames if the oil catches fire, and never leave hot oil unattended. If you’re cooking with young children in the house, no-drill cabinet locks can keep them away from the stove and hot cookware while you work.
 Cut donut rings resting before frying, ready to cook
Credit: www.wellmadebykiley.com
Cut donut rings resting before frying, ready to cook
Credit: www.wellmadebykiley.com
Glazes, Coatings, and Toppings
All glazes and coatings work best when applied to slightly warm (not hot) donuts, as the topping will set properly. Below are easy, tested options:
- Classic Vanilla Glaze: Whisk together 1 cup powdered sugar, 2 tbsp whole milk, and 1 tsp pure vanilla extract until smooth. Dip the top of each cooled donut into the glaze, then let it set for 5 minutes on the wire rack.
- Cinnamon Sugar Coating: Mix ½ cup granulated sugar and 1 tsp ground cinnamon in a shallow bowl. While the donuts are still hot (right after frying), toss them in the mixture to coat evenly. The heat helps the sugar adhere perfectly.
- Maple Pecan Glaze: Whisk ⅓ cup pure maple syrup and 1 cup powdered sugar until smooth. Drizzle over cooled donuts, then top with ¼ cup toasted, chopped pecans before the glaze sets.
- Chocolate Drizzle: Melt ½ cup semi-sweet chocolate chips with 1 tsp coconut oil (to keep it smooth) in the microwave in 30-second bursts, stirring in between. Drizzle over cooled donuts, and add sprinkles or chopped nuts if desired.
For wiping down glaze splatters and sticky countertops after prepping toppings, a professional-grade kitchen brush makes cleanup fast and easy. For more on this, see our guide on classic chex mix recipe baked.
Storing and Reheating For Best Flavor
Proper storage ensures your donuts stay fresh for as long as possible:
- Room Temperature Storage: Place fully cooled donuts in an airtight container lined with paper towels (to absorb excess moisture) at room temperature. They will stay fresh for up to 2 days. Avoid refrigerating, as the cold air will dry out the crumb and make the donuts tough.
- Freezing: For longer storage, wrap each donut individually in plastic wrap, then place them in a freezer-safe bag. They will keep for up to 2 months. Thaw at room temperature for 30 minutes before serving or reheating.
- Reheating: To revive the soft, fluffy texture, reheat donuts in a preheated 300°F (150°C) oven or air fryer for 3–5 minutes. An air fryer is ideal for restoring a slight crisp to the exterior without making the donut rubbery. If you’re in a pinch, microwave for 10 seconds max, but note this will make the donut chewy if overheated.
- Refreshing Leftovers: Sprinkle leftover donuts with a light coating of cinnamon sugar or a fresh drizzle of glaze after reheating to make them taste freshly made.
Common Mistakes To Avoid
Even with a great recipe, small errors can lead to subpar results. Avoid these pitfalls:
- Overmixing the dough: Mixing beyond just combining the ingredients develops gluten, leading to dense, tough donuts. Stir until no dry flour remains, even if small lumps are still visible.
- Skipping the chill step: Chilling firms up the butter and prevents the donuts from spreading too much in the oil, which leads to greasy, misshapen results. Don’t rush this step.
- Using expired leavening: Baking soda and baking powder lose their potency over time. Test them by dropping a pinch into vinegar; if it doesn’t fizz immediately, replace it.
- Frying at the wrong temperature: Oil that’s too hot burns the exterior before the interior cooks through, while oil that’s too low makes donuts greasy and heavy. Always use a thermometer.
- Overworking dough scraps: Re-rolling scrap dough more than once develops excess gluten, leading to tough donuts. Only re-roll scraps once, and discard any leftover dough after that.
Easy Recipe Variations
Once you’ve mastered the classic recipe, try these simple twists to switch up the flavor:
- Spiced Buttermilk Donuts: Add 1 tsp ground cinnamon, ¼ tsp ground nutmeg, and ⅛ tsp ground allspice to the dry ingredients for a warm, cozy flavor perfect for fall.
- Chocolate Buttermilk Donuts: Replace ¼ cup of the all-purpose flour with ¼ cup unsweetened cocoa powder, and add ½ cup mini chocolate chips to the dough for a rich, chocolatey twist.
- Gluten-Free Buttermilk Donuts: Use a 1:1 gluten-free all-purpose flour blend with xanthan gum in place of regular flour, and add 1 extra tbsp of buttermilk to compensate for the absorbency of gluten-free flours.
- Vegan Buttermilk Donuts: Swap buttermilk for 1 cup unsweetened almond milk + 1 tbsp apple cider vinegar, eggs for 2 flax eggs (1 tbsp ground flax + 3 tbsp water per egg, rested 5 minutes), and melted butter for vegan butter.
- Filled Donuts: After frying and cooling, use a piping bag fitted with a small round tip to inject jam, custard, or Nutella into the side of each donut for a surprise filling.
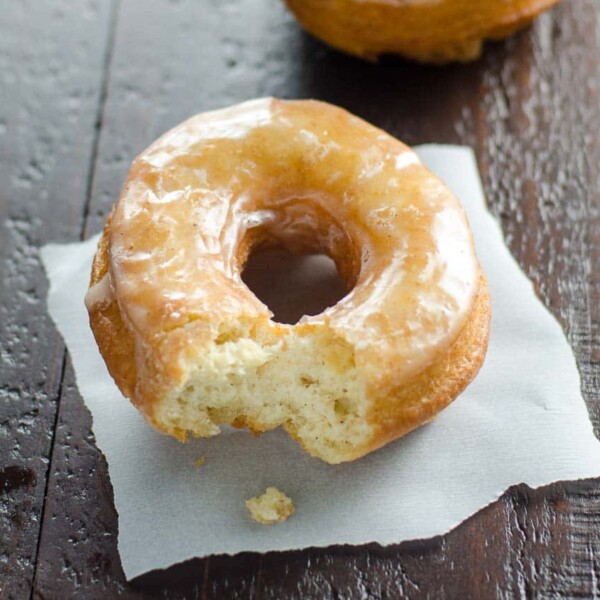 Finished glazed donuts, soft and tangy with a sweet crisp topping
Credit: umamigirl.com
Finished glazed donuts, soft and tangy with a sweet crisp topping
Credit: umamigirl.com
Frequently Asked Questions
What Ingredients Are Needed For Old Fashioned Buttermilk Donuts?
You’ll need all-purpose flour, granulated sugar, baking soda, baking powder, salt, full-fat buttermilk, eggs, melted unsalted butter, vanilla extract, and high-smoke-point oil for frying. Exact measurements are listed in the ingredients table above.
How Do You Make Old Fashioned Buttermilk Donuts At Home?
Mix dry ingredients in one bowl, wet ingredients in another, combine gently, chill the dough for 1 hour, roll and cut into rings, then fry in 350°F oil for 2–3 minutes per side until golden. Top with your choice of glaze or coating.
Can I Use Regular Milk Instead Of Buttermilk?
Yes, but you’ll need to add acidity to replicate the tang and chemical reaction with baking soda. Mix 1 cup of regular milk with 1 tablespoon of lemon juice or white vinegar, and let it sit for 5 minutes until slightly curdled before using.
How Should I Store Old Fashioned Buttermilk Donuts?
Store fully cooled donuts in an airtight container at room temperature for up to 2 days. For longer storage, wrap individually and freeze for up to 2 months. Avoid refrigeration, as it dries out the donuts.
Can I Bake These Donuts Instead Of Frying?
Yes, but baked donuts will have a denser, cake-like texture and lack the classic crisp exterior. To bake, preheat your oven to 375°F (190°C), place donuts on a parchment-lined baking sheet, and bake for 8–10 minutes until a toothpick inserted in the center comes out clean.
Why Are My Donuts Greasy?
Greasy donuts are almost always caused by oil that’s too cool, or overcrowding the pot which drops the oil temperature. Always use a thermometer to maintain 350°F, and fry only 2–3 donuts at a time.
These old fashioned buttermilk donuts deliver that perfect balance of tangy, sweet, fluffy, and crisp that makes diner-style donuts so beloved, and they’re easy enough to make at home even if you’ve never fried food before. With exact measurements, clear step-by-step instructions, and tips to avoid common pitfalls, you’ll get consistent, delicious results every time.
Once you’ve mastered the classic recipe, experiment with the variations above to find your favorite flavor, or serve them warm with a cup of coffee for the ultimate breakfast treat. For more easy, tested kitchen recipes and guides to the best tools for home cooking, check out our full blog library.

I’m Abby Lu, a passionate home cook who loves simplifying everyday meals. At PlugChef.com, I share product reviews and cooking guides to help you find the best tools for your kitchen.
Related posts:
 Seville Expandable Cabinet And Pantry Organizer: Space Savior
 Glideware Pull Out Cabinet Organizer for Pots & Pans: Space Saver
 Small 3-Tier Shelf Organizer: Maximize Space Effortlessly
 Trader Joe’S Spicy Lentil Wrap: Delicious, Healthy, and Quick Meal!
 Easy Way to Peel Pumpkin: Quick Tips for Effortless Prep
 How Long Do Grapes Last: Ultimate Freshness Guide Revealed

