

There’s nothing quite like the smell of freshly fried old fashioned buttermilk donuts wafting through your kitchen on a slow weekend morning. These beloved diner classics boast a crispy, golden-brown exterior, a fluffy, tangy crumb, and just the right amount of sweetness — no fancy pastry skills or specialized equipment required to make them at home. This tested, reliable recipe delivers that iconic, craveable flavor every time, with pro tips to avoid the most common donut-making pitfalls.
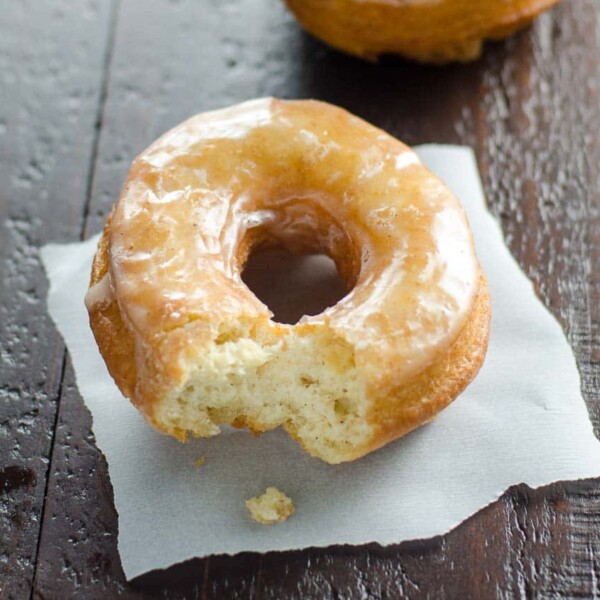 Freshly glazed old fashioned buttermilk donuts, crispy on the outside and fluffy on the inside
Image source: umamigirl.com
Freshly glazed old fashioned buttermilk donuts, crispy on the outside and fluffy on the inside
Image source: umamigirl.com
Why This Recipe Delivers Authentic Diner-Style Flavor
Old fashioned buttermilk donuts are a distinct category of fried dough, separate from airy yeast donuts and dense, sweet standard cake donuts. The tang from buttermilk cuts through the sweetness for a more complex, balanced flavor, while the combination of baking powder and baking soda creates a light, fluffy crumb that doesn’t feel heavy or greasy. This recipe uses full-fat buttermilk for the richest possible flavor, and includes specific guidance for temperature, timing, and dough handling to replicate that classic diner taste you remember from childhood. For more on this, see our guide on old fashioned chocolate icing recipe.
Ingredients You’ll Need
Using the right ingredients, and measuring them correctly, is the foundation of perfect donuts. Below is a breakdown of each component, with notes on how to choose the best options for your batch.
Dry Ingredients
- All-purpose flour: Provides structure for the donut’s fluffy crumb. Use spooned-and-leveled flour (scoop flour with a spoon into your measuring cup, then level off with a knife) to avoid packing in excess flour, which will make your donuts dense and heavy.
- Baking powder: A double-acting leavening agent that gives the donuts their rise and light, airy texture. Make sure yours is fresh — open the container and smell it; if it has a metallic or stale scent, replace it, as old baking powder loses its potency after 6-12 months.
- Baking soda: Reacts with the acidity in buttermilk to create extra lift and a tender crumb. It also balances the tang of the buttermilk and prevents any metallic aftertaste in the finished donuts.
- Granulated sugar: Adds sweetness and promotes even, golden browning during frying. Don’t reduce the sugar too much, as it also helps lock in moisture for a soft crumb.
- Fine sea salt: Enhances all the other flavors in the donut and balances the sweetness of the glaze. Avoid using coarse kosher salt, as it can create salty pockets in the dough.
Wet Ingredients
- Full-fat buttermilk: The star of the recipe! Full-fat buttermilk adds a rich, tangy flavor and an ultra-tender crumb. Low-fat buttermilk works in a pinch, but it will produce slightly drier, less flavorful donuts.
- Large eggs: Use room-temperature eggs for best results, as cold eggs can cause melted butter to solidify and create lumpy dough. Eggs bind the dough together and add richness to the crumb.
- Unsalted butter, melted and slightly cooled: Adds moisture and deep, buttery flavor. Using unsalted butter lets you control the overall salt content of the recipe, so you don’t end up with overly salty donuts.
- Pure vanilla extract: Adds a warm, sweet aroma that cuts through the tang of the buttermilk. Avoid imitation vanilla, which has a harsh, artificial flavor.
Optional Flavor Additions
- Warm spices like nutmeg, cinnamon, or ground cardamom for spiced donuts
- Lemon or orange zest for a bright, citrusy twist
- Cocoa powder (replace 2 tablespoons of flour) for chocolate donuts
- Freeze-dried fruit powder for a subtle fruity flavor
If you don’t have buttermilk on hand, you can make a quick substitute by mixing 1 cup of regular milk with 1 tablespoon of white vinegar or lemon juice and letting it sit for 5 minutes to curdle — the University of Minnesota Extension’s buttermilk substitution guide confirms this mimics the acidity and texture of real buttermilk for baking.
Step-by-Step Instructions
Follow these steps exactly for perfect, consistent donuts every time.
Prep Your Workspace and Ingredients
Start by wiping down your countertops with a reliable kitchen cleaning brush with handle to clear away any crumbs or butter residue that could make the dough stick. Measure out all your ingredients ahead of time, and set up your frying station before you start mixing the dough: pour 2-3 inches of neutral frying oil into a heavy-bottomed pot or deep fryer, and set a candy thermometer on the side to monitor temperature.
Mix the Dough
In a large mixing bowl, whisk together all dry ingredients until fully combined and no lumps remain. In a separate medium bowl, whisk the wet ingredients until smooth. Pour the wet mixture into the dry ingredients, and stir gently with a rubber spatula or wooden spoon just until no dry flour remains — this is critical, as overmixing will develop excess gluten and lead to tough, chewy donuts instead of light, fluffy ones. A few small lumps in the dough are totally fine.
Cover the bowl with a clean kitchen towel or plastic wrap, and let the dough rest at room temperature for 30 minutes. This rest period relaxes the gluten in the flour, making the dough easier to roll out without shrinking, and gives the leavening agents time to start working for a lighter crumb. Skipping this step is one of the most common causes of dense, tough donuts, so don’t be tempted to skip it!
Roll and Cut Donut Shapes
Lightly flour a clean countertop or pastry mat, and turn the rested dough out onto it. Gently pat the dough into a ½-inch thick rectangle — don’t use a rolling pin if you can avoid it, as pressing too hard can compress the dough and make the donuts dense. Use a floured 3-inch donut cutter to cut out donut shapes, dipping the cutter in flour between cuts to prevent sticking. Gather the dough scraps, gently pat them back into a ½-inch thick rectangle, and cut out more donuts — avoid re-rolling the scraps more than twice, as overworking the scraps will make them tough. If you don’t have a donut cutter, use a 3-inch round cookie cutter for the outer shape, and a 1-inch round cutter for the center hole.
Fry to Perfection
Heat the oil to 350°F (177°C) — use a candy thermometer for accuracy, as guessing the temperature is the #1 cause of greasy or burnt donuts. Maintaining a steady oil temperature is critical not just for texture, but for food safety: the USDA deep frying safety guidelines recommend keeping frying oil between 350°F and 375°F to prevent undercooked donuts and reduce the risk of bacterial growth.
Working in small batches of 2-3 donuts (don’t overcrowd the pot, as this drops the oil temperature and leads to greasy, undercooked donuts), carefully lower the donuts into the oil using a slotted spoon. Fry for 2 minutes, then flip and fry for another 1.5-2 minutes, until the donuts are puffed, golden brown, and float to the top of the oil. Use the slotted spoon to transfer the donuts to a wire rack set over a baking sheet to drain — don’t use paper towels, as they will make the bottom of the donuts soggy.
 Un glazed donuts cooling on a wire rack to prevent sogginess before glazing
Image source: www.wellmadebykiley.com
Un glazed donuts cooling on a wire rack to prevent sogginess before glazing
Image source: www.wellmadebykiley.com
Classic Buttermilk Glaze & Topping Ideas
The tangy, sweet buttermilk glaze is the perfect finishing touch for these donuts, adding a glossy, shiny coating that enhances their flavor without overpowering them.
Glaze Ingredients
- 1 cup powdered sugar, sifted
- 2 tablespoons full-fat buttermilk
- 1 teaspoon pure vanilla extract
- Pinch of fine sea salt
How to Apply the Glaze
Let the fried donuts cool for 5-10 minutes, until they are warm to the touch but not hot. Whisk the glaze ingredients together until completely smooth — if the glaze is too thick, add another teaspoon of buttermilk at a time; if it’s too thin, add a little more powdered sugar. Dip the top of each donut into the glaze, lift it out, and let the excess glaze drip back into the bowl before placing it back on the wire rack. Let the glaze set for 10-15 minutes before serving.
Alternative Toppings
If you want to switch up the flavor, try these crowd-pleasing toppings instead of (or in addition to) the classic glaze:
- Cinnamon sugar (toss warm donuts in a mix of ¼ cup sugar and 1 teaspoon cinnamon)
- Melted chocolate or chocolate glaze drizzle
- Toasted coconut or chopped nuts for extra crunch
- Crumbled bacon for a sweet-savory twist
- Rainbow sprinkles for a fun, festive look
 Finished donuts tossed in cinnamon sugar for a warm, spiced variation
Image source: lmld.org
Finished donuts tossed in cinnamon sugar for a warm, spiced variation
Image source: lmld.org
Serving, Storage, and Pairing Tips
These donuts are best served warm, within 2 hours of frying, for the perfect balance of crispy exterior and fluffy interior. They pair beautifully with hot coffee, cold milk, or chai tea — for a more indulgent brunch spread, serve them alongside a custom charcuterie board; our guide on pro cheese cutting tips will help you arrange the perfect selection of cheeses, cured meats, and crackers to balance the sweet, tangy donuts.
Once you’re done frying, scrub your pot or deep fryer with a heavy-duty scrubbing tool to cut through stuck-on oil and batter without scratching the surface.
To store leftovers: place cooled donuts in an airtight container at room temperature for up to 2 days. Don’t refrigerate them, as this will make the exterior soggy and the crumb stale. For longer storage, freeze unglazed donuts in a sealed freezer bag for up to 3 months; thaw at room temperature for 1 hour, then glaze and serve. Keep powdered sugar, sprinkles, and other toppings stored out of reach of little ones with childproofing hardware on low cabinet drawers for peace of mind.
Troubleshooting Common Donut-Making Issues
Even experienced bakers run into issues from time to time. Use this quick reference table to diagnose and fix common problems:
| Common Issue | Likely Cause | Quick Fix |
|---|---|---|
| Dense, heavy donuts | Overmixed dough, old leavening, too much flour added | Mix only until combined, use fresh baking powder/soda, add flour 1 tbsp at a time |
| Greasy, oily donuts | Oil temp too low, overcrowded fryer | Use a candy thermometer to maintain 350°F, fry in small batches of 2-3 donuts |
| Uneven browning | Fluctuating oil temp, not flipping halfway | Stir oil occasionally, flip donuts once during frying |
| Raw or undercooked center | Oil temp too high, donuts too thick | Lower oil to 325°F, roll dough to exactly ½ inch thickness |
| Donuts shrinking after frying | Overmixed dough, oil temp too high | Don’t overmix the dough, maintain steady 350°F oil temp |
| Glaze won’t set | Donuts are too hot when glazing | Let donuts cool for 5 more minutes before dipping |
Frequently Asked Questions
What makes buttermilk donuts different from regular cake donuts?
Buttermilk adds a subtle tang and ultra-tender crumb, and the combination of baking powder and baking soda gives them a lighter, fluffier texture than standard cake donuts, which use only baking powder and no acidic ingredient.
Can I substitute regular milk for buttermilk?
Yes, mix 1 cup of regular milk with 1 tablespoon of white vinegar or lemon juice, let sit for 5 minutes to curdle. This mimics the acidity and texture of buttermilk, per the University of Minnesota Extension’s buttermilk substitution guide. For a richer flavor, use plain Greek yogurt thinned with a little milk as a substitute.
How do I achieve the perfect donut texture?
The key is not overmixing the dough, letting it rest for 30 minutes, and maintaining a steady oil temperature of 350°F. Don’t roll the dough too thin (stick to ½ inch) and don’t re-roll scraps more than twice to avoid tough donuts.
What oil is best for frying buttermilk donuts?
Use a neutral oil with a high smoke point, like canola, vegetable, or peanut oil. Avoid olive oil or butter, as they have low smoke points and will burn at frying temperatures, adding a bitter flavor.
Can I bake these donuts instead of frying them?
Yes, for a lower-fat option. Preheat your oven to 375°F, line a baking sheet with parchment paper, and bake the donuts for 8-10 minutes until golden and a toothpick inserted into the center comes out clean. Note that baked donuts will have a softer, cake-like texture and lack the classic crispy exterior of fried old fashioned donuts.
Can I make the donut dough ahead of time?
Yes! Mix the dough up to 24 hours in advance, store it covered in the refrigerator, and let it come to room temperature for 30 minutes before rolling and frying. This is a great time-saver for brunch or gatherings.
Can I use whole wheat flour for these donuts?
You can substitute up to 25% of the all-purpose flour with whole wheat flour for a nuttier, heartier flavor, but note that the donuts will be denser and less fluffy than the classic version.
Final Thoughts
These old fashioned buttermilk donuts are the perfect blend of nostalgic diner flavor and homemade comfort, with a crispy golden exterior, fluffy tangy crumb, and just the right amount of sweetness. By following these simple tips — using fresh ingredients, not overmixing the dough, resting it properly, and maintaining a steady frying temperature — you’ll avoid the most common donut-making pitfalls and end up with perfect, craveable treats every time.
Ready to bring a taste of classic American bakery fare to your kitchen? Whip up a batch this weekend for a special brunch, a weeknight treat, or a gift for a friend. If you try this recipe, share your photos and results in the comments below — we’d love to see how your homemade donuts turned out! For a personal touch, serve your donuts on a custom engraved serving board to make your presentation extra special.

I’m Abby Lu, a passionate home cook who loves simplifying everyday meals. At PlugChef.com, I share product reviews and cooking guides to help you find the best tools for your kitchen.
Related posts:
 3 Shelf Hanging Closet Organizer: Maximize Your Space
 Do It Yourself Pantry Organizers: Transform Your Space
 How to Organize a Pantry With Wire Shelves: Expert Tips
 How to Organize Snacks in Pantry: Smart Tips
 Small Walk in Pantry Organization Ideas: Transform Spaces
 Under Cabinet Pot And Pan Organizer: Maximize Your Space

