
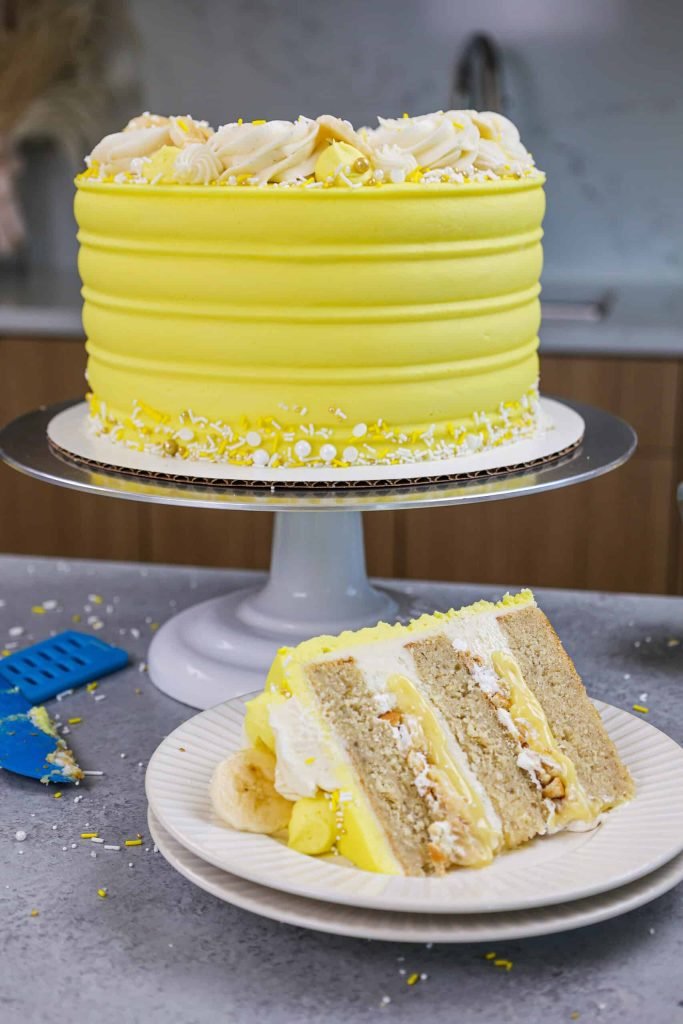
If you love the nostalgic, creamy flavor of classic Southern banana pudding but want a more substantial, celebratory dessert, this banana pudding layer cake is your new go-to. It layers fluffy, tender vanilla cake, silky banana pudding, and tangy cream cheese frosting for a treat that’s equal parts comforting and impressive — no fancy baking skills or special equipment required. Perfect for potlucks, birthday parties, weeknight family dinners, or even a casual weekend bake, this recipe delivers consistent, delicious results every time, and it’s easy enough for beginner bakers to pull off without stress.
Why This Banana Pudding Layer Cake Works Every Time
Many banana pudding layer cakes fail due to common pitfalls: soggy cake layers from excess moisture, runny pudding that seeps out between slices, or bland, dry cake that can’t stand up to the rich filling. This recipe is designed to avoid all of those issues. The cake layers are sturdy enough to hold the pudding and frosting without getting soggy, the pudding is lightened with whipped cream for a fluffy, not dense, texture, and the tangy cream cheese frosting balances the sweetness of the bananas and cake perfectly. We use a mix of straightforward, easy-to-find ingredients and clear, step-by-step instructions to cut down on prep time without sacrificing flavor, so you get a restaurant-quality dessert in under 2 hours of active work.
Ingredients for 3 (8-inch) Cake Layers
Accurate measurements and quality ingredients make all the difference in this recipe. We’ve tested this formula extensively to ensure consistent results, with clear notes on swaps and pro tips for each component.
Cake Layer Ingredients
- 2 ½ cups (315g) all-purpose flour (swap for cake flour for an extra tender, fine crumb)
- 2 ½ tsp baking powder
- 1 tsp fine sea salt
- 1 cup (2 sticks / 225g) unsalted butter, softened to room temperature
- 2 cups (400g) granulated sugar
- 4 large eggs, room temperature
- 1 ½ cups (345g) mashed ripe bananas (about 3 medium spotty bananas)
- 1 cup (240ml) whole milk, room temperature
- 2 tsp pure vanilla extract
Pro tip: Room temperature ingredients mix together more evenly, eliminating lumps in your batter and ensuring a smooth, uniform crumb. If you forget to take your butter and eggs out ahead of time, you can gently warm eggs in a bowl of lukewarm water for 5 minutes, and microwave butter in 5-second bursts until just softened.
Pudding Filling Ingredients
- 2 packages (3.4 oz / 96g each) instant vanilla pudding mix
- 3 cups (720ml) cold whole milk
- 1 cup (240ml) heavy whipping cream, cold
- ¼ cup (30g) powdered sugar
- 1 tsp pure vanilla extract
Pro tip: We use instant pudding mix for convenience, but lighten it with freshly whipped heavy cream for a fluffier, less dense texture that doesn’t weigh down the cake layers. If you prefer a more traditional, dense pudding, you can skip the whipped cream and use 4 cups of milk instead of 3.
Cream Cheese Frosting Ingredients
- 16 oz (450g) full-fat cream cheese, softened to room temperature
- 1 cup (2 sticks / 225g) unsalted butter, softened to room temperature
- 4 cups (480g) powdered sugar, sifted
- 2 tsp pure vanilla extract
- ¼ tsp fine sea salt
Pro tip: Full-fat dairy is non-negotiable here — low-fat cream cheese or milk will make your frosting runny and unable to hold the layers together. If your frosting is too soft to spread, chill it in the fridge for 15 minutes while you prep your cake layers.
Banana Selection Tips
The flavor and texture of your cake depend almost entirely on the ripeness of your bananas. Opt for bananas with yellow peels dotted with small brown spots — these have fully converted their starch to natural sugars, per USDA guidance on produce ripeness, making them far sweeter and easier to mash without adding extra refined sugar to your batter. Avoid overripe bananas with black, leaking peels, as their excess liquid will make your cake layers soggy. If you only have access to underripe bananas, you can ripen them quickly by placing them in a paper bag with an apple overnight at room temperature.
Step-by-Step Baking & Assembly Instructions
Follow these steps in order for perfect, consistent results every time. We’ve included pro tips at each stage to help you avoid common mistakes.
Prep Work & Pan Prep
Start by preheating your oven to 350°F (175°C) and greasing three 8-inch round cake pans with butter or nonstick spray. Line the bottoms of each pan with a round of parchment paper, then grease the parchment as well — this ensures the layers release cleanly without sticking. A small handled brush makes it easy to spread butter evenly into every corner of the pan without making a mess. If you don’t have parchment paper, you can dust the greased pans with a thin layer of flour, tapping out any excess.
Mixing the Cake Batter
In a medium bowl, whisk together the flour, baking powder, and salt until fully combined, then set aside. In a large bowl (or the bowl of a stand mixer), beat the softened butter and granulated sugar on medium speed for 2-3 minutes, until light, fluffy, and pale yellow. Add the eggs one at a time, beating well after each addition to avoid curdling, then mix in the mashed bananas and vanilla extract until fully incorporated. Add the dry ingredients to the wet ingredients in three additions, alternating with the milk, mixing on low speed just until no dry flour remains. Do not overmix the batter — this will develop gluten in the flour, leading to a tough, dense cake crumb.
Baking & Cooling the Layers
Divide the batter evenly between the three prepared pans, smoothing the tops with a spatula. Bake for 25-30 minutes, until a toothpick inserted into the center of each layer comes out with just a few moist crumbs (no wet batter). Rotate the pans halfway through baking if your oven heats unevenly. Let the layers cool in their pans for 10 minutes, then run a thin offset spatula around the edges of each pan to release the layers, and transfer them to a wire rack to cool completely. For extra stability when assembling, wrap the cooled layers in plastic wrap and chill them in the fridge for 1 hour before building the cake.
Making the Silky Pudding Filling
In a large bowl, whisk together the instant vanilla pudding mix and cold milk for 2 minutes, until completely smooth. Let the mixture sit for 5 minutes to thicken fully — this step ensures the pudding doesn’t turn runny when you add the whipped cream. In a separate chilled bowl, whip the cold heavy cream, powdered sugar, and vanilla extract on medium-high speed for 2-3 minutes, until soft peaks form. Gently fold the whipped cream into the thickened pudding with a rubber spatula, turning the bowl occasionally to incorporate all the cream without deflating it. Chill the pudding mixture for at least 30 minutes before assembling to help it set.
Whipping the Tangy Cream Cheese Frosting
In a large bowl (or the bowl of a stand mixer), beat the softened cream cheese and butter on medium speed for 2-3 minutes, until completely smooth and free of lumps. Add the sifted powdered sugar one cup at a time, mixing on low speed to avoid a cloud of sugar dust, then add the vanilla extract and salt. Beat on medium-high speed for 2 more minutes, until the frosting is light, fluffy, and holds stiff peaks. If your kitchen is warm and the frosting is too soft to spread, chill it for 15 minutes while you prep your assembly station.
Assembling the Layer Cake
Place your first chilled cake layer on your serving plate or cake stand. Spread a thin, even layer of frosting over the top of the cake — this is called a crumb coat, and it traps loose cake crumbs so they don’t end up in your final frosting layer. Chill the cake with the crumb coat for 15 minutes to set. Spread half of the chilled pudding filling over the crumb coat in an even layer, then arrange a single layer of banana slices (pat them dry with a paper towel first to remove excess moisture) over the pudding, covering the entire surface. Add your second cake layer, repeat the pudding and banana layer, then top with the final cake layer. Spread the remaining frosting over the top and sides of the cake, smoothing it with an offset spatula for a clean finish.
Decorative Ideas for Any Occasion
This cake looks beautiful with minimal effort, but you can customize the garnish to fit any event:
- Casual potlucks: Top with a generous layer of crushed vanilla wafers and a few fresh banana slices for a classic, no-fuss look. A heavy-duty scrub brush makes quick work of washing off any dried pudding or frosting from countertops and utensils after you finish decorating.
- Celebrations: Pipe rosettes or swirls of leftover frosting around the top edge of the cake, and sprinkle with toasted pecans or a light dusting of cinnamon for extra flavor.
- Individual servings: Use 4-inch cake pans to make mini 2-layer cakes, or layer cake, pudding, and bananas in small mason jars for a portable, picnic-friendly dessert.
Serving, Storage & Make-Ahead Tips
Perfect Serves Every Time
For clean, neat slices, use a sharp serrated knife and run it under hot water, wiping it dry between each cut. This prevents the creamy layers from smudging and keeps your slices looking polished. Serve immediately for a softer, more pudding-forward texture, or chill the assembled cake for 2 hours first for firmer slices that hold their shape when plated. This cake pairs beautifully with strong black coffee, iced tea, or a glass of cold milk to balance its sweetness.
Storage Guidelines
For food safety, always refrigerate the assembled cake within 2 hours of finishing frosting, following FDA recommendations for perishable baked goods. Store the cake in an airtight container in the fridge for up to 4 days for optimal freshness. The banana slices on top may brown slightly after 2 days — you can easily add fresh banana slices and a sprinkle of crushed wafers before serving to refresh the look. Do not leave the cake at room temperature for more than 2 hours, as the cream cheese frosting and fresh bananas will spoil quickly.
Make-Ahead Hacks
To cut down on day-of prep, you can bake the cake layers up to 3 days ahead: wrap them tightly in plastic wrap and freeze, then thaw at room temperature for 1 hour before assembling. The full assembled cake (without fresh banana garnish) can be made up to 1 day ahead: refrigerate it covered, and add fresh banana slices and wafer crumbs just before serving. Individual slices also freeze well for up to 2 months — wrap them tightly in plastic wrap and aluminum foil, thaw in the fridge overnight before serving. If you’re prepping other treats for a family gathering, you may want to install childproof cabinet locks on your baking supply cabinets to keep little hands away from raw ingredients and sharp tools.
Troubleshooting Common Issues
Even experienced bakers run into small issues with this recipe — here’s how to fix them:
Soggy Cake Layers
Soggy layers are almost always caused by excess moisture from overripe bananas, unchilled pudding, or adding filling to warm cake. To fix it: pat banana slices dry with a paper towel before adding them to the cake, chill the pudding for at least 30 minutes before assembling, and always wait until cake layers are completely cool to the touch before building the cake.
Runny or Grainy Pudding
Runny pudding usually means the mix wasn’t given enough time to thicken before adding whipped cream, while grainy pudding is a sign of overmixing. Fix it by letting the instant pudding sit for 5 minutes after whisking, and fold the whipped cream in gently with a spatula instead of stirring vigorously.
Soft or Sliding Frosting
If your frosting is too soft to hold its shape or slides off the sides of the cake, it’s likely too warm or you didn’t use full-fat dairy. Chill the frosting for 15 minutes before using, and always use full-fat cream cheese and butter for the most stable results. For easy cleanup of mixing bowls, piping bags, and crumb-covered countertops after decorating, a soap-dispensing scrub brush cuts through sugary residue in seconds.
Dense, Tough Cake Layers
Dense cake is almost always caused by overmixing the batter, an underheated oven, or opening the oven door too early during baking. Mix your batter just until no dry flour remains, preheat your oven fully before baking, and avoid opening the door for the first 25 minutes of the bake time to prevent the layers from sinking.
Delicious Variations to Try
Once you’ve mastered the base recipe, try these easy twists to switch up the flavor:
- Chocolate banana pudding cake: Swap the vanilla cake layers for chocolate cake, add 1 cup of mini chocolate chips between the pudding and banana layers, and drizzle melted dark chocolate over the top before serving.
- Southern vanilla wafer twist: Add a layer of crushed vanilla wafers between the cake and pudding layers for extra crunch, just like classic Southern banana pudding.
- Vegan and dairy-free version: Swap eggs for flax eggs (1 tbsp ground flaxseed mixed with 3 tbsp water per egg), use plant-based milk and vegan butter for the cake, and coconut cream for the pudding and frosting. Use a 1:1 gluten-free flour blend if needed for gluten-free diners.
- Mini individual cakes: Use 4-inch cake pans for 2-layer mini cakes, or layer the components in small mason jars for individual, picnic-friendly servings.
Frequently Asked Questions
Can I use store-bought cake layers instead of homemade?
Absolutely! Use a high-quality boxed vanilla cake mix prepared according to package instructions, or plain vanilla layers from a local bakery to cut down on prep time by half.
Why does my banana pudding layer cake get soggy after a day?
Excess moisture from bananas or underchilled pudding is almost always the culprit. Pat banana slices dry before adding them to the cake, chill the pudding for at least 30 minutes before assembling, and store the cake in an airtight container in the fridge.
Can I use fresh bananas instead of instant pudding mix?
Yes! You can make homemade vanilla pudding from scratch if you prefer — just make sure it’s fully chilled and thickened before assembling, as homemade pudding is often thinner than instant mix.
Is this cake freezer-friendly?
Yes! Assembled, un-garnished cake freezes well for up to 2 months. Wrap tightly in plastic wrap and aluminum foil, thaw in the fridge overnight before adding fresh banana slices and wafer garnish. Individual slices also freeze well for up to 1 month.
Can I make this cake without cream cheese frosting?
Of course! Use stabilized whipped cream or a classic vanilla buttercream if you prefer a lighter, less tangy frosting. Just make sure to chill the assembled cake for at least 1 hour before serving to keep the layers from sliding.
Final Thoughts
This banana pudding layer cake hits all the right notes: it’s creamy, sweet, easy to make, and customizable to fit any taste or occasion. The combination of fluffy cake, rich pudding, and tangy frosting is guaranteed to be a hit with kids and adults alike, and the straightforward steps mean you don’t need to be a professional baker to pull it off. Ready to bake? Grab your ingredients, preheat your oven, and whip up this showstopping dessert today — it’s guaranteed to become a new family favorite. If you want to elevate your next baking project, you can even engrave a custom wooden serving board using our guide on cutting board customization for a personalized touch to serve your cake on.

I’m Abby Lu, a passionate home cook who loves simplifying everyday meals. At PlugChef.com, I share product reviews and cooking guides to help you find the best tools for your kitchen.
Related posts:
 How to Make a Fruit Basket for a Gift: Easy DIY Guide
 Do You Need a Basket? Essential Guide for Air Fryers
 How to Adjust Syrup Dispenser Pressure: Expert Tips
 Appliance Play Food Kitchen Toys: Ignite Imaginative Play
 How Long Do Beauty Blenders Last: Expert Tips Unveiled
 Philips Kitchen Appliances Compact Pasta And Noodle Maker: Effortless Homemade Pasta

