
Are you planning a home renovation or a DIY project using Hardie Board? If so, you’re probably wondering about the best way to cut this durable and versatile siding material.
You might have heard about its toughness and durability, which makes it such a popular choice for homeowners. But let’s face it, cutting Hardie Board can seem intimidating at first. You might be worried about the dust, the precision, or even damaging the board itself.
Don’t worry! In this guide, you’ll discover how to cut Hardie Board easily and effectively, ensuring that your project turns out just the way you envision. Whether you’re a seasoned DIYer or a novice, the right techniques and tools can make all the difference. Dive into this article to unlock the secrets to cutting Hardie Board like a pro, and save time and effort while achieving flawless results.
Choosing The Right Tools
Choosing the right tools is crucial for cutting Hardie Board effectively. Circular saws equipped with carbide-tipped blades offer precision and efficiency. Dust-reducing tools are essential to maintain a safe working environment.
Choosing the right tools for cutting Hardie Board is crucial. Each tool offers distinct advantages. Selecting correctly ensures smooth edges and accurate cuts. Let’s explore three popular tools.Circular Saw
A circular saw is a powerful choice for Hardie Board. It delivers clean, straight cuts. Use a carbide-tipped blade for best results. This minimizes dust and extends blade life. Ensure the saw is set to the correct depth. Always wear protective gear to safeguard against dust.Jigsaw
A jigsaw is perfect for cutting curves. It offers precision in intricate designs. Choose a blade designed for fiber cement. This prevents chipping and ensures smooth cuts. Adjust the speed for control and accuracy. Always support the board to avoid breakage.Score And Snap Tools
Score and snap tools are ideal for small projects. They offer simplicity and ease of use. Score the board with a specialized scoring tool. Apply even pressure along the line. Snap the board along the scored line. This method reduces dust and noise.Safety Measures
Cutting Hardie Board requires attention to safety. This ensures a safe working environment. Proper safety measures protect you from hazards. It’s important to be prepared before starting. Let’s discuss the essential safety measures.
Protective Gear
Wear protective gear at all times. A dust mask is crucial. It prevents inhaling fine particles. Safety goggles protect your eyes from dust. Gloves shield your hands from sharp edges. Ear protection is also important. Cutting can be loud and harmful to hearing.
Dust Control
Dust control is vital for your health. Use a cutting tool with a dust collection feature. This reduces airborne particles. Wet cutting methods can also help. They minimize dust by dampening the material. Ensure good ventilation in your workspace. Open windows or use fans to improve air circulation.
Preparation Steps
First, gather all necessary tools for cutting Hardie Board, including a saw and protective gear. Measure the board carefully to ensure precise cuts. Mark the cutting lines clearly for accuracy.
When you’re ready to cut Hardie Board, preparation is your best friend. Rushing into the task without planning can lead to mistakes and wasted materials. By taking a few simple preparation steps, you can ensure that the cutting process goes smoothly and efficiently. Let’s explore the essential preparation steps that will set you up for success.Measuring And Marking
Accurate measurements are crucial. Before you even think about picking up a saw, grab a tape measure and a pencil. Measure the space where the Hardie Board will be installed, double-checking each measurement to avoid costly errors. Once you have the dimensions, transfer them onto the board. Use a straight edge to ensure your lines are perfectly straight. Have you ever tried cutting something without proper marks and ended up with a crooked line? It’s frustrating, so take your time here.Setting Up The Work Area
Your work area should be clear and organized. Find a spacious place with plenty of light where you can spread out the Hardie Board. This might mean moving some furniture around or heading to the garage for a bit more space. Consider your cutting surface as well. You don’t want to damage your floors or the board itself, so use a sturdy table or sawhorses. Laying down a drop cloth can catch dust and debris, making cleanup easier. Think about the tools you’ll need. Make sure your saw is plugged in and the blade is suitable for cutting fiber cement. Having everything in place means you won’t have to stop midway to search for a tool. Isn’t it satisfying when everything you need is right at your fingertips? Preparation is not just about measuring and setting up. It’s about creating a seamless process where each step flows into the next. Are you ready to make that perfect cut?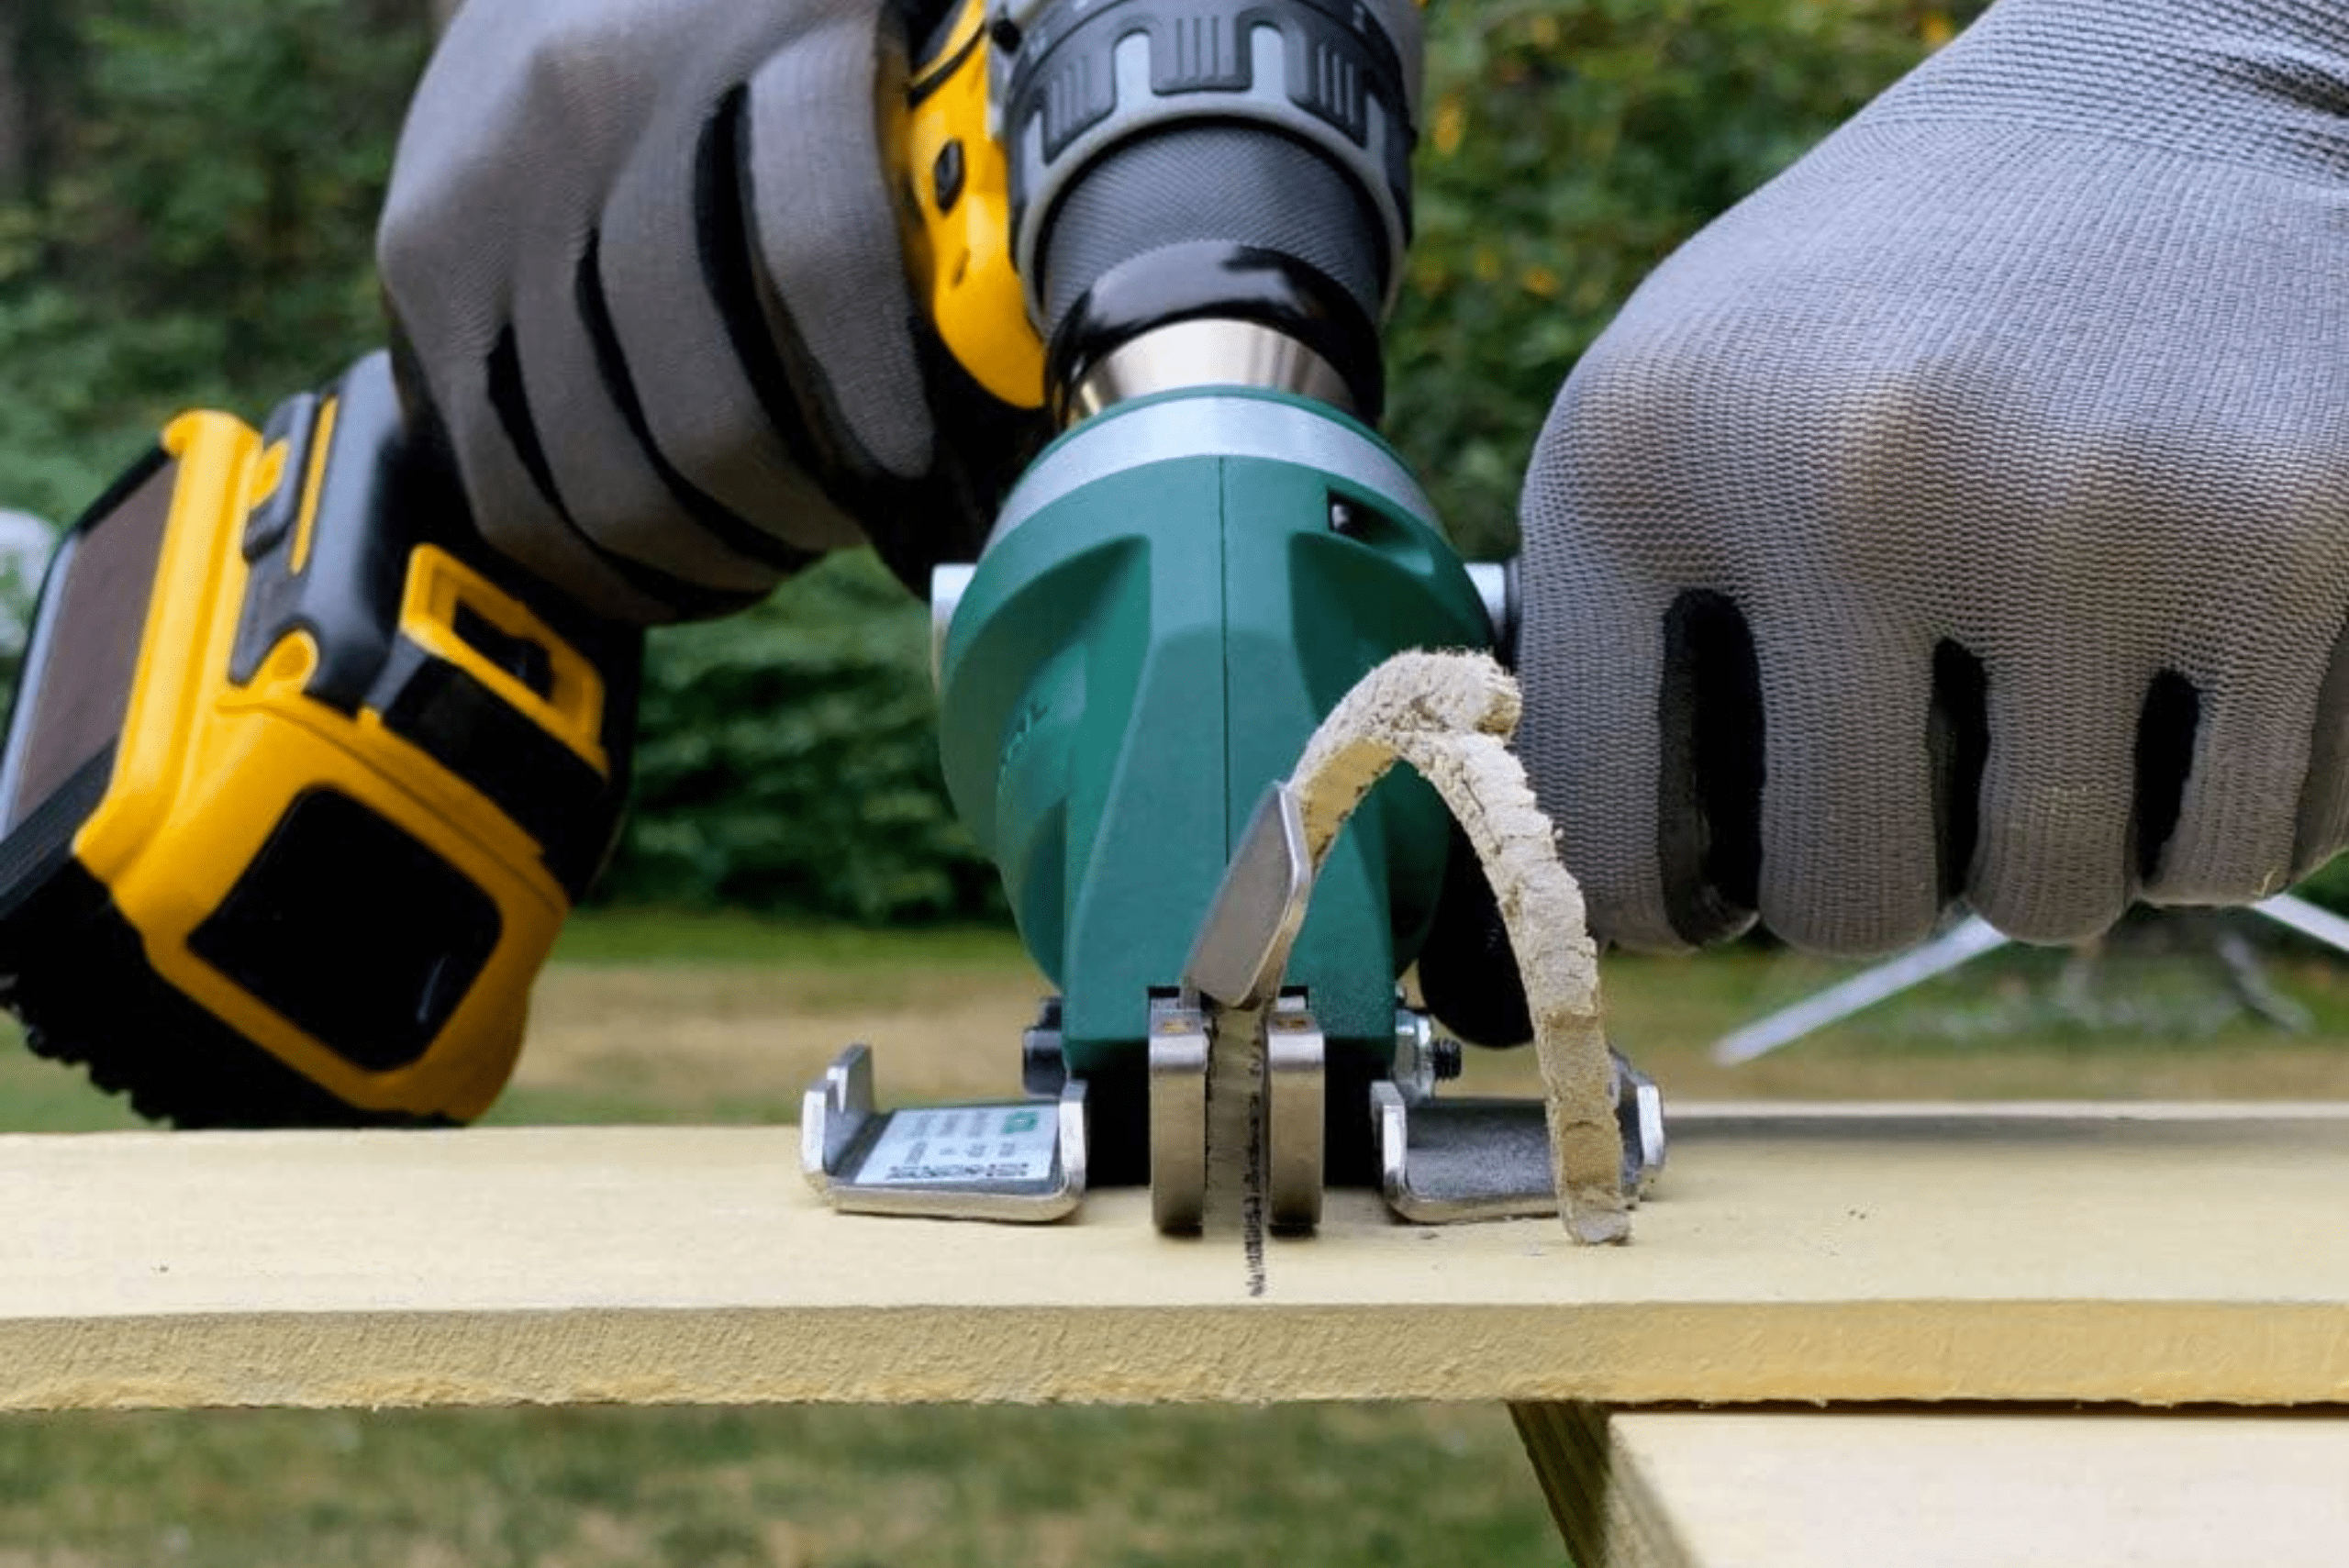
Credit: www.manmadediy.com
Cutting Techniques
Cutting Hardie Board requires precision tools like carbide-tipped scoring knives or circular saws with a diamond blade. Always wear safety gear to protect yourself from dust. Ensure clean cuts by measuring twice and cutting once for best results.
Cutting Hardie Board, a durable and versatile fiber cement siding, requires precision and care. Whether you’re a DIY enthusiast or a seasoned contractor, understanding the right cutting techniques can save time and effort. With a few tips and tricks, you can achieve clean, professional-looking cuts that enhance your project’s appearance. Let’s dive into some essential cutting techniques to help you handle Hardie Board like a pro.Straight Cuts
Creating straight cuts on Hardie Board is straightforward with the right tools. A circular saw equipped with a carbide-tipped blade is ideal for this task. Ensure the board is supported on both sides to prevent breakage. When cutting, mark your line clearly with a pencil. Then, slowly guide the saw along the line, maintaining steady pressure. Wear a dust mask and safety glasses, as cutting fiber cement generates dust. Have you ever felt frustrated by jagged edges? A simple solution is to use a sanding block to smooth out any roughness after cutting. This small step can make a big difference in the final look of your project.Curved And Angled Cuts
Curved and angled cuts can seem intimidating, but with the right approach, they become manageable. A jigsaw fitted with a carbide-grit blade offers flexibility for these cuts. Start by drawing your curve or angle directly on the board. Then, make relief cuts—small straight cuts perpendicular to your line. These help guide the jigsaw and reduce the risk of cracking. Have you tried using a template for complex shapes? Tracing a template onto the board ensures precision and saves time. Plus, it adds a level of confidence when making intricate cuts. Do you find yourself struggling with accuracy on curved cuts? Practice on scrap pieces first. This not only improves your skill but also conserves your main material for the final project. Remember, patience and practice are key. By mastering these cutting techniques, you’ll be well on your way to achieving a flawless finish with Hardie Board. Whether it’s a straight cut or an intricate curve, each cut brings you closer to a job well done.Finishing Touches
Once you’ve made your cuts on the Hardie Board, the magic lies in the finishing touches. This stage ensures that your project not only stands the test of time but also looks polished and professional. It’s easy to overlook this step, but trust me, taking a few extra moments here can make all the difference.
Smoothing Edges
After cutting, the edges of the Hardie Board can be rough and uneven. Use a sanding block or fine-grit sandpaper to smooth them out. This simple act can prevent injuries from sharp edges and help the board fit seamlessly with adjoining pieces.
Imagine admiring your handiwork and knowing it’s as smooth as it is sturdy. Can you feel the pride swelling up? That’s what smoothing edges can do. It’s those small details that elevate your project from good to great.
Inspecting The Cut
Before you call it a day, inspect the cut closely. Check for any jagged edges or irregularities. Does the board fit snugly where you intended it to?
Sometimes, even the best tools leave small imperfections. Shine a flashlight on your cut line to spot any hidden flaws. Addressing these now saves you from headaches down the road.
Did you catch anything that needs a quick fix? It’s better to spot and rectify issues now than to regret them later. Remember, your eyes are your best tools in ensuring precision.
As you wrap up your project, think about how these finishing touches contribute to its overall quality. Are you satisfied with what you see? Your attention to detail is the key to achieving a flawless finish.
Common Mistakes To Avoid
Cutting Hardie board requires precision. Avoid using dull blades, which can cause chipping. Ensure measurements are accurate to prevent wasted materials and uneven cuts. Proper safety gear, like masks and goggles, is essential to protect against dust and debris.
Cutting Hardie Board can be a daunting task, especially if you’re new to DIY projects. However, knowing what mistakes to avoid can make the process much smoother and safer. Let’s explore some common pitfalls that many people face and learn how you can steer clear of them.Overcutting
Overcutting is a frequent mistake that can lead to wasted materials and unsightly edges. It’s tempting to cut more than necessary, thinking it offers more flexibility for adjustments. However, this can weaken the board’s structure, leading to cracks and chips. Instead, measure twice and cut once. Use a pencil to mark your cuts precisely, and always err on the side of cutting less. You can always trim more later, but you can’t replace what’s already been removed. Have you ever had to run back to the hardware store because you cut too much? It’s a frustration you can easily avoid.Ignoring Safety
Safety should be your top priority when cutting Hardie Board. This material can produce hazardous dust that poses health risks if inhaled. Unfortunately, many DIY enthusiasts skip wearing protective gear, thinking a quick cut won’t do much harm. Always use a dust mask or respirator when cutting. Safety goggles and gloves are essential to protect your eyes and hands. Is the convenience of skipping safety equipment worth the potential health risks? Probably not. Make sure your workspace is well-ventilated, and consider using a circular saw with a vacuum attachment to minimize dust. Being mindful of these common mistakes can save you time, money, and stress. Next time you tackle a Hardie Board project, remember these tips, and you’ll likely find the process more straightforward and rewarding.Maintenance Of Tools
Proper maintenance ensures tools last longer and work efficiently. Use a carbide-tipped blade for cutting Hardie Board. Dust control is crucial during the process. Regular cleaning prevents debris buildup, ensuring smooth operation.
Maintaining your tools is crucial when cutting Hardie Board. Well-maintained tools not only ensure precision and safety but also extend their lifespan. Imagine you’re halfway through a project, and your tools start giving up—frustrating, right? Let’s dive into keeping your tools in tip-top shape.Cleaning Tools
After you finish cutting Hardie Board, take a moment to clean your tools. Dust and debris can clog up saws and blades, reducing their efficiency. Simply use a soft brush or a compressed air canister to sweep away the dust. Consider this: a quick five-minute clean-up can save you hours of trouble later. If you’ve ever found your saw struggling to cut smoothly, leftover residue might be the culprit. Regular cleaning prevents this and keeps your cuts precise.Sharpening Blades
Sharp blades are essential for smooth cuts. Dull blades not only slow you down but can also cause jagged edges. Use a sharpening stone or a dedicated tool sharpener to keep your blades in excellent condition. Have you noticed uneven cuts or excessive resistance while cutting? These are signs that your blade needs sharpening. Regular maintenance of blades ensures that your work is both efficient and professional. Neglecting blade sharpening can lead to costly replacements. So, make it a habit to check and sharpen your blades regularly. Remember, a sharp blade not only improves the quality of your work but also ensures your safety.
Credit: www.reddit.com

Credit: smart-toolgroup.com
Frequently Asked Questions
What Is The Best Thing To Cut Hardie Board With?
Use a circular saw with a carbide-tipped blade for cutting Hardie board. Ensure the blade is sharp and clean. A dust-reducing attachment helps minimize mess. For curved cuts, a jigsaw with a carbide blade works best. Always wear protective gear to safeguard against dust and debris.
What Is The Best Tool To Cut Cement Board With?
The best tool to cut cement board is a carbide-tipped scoring knife. It ensures clean cuts. For complex shapes, use a jigsaw with a carbide blade. Both tools provide precision and efficiency. Always wear safety gear while cutting to protect yourself from dust and debris.
Can You Cut Hardie Board With A Utility Knife?
Cutting Hardie board with a utility knife is not recommended. Use a specialized carbide-tipped scoring knife or a power saw. These tools ensure cleaner cuts and are more effective for Hardie board, which is dense and tough. Always wear safety gear when cutting fiber cement boards.
What’s The Easiest Way To Cut A Hardiebacker Board?
Use a carbide-tipped scoring knife for straight cuts on HardieBacker board. Score deeply and snap along the line. For curves, use a jigsaw with a carbide blade. Always wear safety goggles and a mask to avoid dust inhalation.
Conclusion
Cutting Hardie board can be easy with the right tools. Use a carbide-tipped blade for clean cuts. Safety comes first; wear protective gear always. Score and snap method works well for smaller projects. Power tools offer precision for larger tasks.
Practice your technique on scrap pieces. Measure twice to ensure accuracy. Follow guidelines to avoid mistakes. Proper disposal keeps your workspace tidy. With patience and practice, cutting Hardie board gets simpler. Remember, the right approach makes all the difference. Now you’re ready to tackle your next project confidently!

Hi, I’m Daniel Brooks—a food lover and kitchen gear enthusiast. I enjoy testing cookware, utensils, and gadgets to see what really works in everyday cooking. At PlugChef.com, I share honest reviews, comparisons, and simple guides to help you choose the best tools for a safer, smarter, and more enjoyable kitchen.
Related posts:
 What Type of Cooking Utensils are Safe: Expert Picks
 What Innovations Could Blenders Make: Unleashing Future Tech
 Smart Strategies to Organize a Small Kitchen: Maximize Space
 How to Organize a Kitchen Cabinet: Expert Tips & Tricks
 How to Organize Kitchen Drawers: Expert Tips and Tricks
 How to Organize a Corner Kitchen Cupboard: Expert Tips

