
Imagine the satisfaction of slicing and dicing on a cutting board you’ve crafted with your own hands. An end grain cutting board isn’t just any kitchen tool; it’s a masterpiece that combines functionality and artistry.
You might be wondering why you should choose an end grain board over other types. The answer lies in its unique ability to preserve your knife’s sharpness while showcasing the natural beauty of the wood. This article will guide you through each step of creating your own end grain cutting board, making it a rewarding project that adds a touch of elegance to your kitchen.
You’ll learn how to select the right materials, tools, and techniques to ensure your board is both durable and stunning. Dive in, and discover how this DIY adventure can transform not only your kitchen but also your crafting skills.
Credit: www.thenavagepatch.com
Materials And Tools
Creating an end grain cutting board is a rewarding project. It requires the right materials and tools. The choice of wood and tools is crucial for success. This section provides clear guidance on selecting suitable wood and tools.
Choosing The Right Wood
End grain cutting boards need durable wood. Hardwoods like maple, walnut, and cherry are ideal. They resist cuts and scratches well. Maple is popular for its hardness and fine grain. Walnut offers a rich, dark color. Cherry provides a warm tone and smooth finish. Ensure the wood is kiln-dried. Moisture can warp the board. Choose wood pieces with consistent grain patterns. This ensures a uniform look.
Essential Tools For The Project
Proper tools make the process easier. A table saw is vital for cutting wood pieces. Accurate cuts ensure a snug fit. A planer smooths the wood surface. It prepares the wood for gluing. A belt sander helps achieve a polished finish. Clamps are necessary to hold the wood during glue-up. A good square ensures precise angles. A wood glue designed for cutting boards is important. It must be food-safe and waterproof. A finish like mineral oil protects the board. It enhances the wood’s natural beauty.
Credit: aroundhomediy.com
Design And Planning
Crafting an end grain cutting board starts with thoughtful design and planning. Choose durable hardwoods like maple or walnut. Plan your pattern and measurements carefully to ensure a sturdy and attractive finish.
Designing and planning your end grain cutting board is where creativity meets functionality. This phase is crucial as it lays the groundwork for the board’s aesthetic and practical use. Whether you’re crafting a board for personal use or as a gift, investing time in design and planning ensures the final product is both beautiful and durable.Determining The Board Size
Choosing the right size for your cutting board is more than just a matter of preference. Think about the space where you’ll use it. A smaller board may be ideal for a compact kitchen, while a larger one offers more room for food prep. Consider what you’ll mostly use it for. If you’re slicing small fruits and vegetables, a smaller board might suffice. For larger meal preparations, a more substantial size is beneficial. Don’t forget storage. Where will you keep your board when not in use? Ensure it fits comfortably in your kitchen cabinets or on your countertop without crowding the space.Creating A Design Pattern
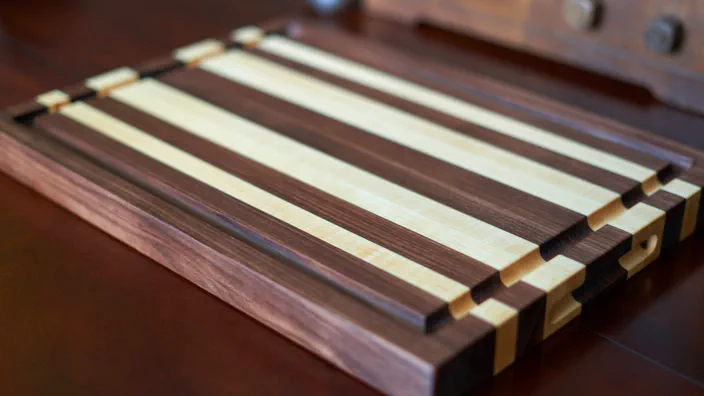
Design patterns give your cutting board a unique flair. You can start simple with basic geometric shapes or explore more intricate patterns for a sophisticated look. Mixing different wood types can enhance the visual appeal. Contrast light and dark woods for a striking appearance. Imagine the satisfaction of seeing your guests admire your handiwork when they spot the beautiful patterns on your board. Personalize your design. What colors and patterns resonate with you? Maybe you have a favorite wood type or color scheme that you’d love to incorporate. Let your imagination guide you while keeping practicality in mind. What design will make your cutting board a conversation starter in your kitchen? Let your creativity shine while ensuring the board remains functional for everyday use.Cutting The Wood
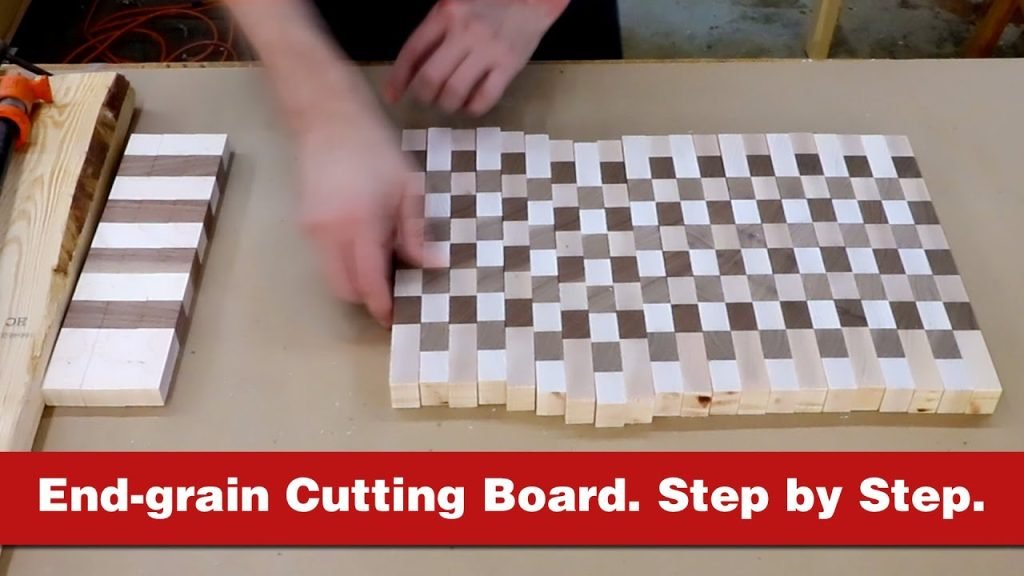
Crafting an end grain cutting board involves slicing wood into small blocks. Arrange these blocks with their grain facing up. Glue them together to create a strong and durable surface.
Crafting an end grain cutting board is a rewarding endeavor that combines skill and creativity. The journey begins with cutting the wood, a crucial step that sets the stage for the entire project. It’s a moment where precision meets patience, transforming raw materials into the potential for beauty and functionality. Whether you’re a seasoned woodworker or a beginner, the process is an opportunity to connect with the material and see the transformation unfold.Measuring And Marking
Accurate measurements are the backbone of any woodworking project. Grab your ruler and pencil and measure the dimensions of your cutting board carefully. Mark the wood clearly to avoid any guesswork when cutting. Consider the pattern you want for your board, as this will influence how you measure and cut each piece. A tip from personal experience: double-check your measurements. It’s easy to misread a ruler or forget a mark, which can lead to costly mistakes.Using A Table Saw Safely
A table saw is your best friend in cutting wood efficiently, but it demands respect. Safety should be your top priority. Ensure the blade is sharp and properly aligned. A dull or misaligned blade can cause accidents and ruin your wood. Keep your workspace tidy and free of clutter. Loose items can be hazardous when operating a saw. Use push sticks to keep your hands at a safe distance from the blade. Reflect on this: How comfortable are you with your table saw? Confidence comes from understanding and practicing safe use. By considering these factors, you ensure not just a successful project, but a safe and enjoyable woodworking experience.Gluing The Wood
Creating an end grain cutting board involves several precise steps. One crucial step is gluing the wood. This step ensures the board’s strength and durability. Proper gluing keeps the pieces tightly bound. This section guides you on arranging the pieces and applying the glue.
Arranging The Pieces
Start by selecting the best wood pieces. Consider the grain pattern and color. Arrange the pieces in a desirable pattern. Aim for a visually appealing design. Each piece should fit snugly with its neighbor. Avoid gaps or misalignments. Once satisfied, keep the arrangement stable.
Applying The Glue
Choose a good quality wood glue. It must be food-safe and waterproof. Apply a generous amount on one side of each piece. Spread the glue evenly with a brush. Ensure full coverage across the surface. Press the pieces together firmly. Use clamps to hold them in place. Leave the board to dry completely. Follow the glue manufacturer’s drying instructions.
Clamping And Drying
Creating an end grain cutting board requires precision and patience. The clamping and drying stages play a crucial role in ensuring durability and appearance. Proper techniques in clamping and allowing ample drying time result in a sturdy board.
Using Clamps Effectively
Clamps ensure the wood pieces remain tightly bonded. Choose clamps that match the board size. Position clamps evenly across the board. This prevents warping and ensures a flat surface. Tighten clamps until the wood feels secure. Avoid over-tightening; it may damage the wood. Use protective pads to shield the board from clamp marks. Double-check the alignment before the glue dries.
Allowing Proper Drying Time
Drying is essential for a strong bond. Allow the board to dry for at least 24 hours. Check the manufacturer’s instructions for specific glue recommendations. Place the board in a well-ventilated area. This helps the glue dry evenly. Avoid exposing the board to direct sunlight or heat sources. These can cause the wood to crack or warp. Patience in drying ensures a long-lasting cutting board.
Sanding And Smoothing
Creating a smooth finish on an end grain cutting board involves careful sanding. Start with coarse sandpaper to remove rough spots. Gradually move to finer grits for a polished surface, ensuring each piece is ready for use in the kitchen.
Sanding and smoothing your end grain cutting board is an essential step to ensure that it is not only functional but also visually appealing. This process will reveal the true beauty of the wood grains and prepare the board for finishing touches. With the right techniques, you can achieve a surface that is both silky and durable, ready for years of culinary adventures.Choosing Sandpaper Grits
Choosing the right sandpaper grits can make all the difference. Start with a coarser grit like 80 or 100 to remove any rough spots and glue residue. You’ll notice the board starting to smooth out, but don’t stop there. Gradually work your way up to finer grits, such as 150, 220, and even 320, for a polished finish. Each level of grit refines the surface more, eliminating scratches from the previous grit. Remember, patience is key; rushing through grits will leave your board less than perfect.Techniques For A Smooth Finish
Your sanding technique can make or break the final look of your cutting board. Always sand in the direction of the grain to avoid unsightly scratches. Use even pressure to ensure a consistent finish across the entire surface. Consider investing in a sanding block or an orbital sander for more efficiency and an even smoother finish. These tools can save time and effort, and they’re worth it if you plan on making more boards in the future. Don’t forget to sand the edges and corners for a well-rounded, comfortable-to-hold board. Have you ever noticed how a well-sanded board seems to glow? That’s the magic of taking your time and being thorough. Make sure to wipe away any dust with a damp cloth before applying any finishes. This ensures a clean, dust-free surface that allows oils or finishes to adhere properly. Sanding and smoothing can be a zen-like experience, a time to connect with your creation. Have you tried listening to music or a podcast while you work? It’s these small personal touches that can turn a simple task into a rewarding ritual.Applying Finish
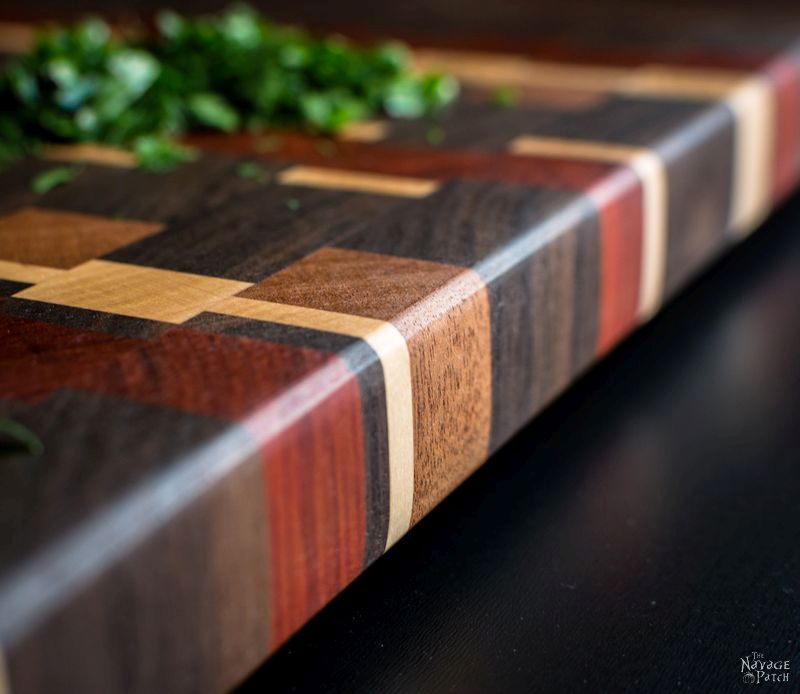
Applying a finish to an end grain cutting board protects it from moisture and enhances its beauty. Use food-safe oil, like mineral oil, to seal the board’s surface. Regular maintenance keeps the board looking fresh and extends its lifespan.
Applying a finish to your end grain cutting board is the final step that brings out its natural beauty and ensures its longevity. A good finish not only enhances the wood’s appearance but also protects it from stains and moisture. When you apply the right finish, you give your cutting board a fighting chance against daily wear and tear. It’s an essential step to preserve your hard work and craftsmanship.Selecting A Food-safe Finish
Choosing a food-safe finish is crucial since your cutting board will have direct contact with food. Look for options like mineral oil, which is readily available and easy to apply. Another popular choice is beeswax, often mixed with mineral oil, which provides a smooth, glossy finish. You might also consider walnut oil or coconut oil, both of which are natural and non-toxic. Ensure any oil you use is food-grade to prevent any health risks. Remember, a good finish should be safe enough to eat off.Applying And Buffing The Finish
Start by applying a generous amount of your chosen oil onto the board’s surface. Use a clean, lint-free cloth or a brush to spread it evenly, ensuring all areas are covered. Let it soak in for at least 20 minutes. After the oil has penetrated the wood, use a clean cloth to buff the surface. This step helps remove excess oil and brings out a nice sheen. Buffing not only enhances the board’s appearance but also ensures the finish is well-set into the wood. Consider repeating the oiling and buffing process two or three times to build up a strong layer of protection. Each application adds depth and resilience to your cutting board. How often you reapply the finish depends on usage, but a monthly touch-up is a good rule of thumb to keep it looking new. Have you ever noticed how a well-finished board makes cooking feel more enjoyable? The effort you put into finishing pays off every time you slice and dice. It’s an investment in both function and pleasure.Maintenance Tips
Crafting an end grain cutting board involves careful selection of wood pieces and precise glue application. Regular oiling keeps the board hydrated and prevents cracking. Sanding the surface maintains smoothness and enhances its durability.
Maintaining your end grain cutting board is crucial for preserving its beauty and functionality. Whether you’re slicing up veggies for dinner or impressing guests with a charcuterie spread, a well-maintained board serves you well. Let’s dive into some essential maintenance tips that ensure your cutting board remains a kitchen staple for years to come.Cleaning And Oiling
Regular cleaning prevents bacteria buildup and keeps your board hygienic. After each use, rinse it under warm water and gently scrub with a mild soap. Avoid soaking it, as too much water can warp the wood. Once cleaned, drying is key. Pat it dry with a towel and let it air dry completely before storing. This prevents moisture from seeping into the wood, which can cause cracks over time. Oiling your board is like giving it a spa day. Use food-grade mineral oil to keep the wood hydrated. Apply a generous amount and rub it in with a clean cloth. Let it soak overnight for best results.Avoiding Common Mistakes
Ever left your cutting board near a hot stove or in direct sunlight? These are common mistakes that can damage the wood. Heat and sunlight can cause the board to warp or crack. Don’t use olive or vegetable oil for oiling. They can go rancid and leave an unpleasant odor. Stick to mineral oil or beeswax for a fresh-smelling board. Another mistake is using harsh cleaning agents. They strip away the natural oils and can damage the surface. Mild soap does the trick without harming your board. Have you ever thought about the impact of cutting techniques on your board? Avoid using serrated knives or cleavers excessively, as they can dig into the wood. Aim for smooth, gliding motions with sharp knives to keep your board pristine. Maintaining your cutting board doesn’t have to be a chore. With these tips, you can ensure its longevity and keep it looking its best. What is your favorite way to keep your kitchen tools in top shape?
Credit: www.youtube.com
Frequently Asked Questions
What’s The Best Wood For An End Grain Cutting Board?
Hardwoods like maple, walnut, and cherry are ideal for end grain cutting boards. They are durable and resist knife marks. These woods also offer a balance of hardness and self-healing properties. Maple is popular for its tight grain and antibacterial properties, while walnut and cherry provide aesthetic appeal.
How To Make An End Grain Wood Cutting Board?
Cut wood strips and arrange end grain upwards. Glue strips together tightly. Clamp until dry. Sand surface smoothly. Apply food-safe mineral oil generously.
What Is The Best Thickness For An End Grain Cutting Board?
The best thickness for an end grain cutting board is 1. 5 to 2 inches. This provides durability and stability. A thicker board resists warping and allows deeper cuts without damaging the surface. Opt for quality hardwood to ensure longevity and a smooth cutting experience.
How Is An End Grain Cutting Board Made?
Craft end grain cutting boards by gluing wood blocks vertically. Sand the surface smoothly. Apply food-safe mineral oil.
Conclusion
Creating an end grain cutting board is rewarding. It looks great and lasts long. A perfect project for any skill level. With the right tools, anyone can do it. Always prioritize safety while working. Sanding ensures a smooth finish. Choose quality wood for durability.
Regular maintenance keeps the board looking new. Wash it after each use. Oil it often. These steps help maintain its charm. Enjoy your new handmade kitchen tool. It’s both functional and beautiful. Share your creation with friends. They might want one too! Happy crafting and cooking!

Hi, I’m Daniel Brooks—a food lover and kitchen gear enthusiast. I enjoy testing cookware, utensils, and gadgets to see what really works in everyday cooking. At PlugChef.com, I share honest reviews, comparisons, and simple guides to help you choose the best tools for a safer, smarter, and more enjoyable kitchen.
Related posts:
 What Type of Cooking Utensils are Safe: Expert Picks
 What Innovations Could Blenders Make: Unleashing Future Tech
 Smart Strategies to Organize a Small Kitchen: Maximize Space
 How to Organize a Kitchen Cabinet: Expert Tips & Tricks
 How to Organize Kitchen Drawers: Expert Tips and Tricks
 How to Organize a Corner Kitchen Cupboard: Expert Tips

