Imagine turning your kitchen sink into the smartest part of your home. With smart kitchen sink installation, you can save time, reduce waste, and make your daily chores easier than ever.
Whether you want touchless faucets, water-saving features, or built-in sensors, this upgrade transforms how you use your kitchen. Ready to discover how a simple change can bring big benefits? Keep reading to find out how you can make your kitchen smarter and more efficient today.

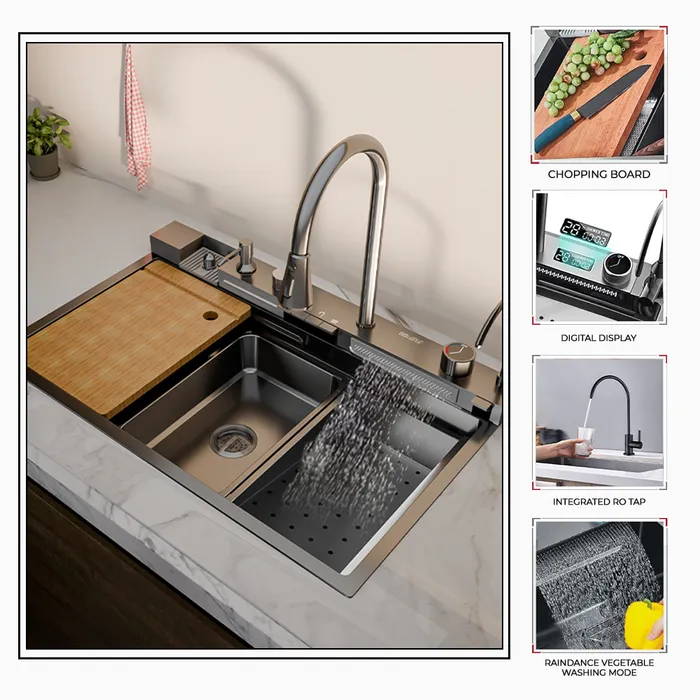
Credit: walnut-sink.en.made-in-china.com
Choosing The Right Smart Sink
Choosing the right smart kitchen sink ensures easy use and fits your space well. Consider features like touch control, water-saving, and simple installation. A good fit makes daily kitchen tasks faster and more efficient.
Choosing the right smart sink can transform your kitchen experience. It combines functionality with modern technology, making everyday tasks efficient. But, selecting the perfect smart sink requires careful thought.Types Of Smart Kitchen Sinks
Smart kitchen sinks come in various types. Some are touch-sensitive. Others use voice commands. A few have built-in water filters. Each type offers unique features. Determine which type meets your needs.Material Options
Smart sinks come in different materials. Stainless steel is durable and popular. Granite composite is elegant and robust. Ceramic adds a classic touch. Choose a material that fits your kitchen style.Size And Design Considerations
Consider the size of your kitchen. Smart sinks come in various sizes. Measure your space carefully. Design is equally important. Some sinks have sleek, modern lines. Others have a traditional look. Pick a design that complements your kitchen decor.
Credit: www.deervalleybath.com
Essential Tools And Materials
Installing a smart kitchen sink requires the right tools and materials. Having everything ready ensures a smooth setup. This section covers the key items needed for installation. It helps avoid delays and errors during the process.
Installation Tools Checklist
- Adjustable wrench for tightening connections
- Screwdrivers (flathead and Phillips) for mounting
- Pipe cutter to trim plumbing pipes
- Plumber’s tape to seal threaded joints
- Level to ensure proper sink alignment
- Measuring tape for accurate placement
- Power drill with drill bits for fixture holes
- Bucket to catch water during disconnection
- Utility knife for cutting sealants or tape
Smart Sink Components
- Touchless faucet with motion sensor
- Integrated soap dispenser for convenience
- LED indicator lights to show water status
- Wireless control module or remote
- Smart drain assembly for clog prevention
- Power adapter or batteries for electronics
- Mounting brackets and hardware included
Plumbing Supplies
- Flexible supply lines for water connection
- Drain pipes and trap assembly
- Compression fittings for secure joints
- Silicone sealant to prevent leaks
- Plumber’s putty for sink flange sealing
- Shut-off valves to control water flow
- Water pressure regulator (if needed)
Preparing Your Kitchen
Preparing your kitchen before installing a smart kitchen sink is crucial for a smooth and efficient process. Taking the time to measure accurately, shut off the water supply, and remove the old sink can save you from unexpected problems later. These steps set the foundation for a successful installation that fits perfectly and functions without leaks.
Measuring And Marking
Start by measuring the dimensions of your new smart sink and the existing countertop opening. Use a tape measure and mark the exact cut lines with a pencil or masking tape. Double-check your measurements—accuracy here prevents costly mistakes.
Consider the space needed for plumbing connections and accessories like soap dispensers or water filters. Are there any obstructions under your counter? Mark these areas clearly to avoid surprises during installation.
Shutting Off Water Supply
Before you touch any plumbing, locate the water shutoff valves under the sink or the main water supply line. Turn these valves clockwise to stop the water flow. If your valves are old or stuck, prepare a bucket and towels—you might need to shut off water at the main house valve.
Test the faucets to make sure the water is fully off. This step prevents water damage and keeps your workspace dry and safe.
Removing Old Sink
Disconnect the water supply lines using an adjustable wrench, then remove the drain pipes carefully. You might find old plumber’s putty or silicone sealing around the edges—scrape this off gently to avoid damaging the countertop. Use a utility knife or putty knife for this task.
Lift the old sink out with help if it’s heavy or stuck. It’s common for sinks to be secured with clips underneath; remove these before trying to lift. Have a container ready to catch any residual water that may spill during removal.
Step-by-step Installation Process
Installing a smart kitchen sink involves careful steps to ensure full functionality. Follow the process to fit the sink properly and activate its smart features. Each part must be done with care to avoid leaks or damage.
Positioning The Smart Sink
Start by placing the smart sink in the countertop cutout. Make sure it fits snugly and aligns with existing plumbing. Check that the sink is level to prevent water pooling. Adjust the position until it sits firmly without gaps.
Connecting Water Lines
Attach the hot and cold water lines to the sink’s valves securely. Use plumber’s tape on threads to avoid leaks. Tighten connections with a wrench but do not over-tighten. Test water flow before sealing connections fully.
Securing The Sink
Use mounting clips or brackets provided with the sink to fix it to the countertop. Tighten all fasteners evenly to hold the sink firmly in place. Seal around the edges with waterproof silicone to stop water from seeping under the sink.
Installing Smart Features
Connect the sink’s smart components to power and Wi-Fi as per instructions. Install sensors and touch controls carefully to avoid damage. Test features like touchless faucets and water temperature control to confirm proper operation. Adjust settings through the app or control panel for best use.
Testing And Calibration
Testing and calibration are crucial after installing your smart kitchen sink. This phase ensures everything runs smoothly and your new setup performs exactly as expected. Skipping these steps can lead to leaks, control issues, or functionality problems that spoil the convenience you aimed for.
Checking For Leaks
Start by carefully inspecting all connections and joints. Turn on the water and watch for any dripping or moisture buildup around pipes and fittings.
Use a dry paper towel or tissue to detect even the smallest leaks. If you spot any, tighten the fittings gently but firmly. Remember, a tiny drip today can cause bigger damage later.
Configuring Smart Controls
Your smart sink likely comes with app controls or touchless sensors. Spend time setting preferences like water temperature, flow speed, and sensor sensitivity to match your daily habits.
Test each control feature several times. Is the sensor responding quickly? Does the app interface update in real-time? Adjust settings until it feels intuitive and reliable.
Ensuring Proper Functionality
Run the sink through its full range of functions. Activate water dispensing, soap dispenser (if available), and any other smart features.
Ask yourself: Does everything work as smoothly as you expected? Are there any delays, unusual noises, or inconsistencies? Identifying these early helps you fix issues before they become frustrating.
Maintenance Tips
Maintaining a smart kitchen sink ensures it works smoothly and lasts longer. Regular care keeps sensors responsive and plumbing problem-free. Follow these tips for easy upkeep and better performance.
Cleaning Smart Sensors
Smart sensors detect your hand to control water flow. Dirt and grime can block these sensors. Clean sensors gently with a soft cloth and mild soap. Avoid harsh chemicals that can damage sensor covers. Wipe sensors weekly to keep them accurate and responsive.
Regular Plumbing Checks
Check pipes and connections for leaks or clogs often. Tighten loose fittings to prevent water damage. Clear drain filters to avoid blockages. Inspect hoses for cracks or wear. Simple checks prevent costly repairs and keep water flowing freely.
Software Updates
Smart sinks may have software controlling sensor functions. Check for updates from the manufacturer regularly. Updates fix bugs and improve performance. Use the sink’s app or website for easy update instructions. Keep software current to ensure smooth operation.
Troubleshooting Common Issues
Troubleshooting common issues in smart kitchen sink installation helps maintain smooth operation. Problems can arise with sensors, water flow, or connectivity. Identifying the cause quickly saves time and effort. Basic checks often fix most problems. Understanding these issues improves your smart kitchen experience.
Sensor Malfunctions
Sensors detect hand movements to control water flow. Dirt, water spots, or poor alignment can cause sensor failures. Clean the sensor surface gently with a soft cloth. Avoid harsh chemicals that may damage the sensor. Check if the sensor is properly aligned and positioned. Reset the sensor by turning off the power briefly. Replace batteries if your model uses them. Regular cleaning keeps sensors responsive and accurate.
Water Flow Problems
Water flow issues may include weak pressure or no water. Check the water supply valves to ensure they are open. Inspect for clogged filters or aerators and clean them. Air trapped in pipes can cause irregular flow; running water for a few minutes may help. Look for leaks or damaged hoses connected to the sink. Tighten any loose fittings to prevent water loss. If the problem persists, consult a plumber for deeper inspection.
Connectivity Errors
Smart sinks connect to Wi-Fi or home networks for advanced functions. Weak signals can cause connectivity errors. Place your router closer to the sink or use a Wi-Fi extender. Restart the sink’s smart system and your router. Ensure the sink’s software is up to date. Check the app settings and reconnect the device if needed. Secure your network with a strong password to avoid interference. Stable connection ensures smooth operation and remote control.
Credit: www.gravitybath.com
Frequently Asked Questions
What Is A Smart Kitchen Sink?
A smart kitchen sink integrates technology for convenience. Features include touchless faucets, built-in soap dispensers, and water sensors. It enhances hygiene and saves water efficiently.
How To Install A Smart Kitchen Sink?
Installation involves connecting water lines and electrical components. Follow manufacturer instructions carefully. Professional help is recommended for complex features to ensure safety and functionality.
What Are The Benefits Of Smart Kitchen Sinks?
They provide hands-free operation, improving hygiene. Smart sinks conserve water and offer customizable settings. They add modern convenience and can increase home value.
Are Smart Kitchen Sinks Energy Efficient?
Yes, many smart sinks use sensors to reduce water waste. Efficient water use lowers utility bills. Some models include energy-saving LED lights.
Conclusion
Smart kitchen sink installation improves daily kitchen use. It saves time and reduces mess. Choosing the right sink fits your space well. Proper installation prevents leaks and water damage. Simple steps make the process easier to follow. A well-installed sink adds value to your home.
Enjoy cooking and cleaning with less hassle. Smart choices lead to a functional kitchen. Take your time and plan carefully. Your kitchen will feel fresh and modern.

Hi, I’m Daniel Brooks—a food lover and kitchen gear enthusiast. I enjoy testing cookware, utensils, and gadgets to see what really works in everyday cooking. At PlugChef.com, I share honest reviews, comparisons, and simple guides to help you choose the best tools for a safer, smarter, and more enjoyable kitchen.
Related posts:
 What Type of Cooking Utensils are Safe: Expert Picks
 What Innovations Could Blenders Make: Unleashing Future Tech
 Smart Strategies to Organize a Small Kitchen: Maximize Space
 How to Organize a Kitchen Cabinet: Expert Tips & Tricks
 How to Organize Kitchen Drawers: Expert Tips and Tricks
 How to Organize a Corner Kitchen Cupboard: Expert Tips

