Are you ready to dive into the fascinating world of homemade kombucha? Starting your own SCOBY is easier than you think, and it’s the key to brewing delicious, healthy kombucha right at home.
Imagine having a living culture that grows with you, turning simple ingredients into a refreshing drink packed with probiotics. In this guide, you’ll discover simple steps to create your own SCOBY from scratch, avoid common mistakes, and unlock the secrets to a perfect brew every time.
Keep reading, and by the end, you’ll have everything you need to start your kombucha adventure confidently.
Credit: www.hollandandbarrett.com
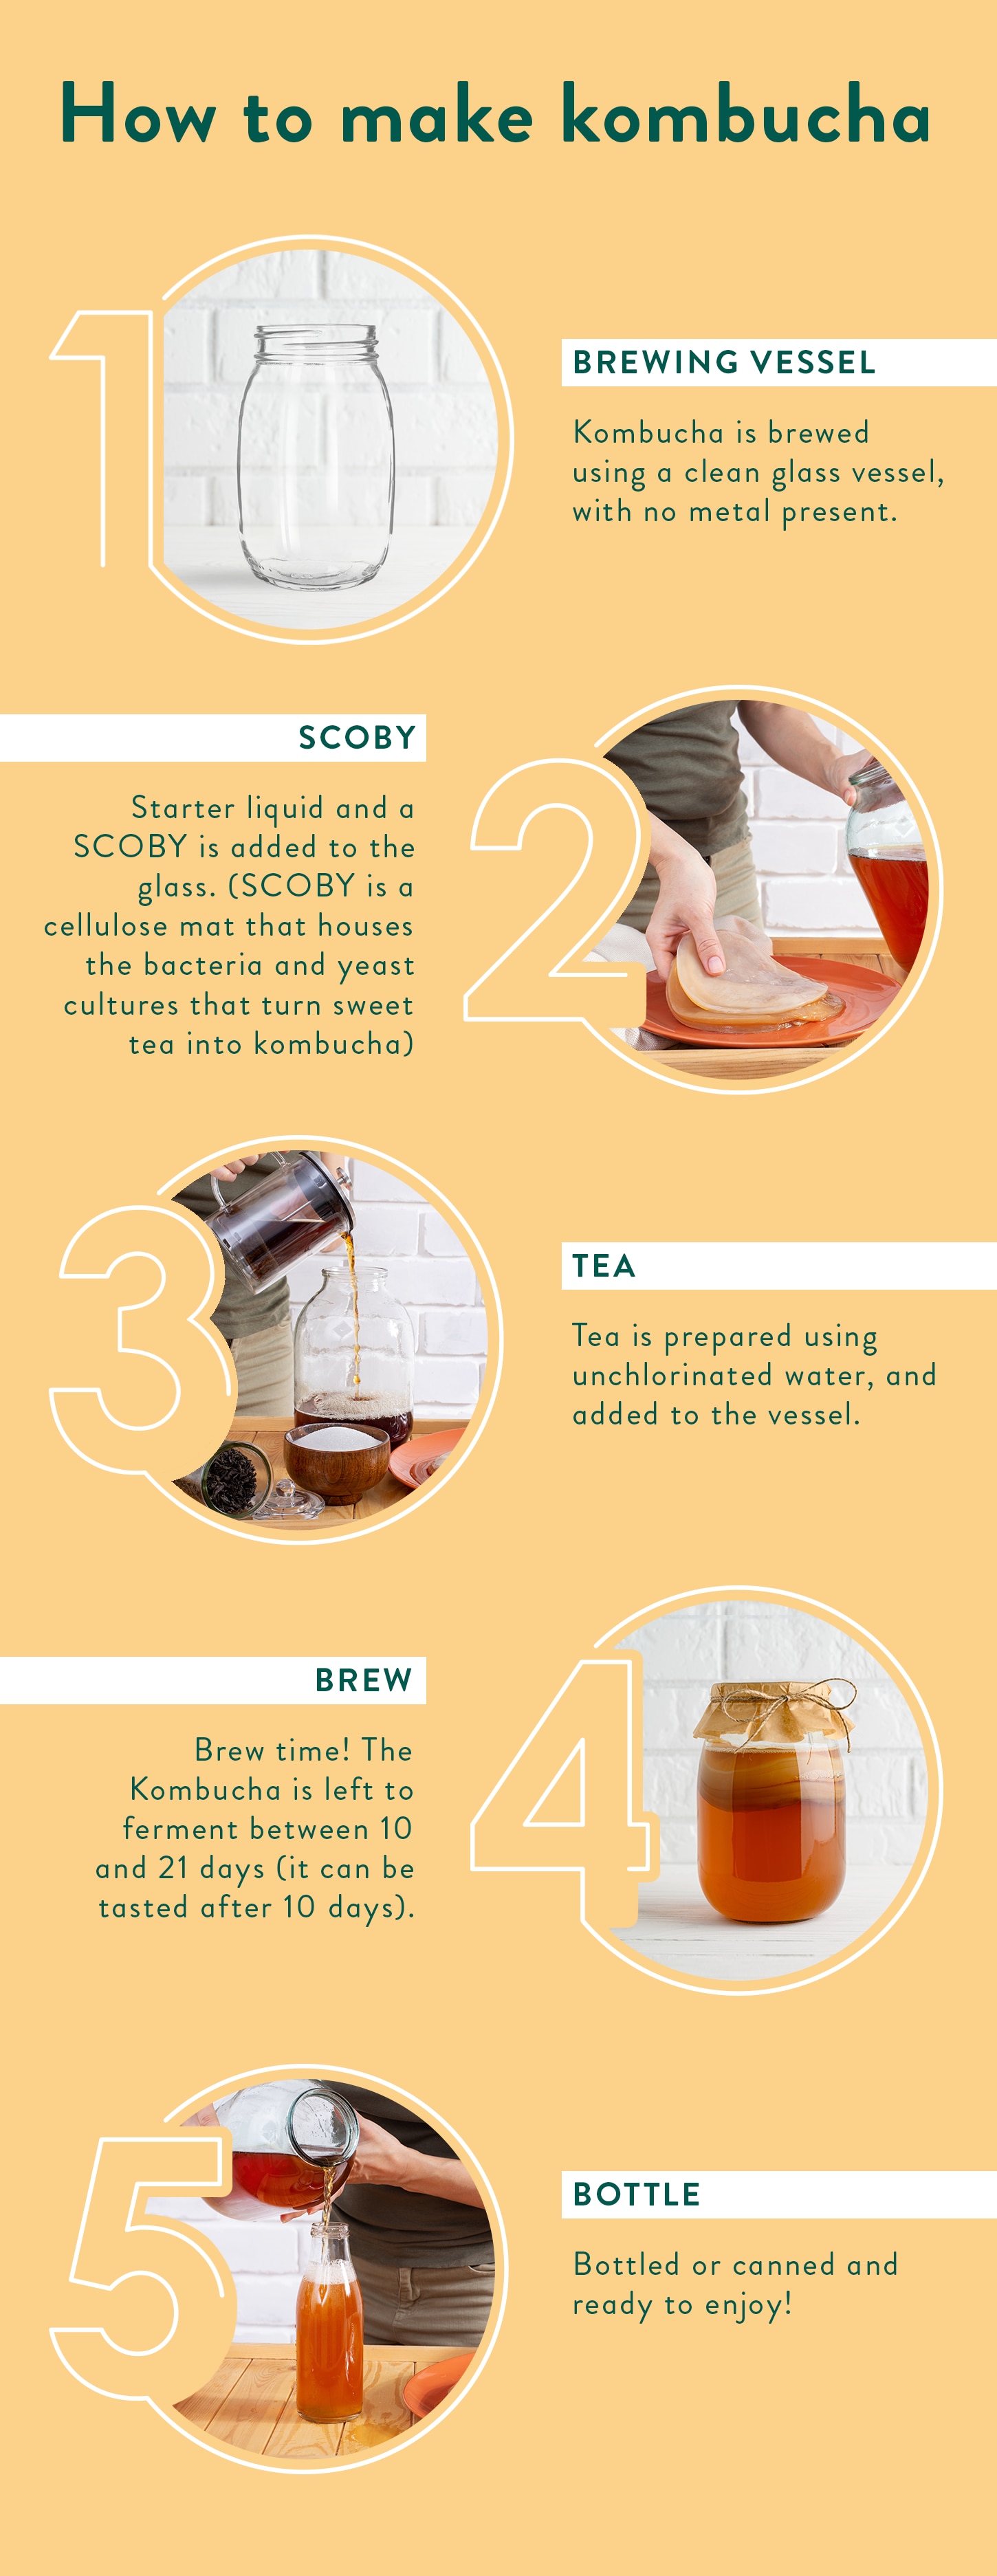
Gathering Supplies
Starting a SCOBY for your kombucha brewing adventure means gathering the right supplies first. Without the proper ingredients and tools, your fermentation journey might hit a rough patch early on. Let’s break down what you really need to get started and how to pick the best options for your setup.
Essential Ingredients
At the core of your SCOBY creation are a few simple ingredients. You’ll need:
- Tea:Black or green tea works best because they provide necessary nutrients for the SCOBY.
- Sugar:Plain white sugar feeds the bacteria and yeast during fermentation.
- Starter liquid:This is unpasteurized, unflavored kombucha from a previous batch or store-bought raw kombucha.
- Water:Use filtered or distilled water to avoid chlorine and impurities that can harm the SCOBY.
Have you ever noticed how some teas taste completely different after brewing? That difference can affect your SCOBY’s growth, so choose wisely.
Choosing The Right Container
The container you use impacts how well your SCOBY forms. Glass jars are the best choice because they don’t react with the acidic kombucha. Avoid plastic or metal containers as they might leach chemicals or rust.
Pick a container with a wide mouth to allow good airflow but be ready to cover it with a breathable cloth or coffee filter secured with a rubber band. This keeps out dust and bugs while letting oxygen in, which your SCOBY needs.
Optional Tools For Brewing
While you can start with just the basics, some extra tools make the process easier and cleaner:
- pH strips:To check acidity levels and ensure your brew stays safe.
- Thermometer:Kombucha ferments best between 70-80°F; a thermometer helps keep your brew in that range.
- Non-metal stirring utensil:Use wood or plastic to avoid reactions with the acidic liquid.
- Breathable cover:A tight-weave cloth or coffee filter works well to protect your SCOBY.
Have you tried brewing without these tools? Adding just one or two can change your results dramatically.
Preparing The Sweet Tea
Preparing the sweet tea is the first step in starting a healthy SCOBY. This tea provides food for the SCOBY and helps it grow strong. The quality of tea and sugar affects the fermentation process and taste of your kombucha. Use clean water and follow the right brewing steps for best results.
Selecting Tea Leaves
Choose black or green tea leaves for best fermentation. Avoid flavored or herbal teas as they can harm the SCOBY. Pure tea leaves give the right nutrients for SCOBY growth. Organic tea is a good choice to avoid chemicals.
Measuring Sugar Correctly
Use plain white sugar to feed the SCOBY. Measure the sugar carefully to keep the balance right. Too much sugar slows fermentation, too little starves the SCOBY. Usually, one cup of sugar per gallon of tea works well.
Brewing Tips
- Boil fresh water to dissolve sugar fully.
- Steep tea leaves for 5 to 10 minutes only.
- Remove tea leaves to avoid bitterness.
- Let the sweet tea cool to room temperature before adding SCOBY.
- Use a glass or food-safe container for brewing.
Starting The Scoby
Start by mixing tea, sugar, and starter liquid in a clean jar. Cover it with cloth and let it sit in a warm place. Wait for a few days as the SCOBY forms on the surface.
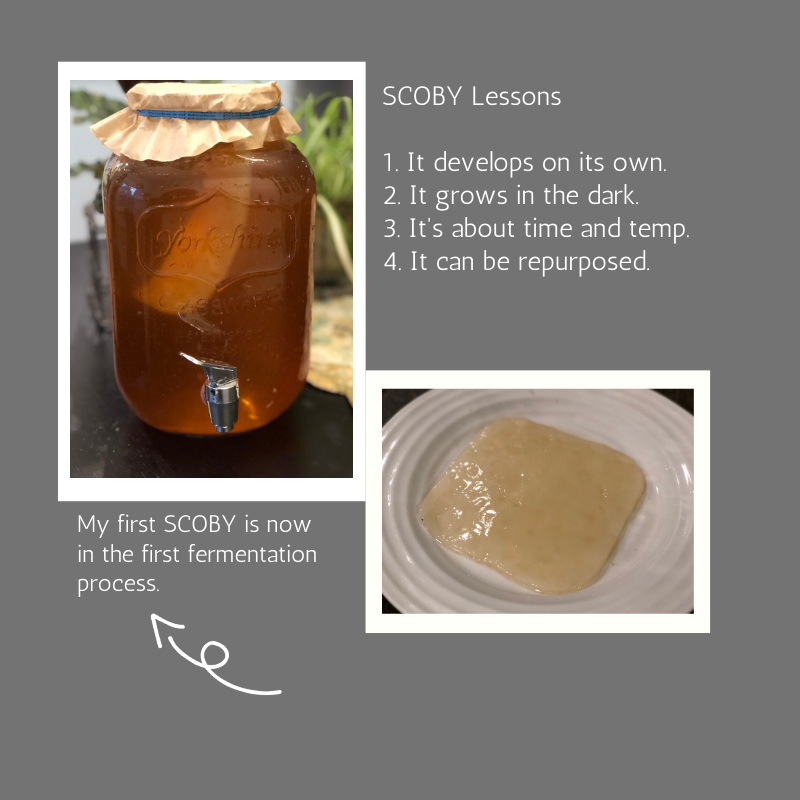
Starting the SCOBY Embarking on the journey to grow your own SCOBY (Symbiotic Culture Of Bacteria and Yeast) is an exciting adventure. It’s like nurturing a living, breathing entity that will reward you with endless batches of delicious kombucha. The process requires patience, but seeing that pale, jelly-like mass form is a testament to your dedication.Adding Starter Liquid
To begin, you’ll need some starter liquid. This is typically a cup of pre-made kombucha, preferably from a previous batch or store-bought. Pour this into a clean glass jar along with your sweet tea. The starter liquid contains the necessary bacteria and yeast to kick-start the SCOBY formation. It’s like giving your new SCOBY a head start in life.Maintaining Ideal Temperature
Temperature plays a crucial role in SCOBY development. Ideally, you want to keep your jar in a warm environment, around 75-85°F (24-29°C). Too cold, and the process slows down significantly; too hot, and you risk harming the delicate balance of bacteria and yeast. I once placed my jar near a sunny window and watched the SCOBY thrive in the gentle warmth.Covering And Securing The Jar
Properly covering the jar is essential to protect the developing SCOBY. Use a breathable cloth, like a coffee filter or a clean dish towel, and secure it with a rubber band. This allows air to circulate while keeping out dust and curious critters. Imagine the disappointment of finding a fruit fly invasion after weeks of care—trust me, you’ll want that cover snug and secure! Are you ready to nurture your SCOBY into a thriving culture? With the right steps and a bit of patience, you’ll soon have a healthy SCOBY ready to brew countless batches of kombucha.Fermentation Process
The fermentation process is the heart of starting a SCOBY. It transforms sweet tea into a living culture that brews kombucha. During this process, natural bacteria and yeast work together to create a thick, jelly-like SCOBY. This culture protects the brew and helps ferment the tea into a tangy, healthy drink.
Patience matters most. The environment needs the right temperature and time for fermentation. The SCOBY forms slowly, layer by layer. Watching this process helps ensure success in creating your own kombucha starter.
Expected Timeline
The fermentation usually takes 7 to 14 days. This depends on temperature and tea quality. Warmer places speed up growth. Cooler spots slow it down. The SCOBY starts as a thin film on the surface. It thickens over time, becoming more opaque and firm.
Signs Of Scoby Growth
- A thin, translucent layer appears on the tea surface.
- The layer becomes thicker and creamy white or beige.
- The tea develops a tangy, vinegar-like smell.
- Small bubbles form as fermentation progresses.
These signs mean your SCOBY is alive and working well.
Common Issues To Watch
- Black or green mold:This is harmful. Discard the batch immediately.
- Off smells:Rotten or foul odors indicate spoilage.
- No film formation:Could mean low temperature or poor tea quality.
- Excessive dryness:SCOBY needs moisture to grow properly.
Keep your brewing area clean. Avoid metal containers and direct sunlight. These factors help prevent problems during fermentation.
Harvesting And Storing Scoby
Harvesting and storing your SCOBY is an important part of maintaining a healthy kombucha brewing routine. Knowing how to properly separate, store, and even share your SCOBY can save you time and help you build a kombucha community. Let’s break down the key steps to keep your SCOBY thriving and ready for your next batch.
Separating The Scoby
As your kombucha ferments, it often forms a thick SCOBY on the surface. You might notice layers building up—each new SCOBY can be separated carefully with clean hands. Gently peel the new SCOBY from the older one, making sure to keep them wet with some kombucha liquid to prevent drying out.
Handle your SCOBY with care; avoid using metal utensils since they can damage its delicate surface. Have you ever tried lifting a SCOBY and accidentally tore it? Keeping it moist and gentle is the key to preserving its strength for future use.
Storing For Future Use
If you’re not ready to brew right away, store your SCOBY properly to keep it alive. Place the SCOBY in a clean glass jar and cover it with enough fresh, unflavored kombucha or sweet tea to submerge it completely.
Seal the jar with a breathable cloth or coffee filter to allow airflow while keeping out contaminants. Store it at room temperature away from direct sunlight—too cold or too hot can harm your SCOBY. How long can you keep a SCOBY without brewing? Typically, up to four weeks works well if stored correctly.
Sharing Or Selling Scoby
Growing a SCOBY gives you more than you need, so why not share it? Offering SCOBYs to friends or selling them can spread the joy of homemade kombucha. Make sure to include some starter tea when you hand over your SCOBY to keep it healthy during transit.
Label your SCOBY with the date and basic care instructions to help new brewers succeed. Have you thought about how sharing your SCOBY could build a local kombucha community? It’s a simple way to connect and learn from others.
Credit: loismelkonian.medium.com
Troubleshooting Tips
Starting a SCOBY can sometimes come with challenges. These troubleshooting tips help you handle common issues. Following simple steps keeps your SCOBY healthy and your kombucha tasty.
Dealing With Mold
Mold looks fuzzy and can be white, green, or black. It grows on the surface of your SCOBY. Mold means harmful bacteria are present. Remove the SCOBY and discard the batch immediately. Clean all equipment with hot, soapy water. Use fresh tea and sugar for the next batch. Keep the brewing area clean and avoid metal lids. Ensure good airflow but cover the jar to stop dust.
Fixing Slow Growth
Slow SCOBY growth happens due to cold temperatures or weak starter tea. Keep the brewing jar between 70-85°F (21-29°C). Use strong, unflavored kombucha as starter tea. Avoid using distilled or softened water. Make sure to use enough sugar and tea. Cover the jar with a breathable cloth to allow oxygen in. Be patient; sometimes growth is slow but normal.
Adjusting Flavor
The taste of kombucha depends on fermentation time and ingredients. Shorter fermentation makes sweeter kombucha. Longer fermentation creates a tangier, more acidic drink. Adjust sugar and tea amounts for different flavors. Add fruit or herbs after fermentation for extra taste. Taste your brew daily to find your preferred flavor. Store the finished kombucha in the fridge to slow fermentation.

Credit: www.dadshack.in
Frequently Asked Questions
What Is A Scoby And Why Start One?
A SCOBY is a symbiotic culture of bacteria and yeast. It’s essential for fermenting tea into kombucha. Starting your own SCOBY lets you control ingredients and brewing quality. It’s cost-effective and fun for homemade kombucha enthusiasts.
How Do I Start A Scoby From Scratch?
To start a SCOBY, brew sweet tea and add raw, unpasteurized kombucha. Cover the jar with a cloth and let it ferment at room temperature for 1-4 weeks. A new SCOBY will form on the surface during this time.
What Are The Best Conditions To Grow Scoby?
SCOBY thrives at 70-85°F (21-29°C) in a dark, well-ventilated place. Use non-chlorinated water and organic tea for best results. Avoid direct sunlight and contaminants to ensure healthy SCOBY growth and successful fermentation.
Can I Use Any Tea To Start A Scoby?
Black and green teas are best for starting SCOBY. Avoid flavored or herbal teas as they lack necessary nutrients. Using pure, caffeine-containing tea promotes healthy bacteria and yeast development for a robust SCOBY.
Conclusion
Starting a SCOBY is simple and rewarding. Just gather the right ingredients and give them time. Watch for the jelly-like layer forming on the surface. This shows your SCOBY is growing well. Keep the environment clean and warm for best results.
Patience is key here. Soon, you will have a healthy SCOBY for brewing kombucha. Enjoy the process and learn as you go. This natural fermentation brings many benefits. Give it a try and see the magic unfold.

I’m Abby Lu, a passionate home cook who loves simplifying everyday meals. At PlugChef.com, I share product reviews and cooking guides to help you find the best tools for your kitchen.
Related posts:
 What Type of Cooking Utensils are Safe: Expert Picks
 What Innovations Could Blenders Make: Unleashing Future Tech
 Smart Strategies to Organize a Small Kitchen: Maximize Space
 How to Organize a Kitchen Cabinet: Expert Tips & Tricks
 How to Organize Kitchen Drawers: Expert Tips and Tricks
 How to Organize a Corner Kitchen Cupboard: Expert Tips

