Your cutting board is more than just a kitchen tool; it’s a trusty companion that helps you prepare delicious meals every day. But are you giving it the care it deserves?
If you’ve noticed your cutting board looking a bit dull or even starting to crack, it might be time for a little TLC. Learning how to oil a cutting board can extend its life and keep it looking and performing its best.
Imagine slicing through your favorite vegetables on a board that feels smooth and looks pristine. In this guide, you’ll discover the simple steps to breathe new life into your cutting board. Plus, we’ll share some expert tips that could save you money by keeping your board in top shape for years to come. Ready to transform your kitchen routine? Let’s dive in!
Choosing The Right Oil
Maintaining a cutting board requires choosing the right oil. The oil not only preserves the board’s quality but also keeps it safe for food preparation. Have you ever wondered which oils are safe or harmful for your beloved cutting board?
Food-safe Oils
When oiling your cutting board, prioritize food-safe oils. These are oils that are safe to consume and won’t contaminate your food. Mineral oil is a popular choice because it’s odorless and tasteless, making it ideal for a cutting board.
Another great option is beeswax mixed with mineral oil. It adds a protective layer while enhancing the board’s appearance. Coconut oil is also food-safe, but ensure you use refined coconut oil to avoid any residue or scent.
Have you tried using walnut oil? It’s food-safe and penetrates deeply, offering long-lasting protection. Remember, choosing the right oil affects not just the longevity of your board, but also the safety of your culinary creations.
Avoiding Harmful Oils
Some oils can do more harm than good. Vegetable oils, for instance, should be avoided as they can become rancid. The last thing you want is a smelly cutting board.
Motor oils or any non-food grade oils are definite no-nos. They can be toxic and pose health risks. Are you accidentally using oils that might harm your health?
It’s crucial to read labels and understand the properties of the oil you’re using. By avoiding harmful oils, you ensure your cutting board remains a safe and effective tool in your kitchen.
Preparing The Cutting Board
Before diving into the rewarding task of oiling your cutting board, it’s essential to prepare it properly. A well-prepared surface ensures the oil penetrates effectively and prolongs the life of your kitchen companion. Whether you’re getting ready for your first oiling session or it’s been a while since the last one, a few simple steps can make a big difference.
Cleaning The Surface
Start by giving your cutting board a thorough clean. Use a mild dish soap and warm water to scrub away any food particles and residues. This is crucial, as lingering food debris can trap bacteria and affect the absorption of the oil. If you’ve ever noticed a faint odor when using your board, this step helps eliminate that.
Consider using a mixture of vinegar and water for deeper cleaning, especially if your board has been through a lot. This natural solution not only cleans but also disinfects. Just make sure to rinse it well afterwards!
Drying Properly
After cleaning, drying is your next priority. Don’t rush this step; a damp board can lead to warping or cracking. Use a clean towel to wipe it thoroughly, ensuring no moisture is left behind.
Let your board sit upright on a dish rack or against the wall. Air drying allows any residual moisture to evaporate naturally. Have you ever tried placing it near a sunny window? This can speed up the drying process and ensure your board is ready for oiling.
By preparing your cutting board carefully, you’re not only enhancing its durability but also setting the stage for a successful oiling session. Ready to see your board shine? Let’s oil it up! But first, how do you ensure your cutting board stays in top condition after oiling? Have you ever noticed the difference in performance after maintaining it well?
Applying The Oil
Applying oil to your cutting board is a crucial step in maintaining its longevity and functionality. It’s easy to overlook, but a well-oiled board can make all the difference in your kitchen routine. The right oil helps in keeping your board hydrated and prevents it from cracking. But how do you ensure you’re doing it correctly? Let’s break it down into manageable steps.
Using The Right Amount
Getting the amount of oil right is key. Too much oil can leave your board sticky and unusable, while too little won’t provide the protection it needs. A tablespoon of mineral oil is typically sufficient for a medium-sized board. Pour it slowly, so you can adjust the amount if needed.
Consider your board’s size and wood type when deciding on the amount. A smaller board needs less oil, while a thicker one might require more. How does your board feel? If it’s dry to the touch, it likely needs more oil than usual.
Spreading Evenly
Once you’ve applied the oil, spreading it evenly is the next step. Use a clean cloth or paper towel to distribute the oil across the board’s surface. Work in circular motions to cover all areas uniformly.
Pay extra attention to the edges and corners. These often get overlooked but are just as important as the center. Imagine the satisfaction of seeing your board shine uniformly, ready for your culinary creations.
Do you find uneven spots after spreading? Add a little more oil to those areas and continue with circular motions. The goal is to have every inch of your board well-nourished.
Applying oil isn’t just about maintenance; it’s about enhancing your cooking experience. A well-oiled board is easier to clean and safer to use. What’s stopping you from giving your cutting board the care it deserves?

Credit: totallybamboo.com
Letting The Oil Soak
Allowing oil to soak into a cutting board protects and moisturizes the wood. This process keeps the board smooth and durable, extending its lifespan. Regular oiling prevents cracks and reduces bacterial growth, ensuring safe food preparation.
Letting the oil soak into your cutting board is a crucial step in maintaining its longevity and functionality. The process ensures that your board remains resistant to moisture and warping, keeping it in peak condition. If you’ve ever wondered how long to let the oil sit or worried about using too much, you’re in the right place.Optimal Soaking Time
The right soaking time can make all the difference. Typically, allowing the oil to sit on your cutting board for 15 to 30 minutes is ideal. This time frame lets the oil deeply penetrate the wood fibers, ensuring a lasting protective coat. You might ask, is 15 minutes really enough? Yes, it is! The wood naturally absorbs the oil quickly. If you have a particularly dry or old board, consider extending the time slightly.Avoiding Over-saturation
While soaking is essential, over-saturation can be detrimental. Too much oil can leave a sticky residue on the surface, which is not what you want when preparing food. It’s vital to wipe away excess oil after the soaking period. Keep a clean cloth handy for this purpose. If the board feels oily to the touch, it’s a sign you’ve used too much. Remove the excess and let it sit for a few more hours. Have you ever noticed a cutting board becoming sticky over time? This often results from not wiping off excess oil. Ensuring you strike the right balance will keep your board in perfect condition for years. Does this mean you should oil less frequently? Not necessarily. Regular oiling is still important, but moderation is key.Removing Excess Oil
Gently wipe away any excess oil with a clean, dry cloth after oiling a cutting board. This step ensures that the board remains smooth and ready for use. Regular maintenance like this keeps your cutting board in good shape.
Oiling a cutting board keeps it in good condition. Excess oil can make the board sticky and attract dirt. Removing this oil is crucial for a smooth and clean surface. Proper techniques help maintain the board’s appearance and functionality.Wiping With A Cloth
Use a clean, soft cloth to wipe away extra oil. This prevents oil buildup on the board. Move the cloth in circular motions for even distribution. It should be slightly damp, not soaked. This ensures the oil is removed without damaging the board’s surface.Ensuring A Smooth Finish
A smooth finish is vital for a functional cutting board. After wiping, check for any remaining oil spots. These can make the board slippery. Use gentle pressure while wiping to avoid scratches. Repeat the process if needed for a perfect finish.
Credit: www.thekitchn.com
Maintaining Your Cutting Board
Keeping your cutting board in good shape is essential for its longevity. Proper maintenance ensures it stays clean and effective. It also prevents cracks and warping. Regular oiling is a key part of this care routine. This process helps preserve the board’s surface. It also adds a protective layer against moisture and bacteria. Let’s explore how to maintain your cutting board effectively.
Regular Oil Maintenance
Oil your cutting board every month. This frequency prevents it from drying out. Use food-grade mineral oil for the best results. Pour a small amount of oil onto the board’s surface. Spread it evenly with a clean cloth. Let the board absorb the oil for a few hours. Then wipe off any excess oil with a dry cloth. Regular maintenance keeps your board looking fresh and new.
Storing Properly
Proper storage is vital for maintaining your cutting board. Store it in a dry, cool place. Avoid placing it near heat sources like stoves. Keep it upright to allow air circulation. This position helps the board dry completely. Never stack heavy items on it. Weight can cause warping and damage. Proper storage extends the life of your cutting board.
Troubleshooting Common Issues
Oiling a cutting board prevents cracks and maintains its smooth surface. Use mineral oil, applying it evenly across the board. Let it absorb overnight for optimal results.
When you’re maintaining your cutting board, issues can arise that make the task feel more like a chore. Encountering sticky surfaces or warped boards is not uncommon, but these problems are easily fixable. Let’s tackle these common issues to ensure your cutting board remains in top condition.Dealing With Sticky Surfaces
Have you ever noticed your cutting board feeling sticky after oiling? This could be due to using too much oil or not letting it absorb properly. A sticky surface isn’t just unpleasant to touch; it can also attract dirt and bacteria. First, wipe the board with a clean, dry cloth to remove excess oil. If it still feels tacky, sprinkle a little salt on the board and rub it with half a lemon. This natural remedy can break down the oil without damaging the wood. Give the board a good rinse with warm water and dry it immediately. Remember, the key is to apply thin layers of oil in the future and let each coat fully absorb.Fixing Warped Boards
A warped cutting board can be a chef’s nightmare. It wobbles on the countertop and can make cutting unsafe. Warping usually occurs when one side of the board is exposed to moisture or heat unevenly. To fix a warped board, start by soaking a towel in hot water. Lay the towel over the warped side and leave it for about an hour. The heat and moisture help the wood fibers relax and flatten out. Alternatively, place the board under a heavy object overnight. This can help press it back into shape. Ensure the board is dried evenly to prevent future warping. Ask yourself, how can you prevent these issues from happening again? The answer lies in regular maintenance and proper storage. Keeping your cutting board clean and dry will go a long way in maintaining its integrity. By addressing these common problems, you’re not just caring for a piece of wood but preserving a tool that enhances your cooking experience.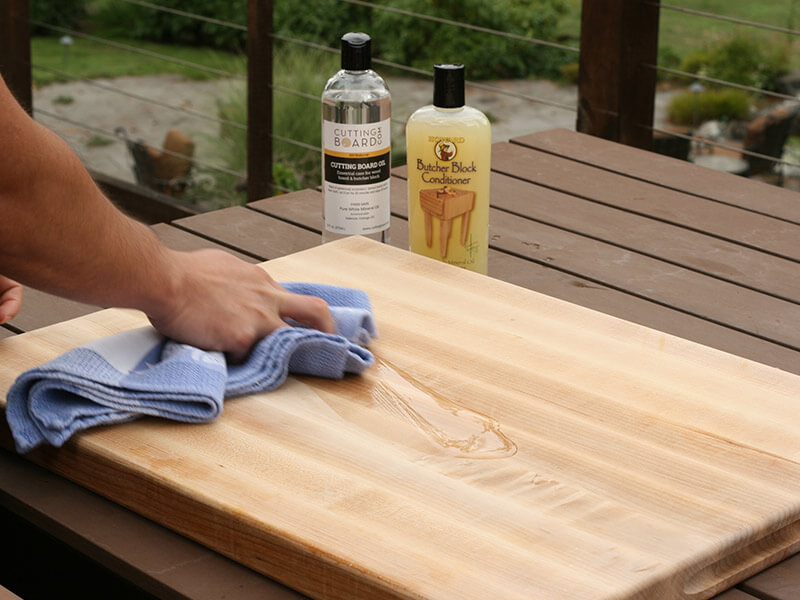
Credit: www.cuttingboard.com
Frequently Asked Questions
What Is The Best Way To Oil A Cutting Board?
Use food-grade mineral oil for your cutting board. Clean it first, then apply oil generously. Rub in with a cloth. Let it absorb overnight, and wipe excess. Repeat monthly for best results.
Can I Use Olive Oil To Oil My Cutting Board?
It’s not recommended to use olive oil on your cutting board. Olive oil can turn rancid over time. Instead, use food-grade mineral oil or specialized cutting board oil to maintain and protect your board effectively. These options help keep the wood in good condition and prevent drying out.
Should I Oil My Cutting Board Before Using It?
Yes, oil your cutting board before using it. This prevents drying, cracking, and protects the surface. Use food-safe mineral oil for best results. Regular oiling maintains the board’s appearance and prolongs its lifespan. Ensure the board is clean and dry before applying oil.
How Often Do Wooden Cutting Boards Need To Be Oiled?
Oil wooden cutting boards once a month to maintain their condition. Regular oiling prevents drying and cracking. Use food-grade mineral oil for best results. Apply a generous amount, then let it soak overnight. Wipe off excess oil with a clean cloth the next day.
This routine keeps boards in top shape.
Conclusion
Oiling your cutting board is easy and keeps it in great shape. Regular oiling prevents cracks and extends its lifespan. Use mineral oil for best results. Apply evenly and let it soak overnight. Your board will stay smooth and clean, ready for any kitchen task.
Make this a routine. Your board will thank you. You’ll enjoy cooking more with a well-maintained board. It’s a simple task with big benefits. Keep your kitchen tools in top condition. Happy cooking!

Hi, I’m Daniel Brooks—a food lover and kitchen gear enthusiast. I enjoy testing cookware, utensils, and gadgets to see what really works in everyday cooking. At PlugChef.com, I share honest reviews, comparisons, and simple guides to help you choose the best tools for a safer, smarter, and more enjoyable kitchen.
Related posts:
 What Type of Cooking Utensils are Safe: Expert Picks
 What Innovations Could Blenders Make: Unleashing Future Tech
 Smart Strategies to Organize a Small Kitchen: Maximize Space
 How to Organize a Kitchen Cabinet: Expert Tips & Tricks
 How to Organize Kitchen Drawers: Expert Tips and Tricks
 How to Organize a Corner Kitchen Cupboard: Expert Tips

