Have you ever admired those stunning cutting boards with intricate patterns and wondered how they are made? You’re in the right place.
Creating an end grain cutting board might seem like a daunting task at first, but with the right guidance, you can craft a piece that’s both functional and beautiful. Picture this: a cutting board that not only serves as a handy kitchen tool but also adds an elegant touch to your countertop.
This article will guide you through each step, ensuring you understand the process and feel confident enough to try it yourself. Imagine the satisfaction of using a cutting board you made with your own hands, knowing it will stand the test of time and the toughest chopping tasks. Stick around to discover how you can transform a simple block of wood into a masterpiece that will impress your friends and family. Let’s dive in and unlock the secrets of making an end grain cutting board that you’ll be proud to showcase in your kitchen.
Credit: aroundhomediy.com
Materials And Tools
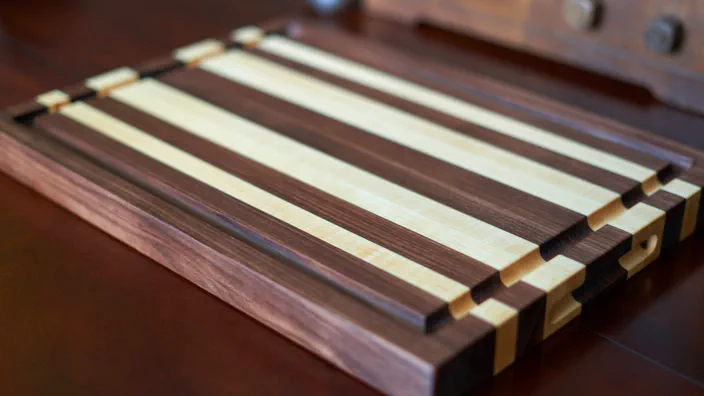
Creating an end grain cutting board is a rewarding project. It requires careful selection of materials and tools. Using the right materials ensures durability and beauty. The right tools make the process smoother and safer. Let’s explore what you need for this DIY project.
Wood Selection
Choose hardwoods like maple, walnut, or cherry. These woods are durable and beautiful. They have tight grains that resist moisture. This makes them perfect for cutting boards. Mixing wood types adds visual appeal. Ensure all pieces are the same thickness for uniformity.
Necessary Tools
A few essential tools make the process easier. A table saw is crucial for precise cuts. A planer smooths the wood surface. A sander gives a fine finish. Wood glue holds the pieces together securely. Clamps apply even pressure while the glue dries. A router rounds the edges for a finished look.
Safety Equipment
Safety should always be a priority. Wear safety goggles to protect your eyes. Use ear protection when using loud tools. A dust mask prevents inhalation of wood dust. Gloves offer a better grip and protect your hands. Ensure your workspace is well-lit and organized.

Credit: www.instructables.com
Design And Planning
Crafting an end grain cutting board requires careful design and planning. Select durable hardwoods like maple or walnut for longevity. Arrange wood pieces to form a checkerboard pattern, enhancing visual appeal and functionality.
Creating an end grain cutting board isn’t just about skill; it’s also about creativity. The design and planning phase is where your ideas come to life. This step is crucial as it sets the foundation for a cutting board that’s not only functional but also a piece of art in your kitchen. You’ll want to focus on choosing patterns, measuring and marking accurately, and devising a precise cutting plan. Let’s dive into each aspect and ensure you create a masterpiece you’ll be proud to use every day.Choosing A Pattern
Choosing the right pattern is like selecting the perfect outfit. It should reflect your personality and fit seamlessly into your kitchen decor. Think about the types of wood you want to use. Maple and walnut are popular choices because they contrast beautifully. You might want to consider classic checkerboard patterns or more intricate designs if you’re feeling adventurous. Have you ever wondered why certain patterns catch your eye more than others? Experiment with different combinations of woods and patterns. Sketch them out and see what resonates with you. Remember, this is your canvas.Measuring And Marking
Accuracy is key when measuring and marking your wood pieces. You don’t want uneven edges or mismatched pieces. Use a reliable ruler or tape measure, and make sure your pencil marks are clear but not too bold. Consider the size of your cutting board. Do you want something large and robust or compact and sleek? Marking your wood correctly ensures that you stick to your plan and avoid any costly mistakes. It’s like following a treasure map—each mark leads you closer to the final product.Cutting Plan
Your cutting plan is the blueprint of your project. It’s where precision meets creativity. Ensure you have all the tools ready and the blades are sharp. The cutting plan should detail each piece’s dimensions and how they fit together. Have a backup plan if things don’t go perfectly. Mistakes happen, and adaptability is your friend. How will you adjust if a piece doesn’t align perfectly? This foresight will save you time and frustration. With these steps, you’ll be well-equipped to bring your vision to life. Design and planning are the heart of your cutting board project, where your creativity and precision blend to create something truly unique.Cutting The Wood
Crafting an end grain cutting board involves arranging wood pieces with the grain exposed. This method enhances durability and showcases beautiful wood patterns. Ideal for kitchen use, it minimizes knife wear.
Cutting the wood is a crucial step in making an end grain cutting board. This process determines the board’s final look and durability. Using sharp tools and precise measurements ensures a perfect start to your project. Follow these simple steps to create a beautiful cutting board.Preparing The Wood
Choose quality hardwoods like maple, walnut, or cherry. Ensure the wood is dry and free from defects. Begin by measuring the thickness and width needed for your board. Mark the wood with a pencil for accurate cutting. Use a square to check that the edges are straight. Sand the wood lightly to remove rough surfaces.Cutting Strips
Set up your table saw with the correct blade height. Cut the wood into strips, each equal in width. Keep the cuts straight and even. Move slowly to avoid splintering the wood. Use a push stick for safety. Check the strips for uniformity before proceeding.Arranging The Strips
Lay the strips side by side on a flat surface. Alternate the colors for a checkerboard pattern. Adjust the strips for an appealing design. Ensure the grain faces up for durability. Align the ends so the board is square. Secure the strips with clamps to hold them in place.Gluing The Strips
Gluing the strips is a crucial step in crafting an end grain cutting board. Align the wood strips carefully, apply glue evenly, and ensure a tight bond by clamping them securely. This process guarantees a durable and visually appealing cutting surface.
Crafting an end grain cutting board is a rewarding project that requires patience and precision. One of the crucial steps in this process is gluing the strips. This stage determines the durability and longevity of your cutting board. If done correctly, it ensures a solid foundation for the beautiful mosaic of end grain. Let’s walk through each part of this gluing process to ensure a successful outcome.Applying Glue
Begin by selecting a high-quality, waterproof wood glue. Ensure that the surfaces of the wood strips are clean and dry. Apply a generous amount of glue along the edge of each strip. Spread it evenly using a brush or a small roller. Don’t rush this step. Consistent coverage is key. You want to avoid gaps that might weaken the structure. Think about how you spread peanut butter on toast—thorough, but not messy.Clamping Techniques
Now, it’s time to clamp the glued strips together. Use bar clamps for even pressure across the board. Place one clamp every few inches along the length of the board. This ensures a tight bond between the strips. Make sure the strips are aligned. A misaligned board can lead to an uneven surface. Have you ever tried to balance a wobbly table? That’s what you’ll get if you skip this step. Check the alignment before the glue sets.Drying Time
Patience is your ally here. Allow the glue to dry completely, usually around 24 hours. It’s tempting to check early, but this can weaken the bond. Consider the drying time as part of the craftsmanship. When was the last time you rushed through a task and regretted it later? Let the board sit untouched and give it the time it needs to become a sturdy kitchen companion. By mastering these steps in gluing the strips, you lay the groundwork for a cutting board that’s both functional and beautiful. What other woodworking projects have you put off because they seemed too complex? Perhaps this is the perfect opportunity to dive in and create something exceptional.Sanding And Smoothing
Sanding and smoothing are key steps to crafting an end grain cutting board. Start with coarse sandpaper, gradually moving to finer grits for a silky finish. Ensure even pressure for a smooth surface, enhancing the board’s aesthetic and functionality.
Sanding and smoothing are crucial steps in creating a beautiful end grain cutting board. These steps ensure a smooth surface, enhancing both functionality and appearance. Proper sanding techniques can transform a rough board into a sleek kitchen tool. Let’s dive into the process.Initial Sanding
Start by using a coarse grit sandpaper. This helps remove any rough spots or uneven areas on the board. Use a sanding block or a mechanical sander for consistent pressure. Pay attention to the edges and corners. Ensure they are smooth and rounded. Check the board for any splinters or rough patches. Sand until the surface feels even and smooth.Filling Gaps
Look for any small gaps or imperfections. Fill these with wood filler that matches the board’s color. This step is essential for a flawless finish. Apply the filler carefully with a putty knife. Allow it to dry completely before proceeding. Once dry, lightly sand the filled areas. This ensures they blend seamlessly with the surface.Final Sanding
Switch to a finer grit sandpaper for the final sanding. This step polishes the board for a smooth finish. Sand gently in circular motions. This helps achieve an even texture across the board. Wipe the board with a damp cloth to remove dust. Inspect the surface for any remaining rough spots. Repeat the sanding if necessary. The goal is a smooth, polished cutting board ready for use.Applying Finish
Applying finish to an end grain cutting board ensures durability and enhances its natural beauty. Use food-safe oil or wax to protect the wood, making it resistant to moisture and stains. Regular maintenance keeps the board looking new and extends its lifespan.
Applying the right finish to your end grain cutting board is a crucial step. It not only enhances the board’s appearance but also protects it from moisture and bacteria. This process requires attention and care, ensuring your board lasts for years. Let’s dive into how you can apply a finish effectively.Choosing A Finish
Selecting the right finish is essential. Food-safe options like mineral oil or beeswax are popular. They are non-toxic and provide a protective layer against moisture. Consider your board’s use when choosing. If it’s heavily used, a durable finish like tung oil might be beneficial. Always prioritize health and safety by confirming the product is food-safe.Application Techniques
Applying the finish properly ensures maximum protection. Start with a clean and dry board. Use a soft, lint-free cloth to apply a generous amount of oil or wax. Apply in the direction of the grain for even coverage. Let the board absorb the finish, then remove any excess. Repeat this process two to three times for optimal results.Curing Time
Allowing your finish to cure is critical. This process can take up to 24 hours. During this time, the board absorbs the finish, enhancing its protective qualities. Ensure the board is in a dry, dust-free environment while curing. Patience is key; rushing this process might compromise the finish’s effectiveness. Wouldn’t you want your hard work to shine through? Remember, these finishing touches not only preserve but also elevate your board’s beauty and durability. Your efforts now will pay off with a stunning and resilient cutting board.Maintenance Tips
Crafting an end grain cutting board requires thoughtful care to ensure durability. Regular oiling helps prevent cracks and warping. Gentle cleaning with warm, soapy water maintains its pristine condition.
Maintaining your end grain cutting board ensures its longevity and beauty. Proper care also keeps it hygienic and safe for food preparation. Here are some essential maintenance tips to follow for your cutting board. These steps will help keep your board in top condition.Cleaning The Board
Clean your cutting board after each use. Use warm water and mild dish soap. Scrub gently with a soft sponge. Avoid soaking the board in water. This prevents wood warping. Rinse thoroughly and dry immediately with a towel. Stand the board on its side to air dry completely. This helps prevent water damage.Regular Oiling
Oiling maintains the board’s luster and prevents drying. Use food-grade mineral oil or beeswax. Apply a generous amount of oil to the surface. Rub it in with a clean cloth. Let the oil absorb for several hours. Wipe off any excess oil with a dry cloth. Repeat this process monthly or as needed. Regular oiling keeps the wood hydrated.Storage Advice
Store your cutting board in a dry area. Keep it away from direct sunlight. This prevents fading and cracking. Ensure proper air circulation around the board. Avoid stacking heavy items on it. Heavy weight can cause warping. Use a dedicated space for storing your board. This ensures it remains in good shape.
Credit: www.youtube.com
Frequently Asked Questions
What Type Of Wood Is Best For An End Grain Cutting Board?
Maple, walnut, and cherry woods are ideal for end grain cutting boards. They are durable and resist knife marks. These woods also minimize bacterial growth due to their dense grain. Opt for hardwoods with tight grains for the best performance and longevity.
How To Make An End Grain Cutting Board?
To make an end grain cutting board, glue wood blocks with end grain facing up. Clamp tightly and let dry. Sand the surface smooth and apply food-safe mineral oil. Ensure even distribution for durability.
What Is The Best Thickness For An End Grain Cutting Board?
The ideal thickness for an end grain cutting board is 1. 5 to 2 inches. This ensures durability and stability while providing a smooth surface for cutting. Thicker boards resist warping and offer better absorption of knife impact, making them a popular choice for both home cooks and professional chefs.
Are End Grain Cutting Boards Really Better?
End grain cutting boards are superior due to their durability and gentle surface. They reduce knife dulling, offering a longer lifespan. The unique design allows self-healing, making them ideal for frequent use. They absorb less moisture, minimizing bacterial growth, ensuring a hygienic kitchen environment.
Conclusion
Crafting your own end grain cutting board can be a rewarding experience. It offers durability and a unique look. Follow the steps carefully, and you’ll create a useful kitchen tool. Remember, patience is key during assembly. Proper sanding ensures a smooth surface.
Regular oiling keeps your board in top shape. Enjoy your handmade cutting board for years. It’s a functional piece that adds charm to any kitchen. Share your creations with friends and family. They might want one too! Explore different wood patterns for a personal touch.
Happy crafting!

Hi, I’m Daniel Brooks—a food lover and kitchen gear enthusiast. I enjoy testing cookware, utensils, and gadgets to see what really works in everyday cooking. At PlugChef.com, I share honest reviews, comparisons, and simple guides to help you choose the best tools for a safer, smarter, and more enjoyable kitchen.
Related posts:
 What Type of Cooking Utensils are Safe: Expert Picks
 What Innovations Could Blenders Make: Unleashing Future Tech
 Smart Strategies to Organize a Small Kitchen: Maximize Space
 How to Organize a Kitchen Cabinet: Expert Tips & Tricks
 How to Organize Kitchen Drawers: Expert Tips and Tricks
 How to Organize a Corner Kitchen Cupboard: Expert Tips

