Imagine having a cutting board that not only enhances your kitchen’s aesthetics but also stands the test of time. You’re about to discover how to create an end grain wood cutting board, a piece that combines beauty with functionality.
This unique design, featuring the wood’s grain pattern on the surface, offers durability and is gentle on your knives. But why settle for a store-bought board when you can craft one that reflects your personal style? With this guide, you’ll learn the step-by-step process to create a masterpiece that could be the envy of your friends.
Ready to elevate your kitchen game and make something truly special? Let’s get started!
Choosing The Right Wood
Selecting the perfect wood for an end grain cutting board is essential. Hardwoods like maple, walnut, and cherry offer durability and aesthetic appeal. Their dense structure resists knife marks, ensuring a smooth surface for chopping.
Choosing the right wood for your end grain cutting board is crucial. The right choice impacts durability and aesthetics. Different woods offer unique benefits. Some enhance the board’s longevity. Others elevate its appearance. Understanding the characteristics of various woods helps make an informed decision.Best Wood Types
Maple is an excellent choice for cutting boards. It’s hard yet easy to work with. Walnut provides a rich color and smooth surface. Cherry is appreciated for its beautiful finish. These hardwoods are durable and resist knife marks. They maintain their integrity over time. Using these woods ensures your cutting board lasts.Avoiding Softwoods
Softwoods, like pine, are not ideal for cutting boards. They are prone to dents and scratches. Their porous nature absorbs moisture. This leads to warping and bacteria growth. Softwoods lack the density needed for a sturdy board. Choosing hardwoods over softwoods is essential. It keeps your cutting board functional and safe.
Credit: www.youtube.com
Tools And Materials Needed
Creating an end grain wood cutting board requires saws, clamps, and sandpaper. Essential materials include hardwood pieces, glue, and mineral oil. Proper tools ensure precision and durability for this kitchen staple.
Creating an end grain wood cutting board is a rewarding woodworking project that combines creativity with functionality. To achieve a beautiful and durable result, you need the right tools and materials. Knowing exactly what you need is the first step to success, so let’s dive into the essentials that will guide your woodworking journey.Essential Tools
To start, you’ll need a table saw. It’s crucial for cutting your wood into precise strips. A table saw ensures clean, straight cuts, which is fundamental for a tight-fitting board. A planer is another must-have. It smoothens the wood surfaces, making sure all pieces are of uniform thickness. This step is key to a seamless fit when you glue your board together. Don’t forget a sander. A random orbital sander works best. It helps in achieving a smooth finish, which is not just about aesthetics but also makes the board safe for food preparation. A clamp set is indispensable. When you glue the pieces, clamps hold them together tightly. This ensures a strong bond and prevents gaps from forming.Additional Supplies
You’ll need quality wood glue. Titebond III is a popular choice because it’s waterproof and food-safe. Strong adhesive is critical to the longevity of your cutting board. Consider your wood selection carefully. Hardwoods like maple, walnut, and cherry are excellent choices. They are durable and offer beautiful grain patterns. Invest in a finishing oil. Mineral oil is food-safe and easy to apply. It enhances the natural beauty of the wood and provides a protective barrier. Keep a set of sandpaper handy, ranging from coarse to fine grits. This helps in smoothing the edges and surfaces after initial sanding. Finally, a good safety gear set is essential. Safety glasses and ear protection are non-negotiable. Your safety should always be a priority. Have you ever tried making an end grain cutting board? If not, imagine the satisfaction of creating something both beautiful and practical with your own hands. With the right tools and materials, you’re well on your way to crafting a masterpiece.Preparing The Wood
Preparing the wood involves selecting quality pieces and cutting them into blocks. Sand each block to remove rough edges. Ensure all pieces are of uniform size for a seamless fit.
Preparing the wood is a crucial step in crafting an end grain cutting board. This process ensures that the board is durable and aesthetically pleasing. Selecting the right wood type is essential. Hardwoods like maple, walnut, or cherry are ideal choices. They offer durability and a beautiful finish. Begin by ensuring the wood is dry and free of defects. This guarantees a sturdy cutting board.Cutting The Wood
Cut the wood into strips of equal width. Use a saw for precision and safety. Each piece should be uniform in thickness. This ensures the board is even and stable. Measure twice, cut once. This prevents mistakes and material wastage. A clean cut is essential for a seamless finish.Arranging The Pieces
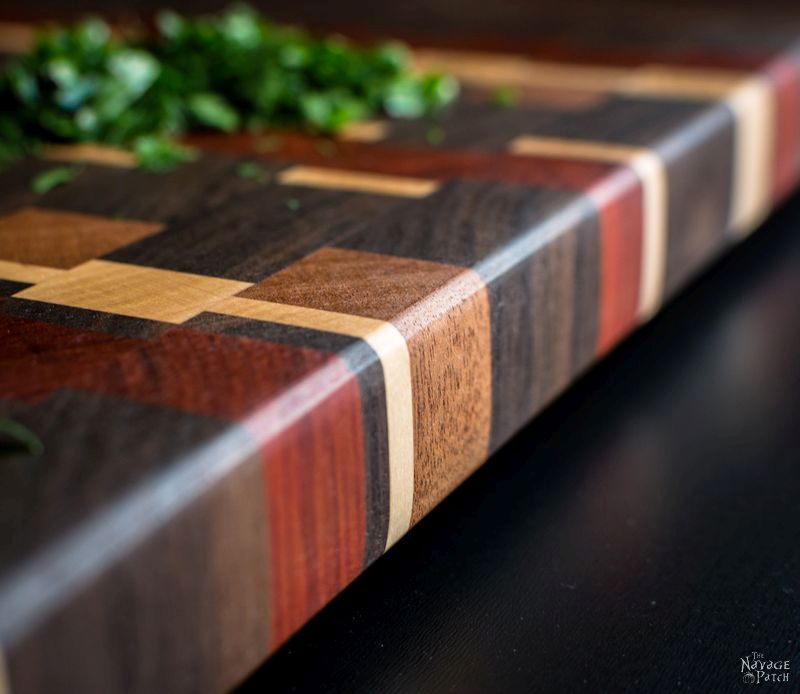
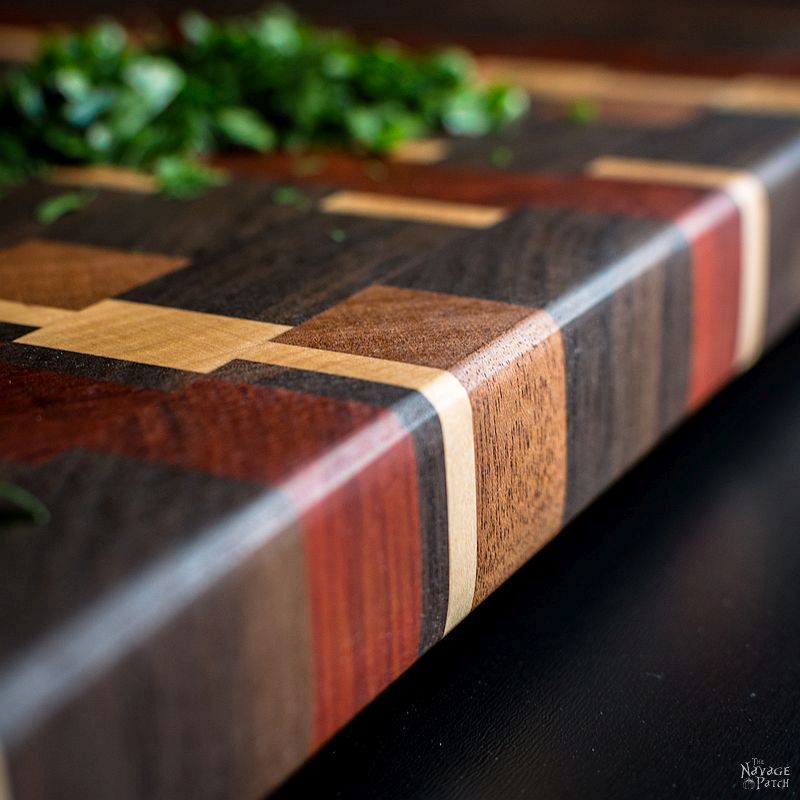
Arrange the wood pieces in a pattern of your choice. End grain boards have unique patterns. Rotate each piece to expose the end grain. This arrangement enhances the board’s durability. Experiment with different designs. Create a checkerboard or striped pattern. Ensure the pieces fit snugly together. This minimizes gaps and maximizes strength.Glue-up Process
The glue-up process is crucial for making an end grain wood cutting board. Proper application and clamping ensure the board is sturdy and durable. The steps are straightforward, but attention to detail is key. This section will guide you through applying glue and mastering clamping techniques.
Applying The Glue
Start by choosing a high-quality wood glue. Spread the glue evenly on each wood piece. Use a brush for a smooth and thorough application. Too much glue can create a mess. Too little will weaken the bond. Aim for a thin, even layer. Ensure all surfaces are covered. Check for any dry spots. They need more glue.
Clamping Techniques
Clamping is essential for a solid bond. Align the wood pieces carefully before clamping. Use parallel clamps for even pressure. Start by tightening the middle clamps. Then move to the outer ones. Check alignment as you tighten. Adjust if necessary. Ensure the clamps are tight. But avoid over-tightening. It can damage the wood. Let the glue dry completely. Follow the manufacturer’s drying time. This ensures a strong, lasting bond.
Sanding And Finishing
Sanding and finishing are crucial steps in crafting a beautiful end grain wood cutting board. These steps enhance the board’s appearance and ensure its durability. Proper sanding smooths the surface, while the right finish protects the wood. Let’s explore effective techniques for sanding and the best finishes to apply.
Sanding Tips
Begin sanding with coarse grit sandpaper. This removes rough patches and uneven surfaces. Gradually switch to finer grits for a smoother feel. Use even pressure to avoid gouges. Sand in circular motions for uniformity. Ensure all edges are smooth to prevent splinters. Check the board’s surface regularly. This ensures you achieve the desired smoothness.
Choosing The Right Finish
Select a food-safe finish. Mineral oil is popular for cutting boards. It penetrates deeply, protecting the wood. Beeswax adds a glossy sheen and repels water. Consider using a combination of oil and wax. This provides both protection and shine. Apply finish with a clean cloth. Rub in circular motions for even coverage. Allow the finish to absorb overnight. Buff the board with a soft cloth for a polished look.
Credit: www.thenavagepatch.com
Maintaining Your Cutting Board
Crafting an end grain wood cutting board ensures durability and elegance. Regularly oil the board with food-grade mineral oil to maintain its quality. Clean it gently with warm soapy water after each use to prevent bacteria build-up. Let it dry completely before storing to preserve its shape and function.
Maintaining your end grain wood cutting board is essential for its longevity. Proper care ensures it remains a functional kitchen tool. Regular maintenance not only keeps it clean but also prevents damage. Here’s how you can take care of your cutting board effectively.Cleaning Tips
Wash your cutting board with warm water and mild soap. Use a soft sponge to avoid scratches. Rinse thoroughly to remove soap residue. Stand the board upright to air dry completely. Avoid soaking it in water to prevent warping.Periodic Maintenance
Apply mineral oil to your cutting board monthly. Use a clean cloth to spread the oil evenly. Let the board absorb the oil for a few hours. Wipe off any excess oil with a dry cloth. This helps maintain the board’s moisture balance.Troubleshooting Common Issues
Creating an end grain wood cutting board is rewarding. Yet, challenges may arise. Knowing how to troubleshoot common issues is key. This section will guide you through two prevalent problems. Let’s get started.
Dealing With Warping
Warping occurs when wood absorbs moisture unevenly. This causes the board to twist or bend. Ensure your wood is dry before starting. Use a moisture meter to check levels. Store wood in a cool, dry place. This prevents unwanted moisture absorption. If warping occurs, try to flatten the board. Use clamps to apply pressure. Keep the board clamped until it dries completely. Sand the surface to restore a flat finish.
Repairing Cracks
Cracks can appear from sudden temperature changes. Or from drying too fast. To fix small cracks, use wood glue. Fill the crack with glue. Press the crack closed. Wipe excess glue with a damp cloth. For larger cracks, use sawdust and glue. Mix them to form a paste. Fill the crack with the paste. Let it dry. Sand the area smooth. This restores the board’s appearance and strength.
Credit: www.thenavagepatch.com
Frequently Asked Questions
What Wood To Use For An End Grain Cutting Board?
Choose hardwoods like maple, walnut, or cherry for end grain cutting boards. These woods are durable and resist knife marks. Ensure the wood is properly dried to prevent warping. Avoid softwoods as they can damage easily. Properly finished hardwood ensures longevity and a smooth cutting surface.
How To Make An End Grain Cutting Board?
To make an end grain cutting board, select hardwoods like maple or walnut. Cut and glue wood strips with end grain facing up. Clamp tightly, then sand and finish with food-safe oil. Ensure a smooth surface for durability and safety.
What Is The Best Thickness For An End Grain Cutting Board?
The best thickness for an end grain cutting board is 1. 5 to 2 inches. This thickness offers durability and prevents warping. It also provides a stable surface for chopping, enhancing safety and longevity. Choose thicker boards for heavy-duty use in professional kitchens.
Are End Grain Wood Cutting Boards Better?
Yes, end grain wood cutting boards are better. They are durable and knife-friendly, minimizing blade dulling. They also self-heal from cuts, prolonging board life. Their unique pattern provides an attractive kitchen aesthetic.
Conclusion
Crafting an end grain wood cutting board is a rewarding project. You’ve learned the steps, from selecting the right wood to finishing the board. Each step requires patience and precision. But the result? A durable and beautiful cutting board. It will enhance your kitchen’s functionality and charm.
Remember to maintain your board regularly. This ensures it lasts for years. Enjoy the satisfaction of using something you made. Start your woodworking journey today. Your kitchen deserves this handmade touch. Happy crafting!

I’m Abby Lu, a passionate home cook who loves simplifying everyday meals. At PlugChef.com, I share product reviews and cooking guides to help you find the best tools for your kitchen.
Related posts:
 What Type of Cooking Utensils are Safe: Expert Picks
 What Innovations Could Blenders Make: Unleashing Future Tech
 Smart Strategies to Organize a Small Kitchen: Maximize Space
 How to Organize a Kitchen Cabinet: Expert Tips & Tricks
 How to Organize Kitchen Drawers: Expert Tips and Tricks
 How to Organize a Corner Kitchen Cupboard: Expert Tips

