Imagine stepping into your kitchen and seeing a stunning butcher block cutting board that you made with your own hands. This piece doesn’t just serve as a practical tool; it becomes a centerpiece, telling a story of craftsmanship and creativity.
You’re about to embark on a rewarding adventure where you transform simple wood into a masterpiece that reflects your personal style. With each step carefully laid out, you’ll discover the secrets to crafting a cutting board that not only meets your culinary needs but also impresses friends and family.
Ready to roll up your sleeves and dive into the world of woodworking? Let’s turn those dreams into reality, and make something extraordinary together.

Credit: www.youtube.com
Materials And Tools Needed
Crafting a butcher block cutting board requires hardwood like maple or oak. Essential tools include clamps, a saw, and sandpaper. Food-safe oil or finish completes the project, ensuring durability and safety for kitchen use.
Creating a butcher block cutting board is a rewarding DIY project that not only enhances your kitchen but also provides a sense of accomplishment. Before you dive into the crafting process, understanding the materials and tools required is crucial. Having the right supplies at hand will ensure the process is smooth and enjoyable. You don’t want to be in the middle of your project and realize you’re missing a key component. Let’s break down what you’ll need to get started.Wood Selection
Choosing the right wood is essential for the durability and appearance of your cutting board. Maple, walnut, and cherry are popular choices due to their hardness and aesthetic appeal. Consider the grain pattern and color that will best match your kitchen decor. Remember, not all woods are food-safe, so pick ones that are non-toxic and won’t dull your knives.Adhesives
You’ll need a strong wood glue to hold the pieces together. Titebond III is a favorite among DIY enthusiasts for its water resistance and strength. Make sure the glue is FDA-approved for food contact, ensuring your board is safe for meal prep. Test the glue on a small piece of wood first to see how it dries.Tools For Cutting And Shaping
A table saw or miter saw is essential for cutting the wood to size. For a smooth finish, a planer and a sander will come in handy. You might find it helpful to use a router for rounded edges, giving your board a professional look. If you don’t own these tools, consider borrowing them from a friend or renting them from a local hardware store.Clamps
Clamps are necessary to hold the glued pieces of wood firmly together until they dry. Bar clamps are particularly effective for larger boards. You’ll need several to ensure even pressure across the entire board. Clamps can be tricky, so practice using them beforehand.Finishing Supplies
To protect your butcher block from moisture and bacteria, you’ll need mineral oil or beeswax. These finishing oils will enhance the wood’s natural beauty and keep it looking fresh. Apply them liberally and let them soak in overnight for the best results. Are you ready to transform your kitchen with a handmade butcher block cutting board? The right materials and tools can make all the difference in achieving a high-quality finish. Take your time to gather everything you need, and soon you’ll be crafting a functional and stylish piece for your home.Selecting The Right Wood
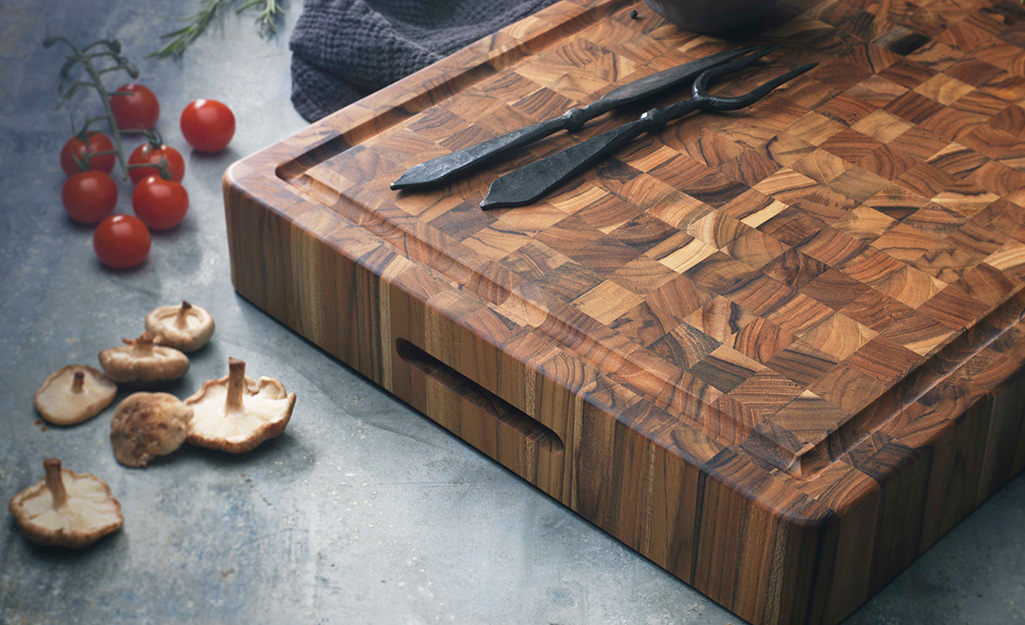
Choosing the right wood is key for a durable butcher block cutting board. Opt for hardwoods like maple or walnut. These woods are strong and resist knife marks. Plus, they add a nice look to your kitchen.
Selecting the right wood for your butcher block cutting board is crucial. The wood you choose will affect the board’s durability, appearance, and overall performance. Your cutting board is more than just a kitchen tool; it’s a craft that reflects your personal taste and style.Selecting The Best Type Of Wood
When choosing wood, think about hardness. Hardwoods like maple, walnut, and cherry are popular choices. They are tough enough to withstand knife cuts without damaging your blades. Consider the wood grain. End grain boards, for example, show the ends of the wood fibers and are gentle on knives. Edge grain boards, on the other hand, display the wood’s long fibers and are often more affordable.Understanding Wood Toxicity
Not all woods are food-safe. Avoid woods like pine or cedar as they can release harmful toxins. Always opt for woods that are known to be safe for food preparation. Check for allergies. Some people are sensitive to certain wood types. It’s always a good idea to ensure the wood you choose won’t cause an allergic reaction.Considering Wood Aesthetics
Each wood type offers a unique color and pattern. Maple is light and uniform, walnut is dark and rich, while cherry has warm, reddish tones. Think about which color best complements your kitchen decor. Ask yourself which aesthetic appeals to you most. Do you prefer a clean, modern look or a rustic, traditional feel? Your choice of wood can dramatically change the visual impact of your cutting board.Evaluating Wood Cost And Availability
Budget plays a role in your decision. Exotic woods may look beautiful, but they can be expensive. More common woods like maple or oak can be just as effective and easier on your wallet. Consider local availability. Locally sourced wood can be more sustainable and cost-effective. Plus, supporting local suppliers helps your community thrive.Personal Experience With Wood Selection
When I made my first butcher block, I chose maple for its hardness and clean look. It fit perfectly with my kitchen’s minimalist style. The process taught me how much the right wood can enhance both function and beauty. What wood will you choose for your butcher block? Making the right selection can transform your project from a simple board to a cherished kitchen centerpiece. So, take your time and enjoy the process of creating something uniquely yours.Preparing The Wood
Crafting a butcher block cutting board begins with selecting quality wood. Cut pieces to uniform size. Ensure smooth surfaces by sanding each piece thoroughly.
Preparing the wood for a butcher block cutting board is a rewarding step that lays the foundation for the entire project. It’s a process that requires both precision and a touch of creativity. Whether you’re a seasoned woodworker or trying it out for the first time, getting this part right ensures your cutting board will be both functional and beautiful. Have you ever noticed how the right kind of wood can completely transform a kitchen tool into a work of art?Cutting To Size
First, you’ll want to decide on the dimensions of your cutting board. Think about how you plan to use it. Will it be a centerpiece on your kitchen counter or a handy tool tucked away in a drawer? Once you’ve settled on the size, mark your measurements clearly on the wood. A sharp pencil or a piece of chalk can do wonders here. With your measurements in place, it’s time to cut. Use a table saw for straight, clean cuts. Don’t rush this step. Precision is key to ensuring each piece fits together seamlessly.Smoothing The Surfaces
Now that you’ve cut your pieces, it’s time to smooth the surfaces. This is where your board starts to take on its polished look. Grab some sandpaper, starting with a coarse grit like 80, and work your way to a finer grit such as 220. This gradual process ensures a silky finish. Pay attention to the edges and corners. These areas can often be overlooked, but smoothing them out makes your board safer and more comfortable to handle. How smooth do you like your cutting boards? That’s the level of detail you should aim for. By focusing on these steps, you’re not just making a cutting board; you’re crafting a unique piece that reflects your personal style.Arranging The Wood Pieces
Arrange wood pieces carefully to create a beautiful butcher block cutting board. Choose similar-sized pieces for a uniform look. Ensure tight, even joints for a smooth finish.
Arranging the wood pieces is a crucial step in making a butcher block cutting board. This process involves selecting and positioning the wood segments to form a durable and visually appealing board. Careful attention to detail ensures the cutting board will be both functional and beautiful.Creating A Pattern
Selecting wood pieces is more than choosing any block. Consider the grain and color of each piece. A unique pattern can enhance the board’s appearance. Place darker wood next to lighter wood for contrast. Experiment with different arrangements. This adds character and uniqueness to your board.Ensuring Tight Fits
A tight fit between wood pieces is essential for durability. Gaps can weaken the board and trap food particles. Proper alignment prevents these issues. Sand edges for smooth connections. This ensures each piece fits snugly. Test the fit before gluing to confirm stability.Gluing The Pieces Together
Creating a butcher block cutting board is a rewarding experience that combines craftsmanship with functionality. One of the pivotal steps in this process is gluing the pieces together. This phase requires precision and patience to ensure your cutting board is durable and aesthetically pleasing. Let’s explore how to carefully glue and clamp the pieces for a seamless finish.
Applying The Glue
Begin by selecting a high-quality wood glue that promises a strong bond. You’ll want to apply the glue evenly on the edges of each wood piece. Remember, too much glue can create a mess, while too little might compromise the strength of your board.
Spread the glue using a brush or a roller for a uniform coat. As you do this, think about the satisfaction of seeing your pieces come together. Consider: how will you ensure every piece aligns perfectly? Precision here makes all the difference.
Clamping The Wood
Once the glue is applied, clamping the wood is your next step. Clamps are essential for holding the pieces tightly together while the glue dries. Choose clamps that are appropriate for the size of your board, ensuring they’re evenly spaced for balanced pressure.
As you tighten the clamps, watch for excess glue squeezing out. This is your chance to wipe it off for a clean finish. Have you ever thought about how the right amount of pressure can prevent warping and gaps? Clamping correctly is crucial for a flawless result.
After securing the clamps, allow the glue to dry for the recommended time. This patience pays off with a sturdy cutting board that stands the test of time. How confident are you in your clamping technique to achieve that professional touch?
Sanding The Board
Smooth surfaces create a professional look for butcher block cutting boards. Sand the board using fine-grit sandpaper for a polished finish. Ensure even sanding to achieve a uniform texture, making it ready for oiling and use.
Sanding your butcher block cutting board is a crucial step in achieving a smooth, professional finish. It not only enhances the board’s appearance but also ensures that it’s safe for food preparation. This process might seem straightforward, but there are specific techniques that can make all the difference. Let’s dive into how to sand your board effectively.Using Coarse Grit
Start with a coarse grit sandpaper, typically around 60 to 80 grit. This step is all about removing any rough spots or leftover adhesive from the glue-up process. Secure your board and sand evenly across the surface, applying consistent pressure. Feel free to use an orbital sander if you have one; it saves time and effort. However, if you prefer the old-school method, hand sanding works just fine. Inspect the board for any uneven areas or scratches. If you find any, give those spots a little extra attention. This initial sanding sets the foundation for a flawless finish. Have you ever noticed how a smooth surface can make a difference in your woodworking projects?Finishing With Fine Grit
Once you’re satisfied with the initial sanding, switch to a fine grit sandpaper, around 220 grit. This part of the process is about refining the surface and getting rid of any remaining imperfections. Sand the board again, this time with a gentler touch. The goal here is to polish the surface and prepare it for the final sealing. Remember to sand with the grain of the wood to achieve the best results. A smooth finish not only looks great but also feels pleasing to the touch. You’ll notice a remarkable difference in texture, almost like a piece of art ready to be displayed in your kitchen. After sanding, wipe the board down with a damp cloth to remove any dust. This ensures a clean surface for the finishing touches. Are you excited to see how your hard work pays off?Applying Finishes
Applying finishes to your butcher block cutting board gives it a polished look. This step is crucial for protecting the wood and enhancing its beauty. A good finish will prevent moisture damage and prolong the board’s life. Let’s explore how to choose and apply the right finish.
Choosing The Right Finish
Not all finishes are suitable for butcher block cutting boards. Food-safe finishes are a must. Popular options include mineral oil, beeswax, and coconut oil. Each has benefits. Mineral oil is clear and easy to apply. Beeswax adds a natural shine. Coconut oil is antibacterial. Choose based on your preference and availability.
Applying Oil Or Wax
Start with a clean, dry cutting board. Use a soft cloth or brush for application. Pour a small amount of oil onto the board. Spread evenly using circular motions. Let the oil soak for a few hours. Wipe off any excess with a dry cloth. For wax, rub it directly onto the board. Buff the surface with a cloth for a smooth finish. Reapply as needed to maintain protection.

Credit: www.reddit.com
Maintenance Tips
Maintaining your butcher block cutting board ensures it stays durable and beautiful. Proper care extends its lifespan and keeps it hygienic. Routine cleaning and oiling are essential practices for a healthy board.
Cleaning The Board
Clean your board after each use. Use mild soap and warm water. Scrub gently with a soft sponge. Avoid soaking the board in water. Water can warp the wood over time. Dry it immediately with a clean towel. This prevents moisture from seeping in.
For stubborn stains, use a mixture of baking soda and water. Apply the paste and let it sit for a few minutes. Scrub with a brush and rinse thoroughly. This method is effective yet gentle on the wood.
Regular Oiling
Oil your butcher block every few weeks. Use food-grade mineral oil. It penetrates the wood and maintains its sheen. Apply a generous amount with a clean cloth. Let the oil soak in overnight.
Wipe off excess oil with a dry cloth. This keeps the board moisturized and prevents cracking. Regular oiling maintains the board’s natural color. It also adds a protective layer against bacteria.
Credit: www.homedepot.com
Frequently Asked Questions
What Is The Rule Of 7 For Butcher Block?
The rule of 7 for butcher block involves sanding and oiling the surface seven times. This ensures a smooth finish, enhances durability, and maintains the wood’s condition. Regular maintenance is crucial for preserving the beauty and functionality of butcher block countertops.
What Kind Of Wood Do You Use To Make A Butcher Block?
Butcher blocks often use hardwoods like maple, walnut, and cherry. These woods provide durability and resistance to knife marks. Maple is the most popular due to its fine grain and hardness. Walnut offers a rich color, while cherry darkens over time, adding character to the block.
Can You Make Cutting Boards Out Of Butcher Block?
Yes, you can make cutting boards out of butcher block. Butcher block is durable and food-safe. It offers a sturdy surface for chopping. Ensure the wood is properly sealed to prevent moisture absorption and bacterial growth. Regular maintenance will keep the cutting board in good condition.
What Do You Seal A Butcher Block Cutting Board With?
Seal a butcher block cutting board with food-safe mineral oil or beeswax. Apply generously and let it absorb overnight. Regular maintenance ensures longevity and keeps the board hygienic. Avoid using vegetable oils, as they can go rancid. Proper sealing prevents moisture damage and maintains the board’s smooth surface.
Conclusion
Creating a butcher block cutting board is rewarding. You crafted something useful. Your kitchen now has a durable tool. This board lasts long with proper care. It enhances your cooking experience. You learned valuable skills. Woodworking can be fun and relaxing.
Enjoy using your handmade cutting board. Feel proud of your achievement. Invite friends over. Show them your new creation. They will admire your effort. Share your woodworking journey. Inspire others to try it. Keep exploring new projects. Your skills will grow with each task.
Embrace the joy of crafting.

I’m Abby Lu, a passionate home cook who loves simplifying everyday meals. At PlugChef.com, I share product reviews and cooking guides to help you find the best tools for your kitchen.
Related posts:
 What Type of Cooking Utensils are Safe: Expert Picks
 What Innovations Could Blenders Make: Unleashing Future Tech
 Smart Strategies to Organize a Small Kitchen: Maximize Space
 How to Organize a Kitchen Cabinet: Expert Tips & Tricks
 How to Organize Kitchen Drawers: Expert Tips and Tricks
 How to Organize a Corner Kitchen Cupboard: Expert Tips

