Are you ready to add vibrant, beautiful colors to your eggs without using harsh chemicals? Dyeing eggs naturally is easier than you think, and it’s a fun way to bring creativity and safety into your home.
Imagine creating stunning, unique designs using ingredients you probably already have in your kitchen. In this guide, you’ll discover simple, natural methods that make your eggs look amazing and keep your family safe. Keep reading, and you’ll learn how to transform ordinary eggs into colorful works of art—quickly, safely, and naturally.
Benefits Of Natural Egg Dyeing
Dyeing eggs naturally offers more than just beautiful colors. It brings several benefits that go beyond aesthetics and touch on health, environment, and creativity. Understanding these advantages can inspire you to choose natural dyes for your next egg decorating project.
Eco-friendly Advantages
Natural dyes come from plants, spices, and other organic sources, making them biodegradable and less harmful to the environment. Unlike synthetic dyes, they don’t contain harsh chemicals that can pollute water or soil. When you use natural ingredients like onion skins or beet juice, you reduce plastic waste and toxic runoff.
Have you ever thought about how much waste a typical egg dye kit creates? Switching to natural dyes means you’re helping cut down on packaging and chemical residues. It’s a small step that adds up when many people join in.
Health And Safety Benefits
Using natural dyes means fewer risks for your family, especially if children are involved. Synthetic dyes can contain ingredients that irritate skin or cause allergic reactions, but natural dyes are usually gentle and food-safe. This makes them safer if you plan to eat the eggs afterward.
Consider the peace of mind you get when you know the colors come from familiar kitchen ingredients. It’s reassuring to avoid artificial chemicals in a hands-on activity with kids. Plus, you can customize colors without worrying about toxins.
Unique Color Results
Natural dyes create colors that vary with each batch, giving you one-of-a-kind eggs every time. The shades from turmeric, red cabbage, or coffee tend to have a soft, organic look that synthetic dyes can’t replicate. This unpredictability can make the process more fun and creative.
Have you noticed how natural dyes often produce subtle tones and unique patterns? These little imperfections add charm and personality to your eggs. You can even experiment by mixing different natural ingredients to discover new hues.
Credit: vincesmarket.ca
Materials Needed
Gathering the right materials is crucial for dyeing eggs naturally. You want vibrant colors and a smooth process, so having everything ready will save you time and frustration. Let’s take a closer look at what you’ll need to create your natural egg dyes successfully.
Natural Ingredients For Colors
- Red/Pink:Beets or red cabbage
- Yellow:Turmeric powder or yellow onion skins
- Blue/Purple:Red cabbage or blueberries
- Green:Spinach or parsley
- Brown:Coffee or black tea
These ingredients not only add color but also bring a unique earthy tone you won’t get from artificial dyes. Have you ever tasted turmeric or beet juice? Their strong pigments make your eggs pop with natural beauty.
Essential Tools
- White eggs (they show colors best)
- Glass jars or bowls (for soaking eggs in dye)
- Strainer or fine mesh sieve (to remove solids from dye)
- White vinegar (helps colors stick to eggshells)
- Measuring cups and spoons
- Spoons or tongs (to handle eggs safely)
- Paper towels or drying rack
Using glass containers lets you watch the colors develop, which is pretty satisfying. White eggs work best because they act like a blank canvas for your natural dyes.
Egg Preparation Tips
- Use room temperature eggs to prevent cracking during boiling.
- Boil eggs for about 10 minutes to ensure hard-cooked centers.
- Cool eggs quickly in ice water to stop cooking and make peeling easier.
- Handle eggs gently to avoid cracks before dyeing.
- Wipe eggs with a little vinegar before dyeing to remove oils that repel color.
Have you noticed how a tiny crack can ruin your color pattern? Taking time to prepare eggs carefully makes a big difference. I once skipped cooling eggs properly and ended up with messy, uneven colors—definitely a lesson learned.
Creating Natural Dyes
Use natural ingredients like onion skins, beet juice, or turmeric to create vibrant egg dyes. Soak boiled eggs in these colorful liquids for a few hours to achieve soft, beautiful hues. This simple process is safe and eco-friendly for all ages.
Creating natural dyes is an exciting and eco-friendly way to bring vibrant colors to your Easter eggs. Using ingredients you likely already have in your kitchen, you can craft a spectrum of hues without relying on synthetic chemicals. Plus, it’s a wonderful opportunity to experiment and learn which natural elements yield the most striking results.Using Fruits And Vegetables
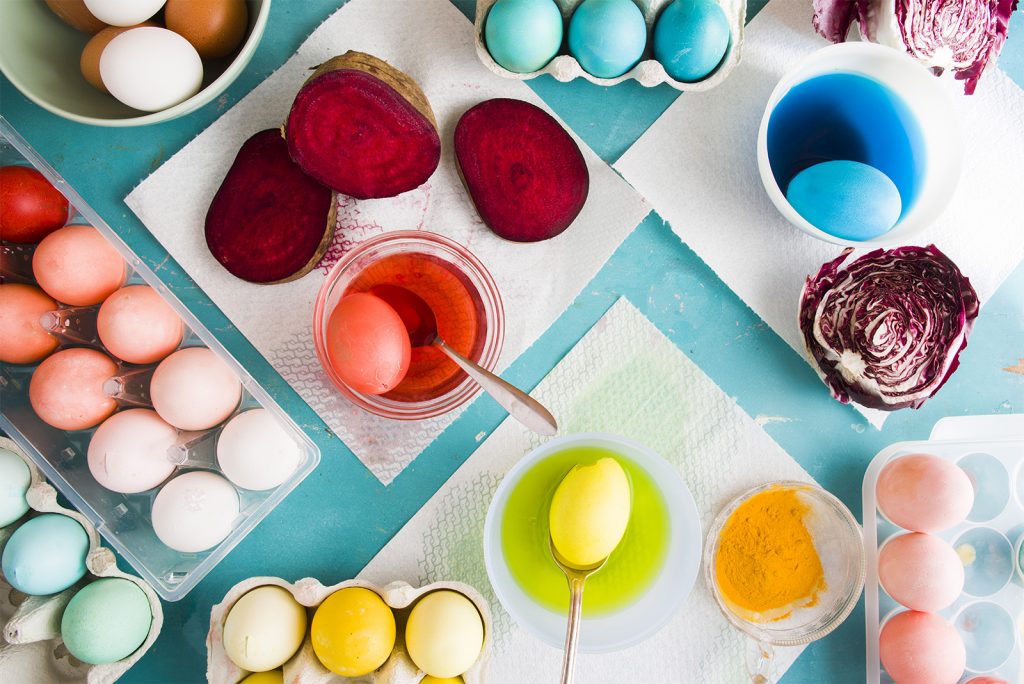
Fruits and vegetables are excellent sources of color. Red cabbage can create a lovely blue dye, while beetroot provides a deep pink. If you have some yellow onion skins, they can transform your eggs into a warm golden shade. Simply chop your chosen fruit or vegetable, add it to a pot with water, and simmer. The longer you simmer, the more intense the color will be.Herbs And Spices For Color
Herbs and spices aren’t just for cooking; they can also be used to dye eggs. Turmeric is a great choice if you want a vibrant yellow. Paprika can give your eggs an orange tint, and hibiscus tea might surprise you with its ability to produce a gentle lavender shade. Crush the herbs or spices to release their natural colors. Add them to boiling water and let them steep to develop the dye.Brewing And Straining Techniques
Brewing your natural dyes is straightforward but requires attention to detail. Start by bringing water to a boil, then reduce the heat to a simmer. Add your chosen dye materials and let them brew for at least 30 minutes. Straining is key to ensuring a smooth application. Use a fine mesh strainer to remove any solid particles from your dye. This step helps in achieving a consistent color on your eggs. Have you ever experimented with natural dyes? It’s a fun way to discover the rainbow of colors hidden in everyday ingredients. Why not make it a family project and see who can create the most unique shade?
Credit: cedarhouseliving.com
Dyeing Process Step-by-step
Natural egg dyeing is a fun, creative process that connects you with simple ingredients and nature’s colors. Understanding each part of the process helps you get the best results and enjoy the activity more. Let’s break down the dyeing process step-by-step so you can create beautifully colored eggs naturally.
Preparing The Eggs
Start with clean eggs. Gently wash them with warm water to remove any dirt or oils that might block the dye. Use white or light-colored eggs for the brightest results since darker shells won’t show natural colors well.
Decide if you want hard-boiled eggs or raw eggs for decoration only. Hard-boiled eggs are best if you plan to eat them later. Pierce a small hole at the bottom if you want to blow out the contents and keep just the shell for decoration.
Soaking Time For Vibrant Shades
The longer you soak your eggs in the natural dye, the deeper the color. Place the eggs in the dye bath made from ingredients like red cabbage, turmeric, or beet juice. Keep the temperature just below boiling for better absorption.
Check the color every 5-10 minutes. Sometimes, a quick dip gives a pastel shade, but soaking for an hour or more can produce rich, vivid colors. Have you noticed how some colors brighten up even more after drying?
Drying And Finishing Touches
Once you’re happy with the color, carefully remove the eggs and let them dry on a rack or paper towels. Avoid touching them too much while wet to prevent streaks or smudges. You can gently rub a little vegetable oil on the dry eggs to give them a glossy finish.
Consider adding designs by wrapping eggs in leaves or twine before dyeing. This creates natural patterns that make your eggs truly unique. What personal touch will you add to make your naturally dyed eggs stand out?
Color Variations And Effects
Natural egg dyeing offers a vibrant playground of colors and effects that go beyond the usual store-bought shades. By experimenting with different ingredients and techniques, you can create a stunning variety of hues that reflect your personal style. Let’s dive into how you can mix and match natural materials to get the perfect color and texture on your eggs.
Mixing Ingredients For New Hues
Combining natural dyes can lead to surprising and beautiful colors. For example, mixing beet juice with a little red cabbage water can shift the color from bright pink to a soft lavender. Try layering dyes by dipping the egg first in one color, letting it dry, and then dipping it in another to see unique shades emerge.
Don’t hesitate to experiment with quantities. More concentrated dye usually results in richer colors, but diluting the mixture can give you pastel tones. Have you thought about adding a pinch of turmeric to your onion skin dye? It can brighten the yellow and add warmth.
Using Vinegar And Other Fixatives
Vinegar plays a crucial role in natural dyeing by helping the color stick to the eggshell. Adding about a tablespoon of vinegar to your dye bath will make the colors more vibrant and longer-lasting. Without a fixative, your eggs might end up with dull or uneven patches.
Other fixatives like lemon juice or alum can also enhance color absorption, but vinegar is the most accessible and effective for most natural dyes. Have you tried soaking eggs in vinegar before dyeing? It can make a noticeable difference in how the color sets.
Creating Patterns And Designs
Patterns add personality to your naturally dyed eggs. You can use simple tools like rubber bands, leaves, or even old lace to create interesting textures. Place these items on the egg before dyeing and remove them afterward to reveal white or lighter patterns.
For more control, try using a toothbrush to flick dye onto the eggshell, creating speckled effects. Wrapping eggs in cloth soaked with dye can also produce subtle and unpredictable designs. What kind of patterns would you like to create? The possibilities are endless once you start experimenting.
Troubleshooting Common Issues
Natural egg dyeing is fun but can bring some challenges. Troubleshooting helps fix common problems fast. This section covers fading, uneven colors, and cracked eggs. Follow these tips to improve your results and enjoy the process more.
Faded Colors
Faded colors often happen when dye is too weak or eggs soak too briefly. Use more natural dye ingredients like red cabbage or turmeric. Boil them longer for stronger colors. Soak eggs at least 30 minutes for deep hues. Cooler water helps colors hold better.
Uneven Dyeing
Uneven dyeing shows as spots or streaks on eggs. Dirt, oil, or cracks cause this problem. Clean eggs well before dyeing using mild soap and water. Avoid touching eggs with oily hands. Stir dye gently during soaking to get even color.
Preventing Cracks
Cracks ruin egg dyeing by letting color seep inside. Use room temperature eggs to avoid shock in hot dye. Handle eggs gently to prevent damage. Add a teaspoon of vinegar to the dye bath to soften eggshells and reduce cracking risk.
Creative Ideas With Naturally Dyed Eggs
Natural dyes bring a fresh, earthy look to eggs. Their soft, muted colors create a warm, inviting feel. These eggs inspire many creative uses beyond simple dyeing. Explore unique ways to decorate, gift, and celebrate with naturally dyed eggs.
Decorating And Display Tips
Use leaves, flowers, or lace as stencils for patterns. Wrap eggs in cheesecloth to create subtle textures. Display eggs in wooden bowls or woven baskets for a rustic charm. Combine different colors and sizes for a vibrant arrangement. Place eggs on natural moss or hay for a spring vibe. Use twine or raffia to hang eggs as ornaments.
Gift Wrapping With Eco-friendly Eggs
Place dyed eggs in small burlap bags or recycled paper boxes. Add a sprig of herbs or dried flowers for decoration. Tie packages with jute string or ribbon made from natural fibers. Write personalized notes on recycled tags to accompany each gift. Use the eggs as part of a handmade gift basket. This adds a thoughtful, eco-friendly touch to presents.
Incorporating Into Festive Traditions
Use naturally dyed eggs in Easter egg hunts for a subtle twist. Arrange eggs as table centerpieces during spring celebrations. Include eggs in family rituals like blessing or storytelling. Create a natural egg garland to hang around the house. Share eggs as tokens of friendship or good luck. These ideas help keep traditions meaningful and green.

Credit: cedarhouseliving.com
Frequently Asked Questions
What Natural Ingredients Are Best For Dyeing Eggs?
Common natural dyes include beet juice, turmeric, red cabbage, and spinach. These ingredients provide vibrant, safe, and eco-friendly colors. Using vinegar helps the dye stick better to the eggshell. Experimenting with different plants can create unique shades and patterns.
How Long Should Eggs Soak In Natural Dye?
Eggs should soak for at least 30 minutes for light color. For deeper, richer hues, soak them for 1-3 hours or overnight. The soaking time depends on the dye concentration and desired shade intensity. Longer soaking results in more vibrant colors.
Can I Use Natural Dyes On Hard-boiled Eggs?
Yes, natural dyes work best on hard-boiled eggs. The boiling process helps the eggshell absorb color evenly. Ensure eggs are cooled before dyeing to prevent cracking. Natural dyes also maintain food safety for eggs intended to be eaten.
How To Make Natural Egg Dye At Home?
To make natural dye, boil chopped fruits, vegetables, or spices in water. Add 1 tablespoon of vinegar to enhance color absorption. Strain the mixture and let it cool before soaking eggs. This method is simple, safe, and environmentally friendly.
Conclusion
Natural egg dyeing brings color with simple kitchen ingredients. It’s safe and fun for all ages. You can use beets, turmeric, or spinach to create bright hues. The process is easy and eco-friendly. Try different plants to find your favorite colors.
This craft connects you with nature and tradition. Enjoy the creativity and the beautiful results. Natural dyes make your eggs unique and special. Give it a try and brighten your celebrations today.

I’m Abby Lu, a passionate home cook who loves simplifying everyday meals. At PlugChef.com, I share product reviews and cooking guides to help you find the best tools for your kitchen.
Related posts:
 What Type of Cooking Utensils are Safe: Expert Picks
 What Innovations Could Blenders Make: Unleashing Future Tech
 Smart Strategies to Organize a Small Kitchen: Maximize Space
 How to Organize a Kitchen Cabinet: Expert Tips & Tricks
 How to Organize Kitchen Drawers: Expert Tips and Tricks
 How to Organize a Corner Kitchen Cupboard: Expert Tips

