Are you looking to elevate your drawing skills with a challenging yet rewarding subject? If so, you’re in the right place.
Discover how to draw a knife with blood, a medium difficulty art project that will sharpen your skills and unleash your creativity. This guide is designed to help you capture the drama and intensity of this powerful image with ease.
You might feel a mix of excitement and curiosity as you think about the final result. Don’t worry; this tutorial will lead you through each step with clarity and precision. Ready to transform a blank canvas into a gripping masterpiece? Keep reading, and let’s dive into the details of bringing this vivid scene to life.
Materials And Tools
Creating a compelling drawing of a knife with blood requires the right materials and tools. The right supplies ensure precision and enhance your artwork’s realism. Let’s explore the necessary drawing supplies, suitable paper, and essential pencils and erasers.
Essential Drawing Supplies
Start with basic drawing supplies. You need quality pencils, erasers, and paper. These are the foundation of your art. A sharpener is vital for detailed work. Consider a blending stump for smooth shading effects. A ruler helps in drawing straight lines. Each tool plays a crucial role in bringing your vision to life.
Choosing The Right Paper
Selecting the right paper is essential. Choose a medium-texture paper. It holds pencil marks well. A heavier weight paper prevents tearing. It supports multiple layers of shading. Opt for acid-free paper for longevity. It keeps your drawing fresh over time.
Recommended Pencils And Erasers
Pencils come in various grades. Use HB for outlines. It provides a balanced tone. For darker areas, opt for 2B or 4B pencils. They offer deep, rich blacks. Mechanical pencils are great for fine details. For erasers, use a kneaded eraser. It lifts graphite without leaving marks. A vinyl eraser removes stubborn lines. Keep your tools organized and within reach.

Credit: www.amazon.com
Understanding Knife Anatomy
Discover the essentials of knife anatomy for a drawing. Capture its details with medium difficulty. Add realistic blood effects to your art. Understanding key knife features enhances your drawing skills.
Understanding Knife Anatomy Drawing a knife with blood requires a keen eye for detail and understanding the anatomy of the knife. Recognizing the distinct parts can transform your illustration from a basic sketch to a captivating artwork. Just like a chef needs to know their tools, an artist should be familiar with their subject. Have you ever considered the subtle curves and angles that make a knife both functional and aesthetically intriguing? Let’s dive deeper into the anatomy of a knife to enhance your drawing skills.
Blade Structure
The blade is the soul of the knife. It’s not just a simple straight line; it has depth and character. Look closely at how the blade tapers from the spine to the edge. Notice the way light plays off its surface. Many blades have a slight curve that can add drama to your drawing. When sketching, think about the balance between sharpness and elegance. How will you depict the blade’s sheen and shadow?
Handle Design
The handle is where function meets form. It provides grip and control, yet it can be an art piece itself. Consider the materials—wood, metal, or plastic—and how they affect the texture. Handles often have intricate patterns or designs that tell a story. Have you ever held a knife and felt its weight and balance? Capture that sense in your drawing. Use shading to show depth and dimension, bringing the handle to life.
Detailing The Edge
The edge is the knife’s defining feature. It’s the part that demands the most attention and precision. Observe the fine line that separates the blade from its surroundings. Adding detail to the edge can create a sense of sharpness and danger. Experiment with different techniques to illustrate the edge’s sharpness—perhaps a glint of light or a subtle gradient. How will you convey the knife’s lethal potential through your illustration? By understanding these components, you enhance your ability to draw a realistic knife with blood. Remember, it’s all about the details. What stories will your knife tell?
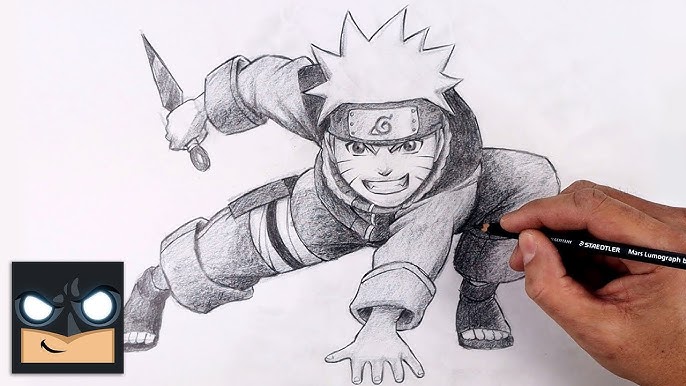
Sketching The Basic Outline
Sketching the basic outline of a knife with blood might seem challenging, but it’s actually a rewarding process. Creating an engaging drawing involves breaking down the image into manageable steps. You’ll find that the initial outline sets the foundation for a striking and realistic representation.
Positioning The Knife
Consider where you want the knife to be placed on your canvas. Its position can dramatically impact the mood of your drawing. Imagine the knife at an angle that suggests movement or tension. You might have seen a scene in a movie that inspired this placement. Where does your knife fit in your story?
Think about the overall composition. Is it centered, or does it cut across the page diagonally? Position the blade in a way that balances the drawing and guides the viewer’s eye.
Creating Proportional Guidelines
Before diving into details, sketch light guidelines to ensure the knife’s proportions are accurate. Use simple shapes like rectangles or triangles to represent different sections. These shapes help maintain the knife’s symmetry and ensure each part is correctly sized.
If you’re unsure about proportions, compare your sketch to a real knife or a reference image. This is similar to when you outline a face, ensuring the eyes are evenly spaced. Do your shapes form a cohesive outline?
Initial Line Work
Once your guidelines are set, begin tracing over them with more defined lines. This is where your knife starts to take shape. Use a sharp pencil for crisp lines, adding slight curves where the blade meets the handle.
Consider the blade’s edge – is it smooth, serrated, or slightly worn? Every choice adds character to your drawing. These initial lines serve as a skeleton, providing structure as you move forward.
As you draw, think about how these lines will guide the final details. Are they strong enough to support shadows and textures later? Keep your lines light so adjustments are easy.
Remember, sketching is about exploration and finding your personal touch. What does your unique style bring to this drawing?
Credit: www.mathiesonart.co.uk
Adding Details And Texture
Drawing a knife with blood requires adding details and texture for realism. Focus on the blade’s gleam and the blood’s fluidity. Use shading to create depth and highlight reflections.
When you’re drawing a knife with blood, adding details and textures can elevate your artwork to a whole new level. This stage separates a basic drawing from a realistic one, allowing viewers to almost feel the cold steel or the textured handle. With the right techniques, you can make your knife seem tangible, as if it could be lifted right off the page. Let’s dive into enhancing these elements with precision and creativity.
Enhancing The Blade
Start by refining the blade’s surface. Use light pencil strokes to create a sleek, shiny appearance. This reflects light naturally, giving your blade a realistic metallic sheen. Consider adding subtle scratches or wear marks. These minor imperfections can tell a story about the knife’s history. It adds character and depth to your drawing. Pay attention to the blood droplets on the blade. They should follow the contours naturally, appearing as if they are dripping or pooling in specific areas. This realism can provoke a visceral reaction from your viewers.
Texturing The Handle
The handle is an opportunity to experiment with textures. Whether it’s wood, metal, or plastic, each material has distinct characteristics you can showcase. For a wooden handle, sketch fine lines to represent the grain. Use varying pencil pressures to highlight knots or worn spots. If the handle is wrapped in leather, mimic the stitching or any wear and tear. These details make your drawing not just seen, but felt.
Highlighting The Edge
The edge of the blade is crucial for realism. It should appear sharp and ready to cut. Use a clean, straight line to separate the edge from the rest of the blade. Add highlights along the cutting edge. This gives the impression of sharpness and reflects the light source in your drawing. Consider the play of shadows on the edge. A slight shadow can suggest thickness, enhancing the three-dimensional illusion. How does this change your perception of the knife’s sharpness? By focusing on these detailed elements, you breathe life into your artwork. Remember, each stroke you add can change how your drawing is perceived. What story does your knife tell?
Incorporating Blood Effects
Create realistic knife drawings with blood effects using medium difficulty techniques. Focus on shading and color blending. Enhance the drawing’s depth by adding drops and splatter effects.
Creating lifelike drawings with blood effects can add a dramatic and intense touch to your art. Whether you’re sketching a knife for a horror illustration or simply experimenting with textures, understanding how to depict blood realistically is key. Adding these elements might seem challenging, but with a little guidance, you can master it.
Understanding Blood Flow
Blood doesn’t just stay in one place; it flows and spreads. Think about how it would naturally move on a surface. When drawing a knife, imagine how blood would drip from the blade and pool beneath it. Consider the direction of the blade and gravity’s impact on the blood flow. Tip: Practice observing real-life liquids and how they interact with surfaces. This will help you create more convincing blood patterns.
Realistic Blood Placement
Placement of blood is crucial for realism. You don’t want to overdo it or have it appear random. Imagine the scenarios where the knife might have been used. Would the blood be smeared from wiping, or would it be pooling from a fresh cut? Example: If the knife is freshly used, place blood along the edge, dripping down the point. If it’s been wiped, consider streaks along the blade instead.
Shading And Highlighting Blood
Blood has depth, and capturing this requires attention to shading and highlights. Use darker reds for shadows and lighter ones where light hits. This creates a three-dimensional look. Tip: Try layering colors, starting with a base red, then adding darker tones for depth and lighter ones for highlights. Have you ever noticed how lighting affects everything we see? Use this observation to guide your shading techniques. Incorporate different shades to reflect the texture and movement of the blood. This will make your drawing stand out.
Refining And Final Touches
Drawing a knife with blood medium requires precision and creativity. Start with basic outlines, focusing on the blade’s shape. Add realistic blood details for a chilling effect, ensuring shadows and highlights enhance depth.
Drawing a knife with blood can be a captivating subject for artists seeking to explore the darker side of illustration. The process doesn’t stop at sketching; refining and adding final touches are crucial to bring your art to life. This part of the drawing journey requires patience and attention to detail to make your work stand out. Let’s dive into the essential steps for refining and completing your drawing.
Fine-tuning Details
Adding detail can transform a sketch into a compelling piece of art. Look closely at the knife’s blade and handle. Notice any imperfections or areas that need more definition. Use a finer pencil or pen to sharpen the edges and add texture. This could mean drawing subtle scratches or reflections on the blade. Consider how the blood should realistically flow or pool on the surface. Ask yourself: Does the knife look realistic? This is your chance to adjust any elements that feel off. Sometimes stepping back from your work can reveal areas that need attention.
Depth And Contrast Adjustments
Depth and contrast can give your drawing a three-dimensional feel. Use shading techniques to enhance the sense of depth. Apply darker tones to areas where shadows naturally fall, such as under the blade or where the blood pools. This will make these parts stand out more against the lighter areas. Experiment with the contrast between the knife and the blood. A well-placed shadow or highlight can add drama and intensity. Do the darks and lights create a striking balance?
Final Review
Before you call it complete, review your artwork as a whole. Step back and view it from a distance. This perspective can highlight any inconsistencies or areas lacking cohesion. Double-check for any missing elements or details that need refining. Is there an area that seems too busy or too empty? Balance is key. Finally, ask yourself: Does your drawing evoke the intended emotion or narrative? Your final review is your chance to make those last adjustments that can elevate your work from good to great. In my own experience, this step is where the magic happens. It’s the moment when an ordinary sketch becomes a powerful image. Embrace the process and trust your instincts. Your masterpiece is just a few strokes away.
Credit: www.youtube.com
Frequently Asked Questions
How Do I Start Drawing A Knife?
Begin by sketching the knife’s outline lightly. Focus on the blade, handle, and any distinguishing features. Use simple shapes to guide your proportions. Refine the sketch by adding details like the blade’s edge and handle texture. Practice makes perfect, so don’t hesitate to start over for improvement.
What Materials Are Best For Drawing Blood?
For drawing blood, red pencils or markers work well. Watercolors can add realistic shading and depth. Ensure your materials are erasable or blendable to achieve the desired effect. Experiment with different mediums to find what suits your style and the drawing’s mood.
How Can I Achieve Realistic Blood Effects?
To achieve realistic blood effects, focus on color and texture. Use varying shades of red to mimic depth and shadows. Add highlights to suggest wetness. Experiment with blending and layering techniques. Referencing real-life images can help enhance accuracy and realism in your drawing.
What Are Common Mistakes In Knife Drawings?
Common mistakes include incorrect proportions and lack of detail. Ensure the blade and handle are proportionate. Avoid excessive or unrealistic blood effects. Overworking the drawing can also diminish its impact. Regularly step back to assess and make necessary adjustments for improved accuracy.
Conclusion
Drawing a knife with blood can seem complex. Yet, with practice, it becomes manageable. Start with basic shapes. Then, add details gradually. Use shading to create depth. Blend colors for realistic blood effects. Patience and persistence are key. Mistakes are learning steps.
Keep refining your skills. Soon, you’ll see improvement. Your art will reflect your dedication. Remember, every artist begins somewhere. Enjoy the journey of learning. Celebrate small successes. Each drawing is a step forward. Keep drawing, keep improving.

Hi, I’m Daniel Brooks—a food lover and kitchen gear enthusiast. I enjoy testing cookware, utensils, and gadgets to see what really works in everyday cooking. At PlugChef.com, I share honest reviews, comparisons, and simple guides to help you choose the best tools for a safer, smarter, and more enjoyable kitchen.
Related posts:
 What Type of Cooking Utensils are Safe: Expert Picks
 What Innovations Could Blenders Make: Unleashing Future Tech
 Smart Strategies to Organize a Small Kitchen: Maximize Space
 How to Organize a Kitchen Cabinet: Expert Tips & Tricks
 How to Organize Kitchen Drawers: Expert Tips and Tricks
 How to Organize a Corner Kitchen Cupboard: Expert Tips

