Are you planning a home improvement project that involves tiling your bathroom or kitchen? If so, understanding how to cut Hardie Backer Board can make your job much smoother and more efficient.
You know that laying tiles requires precision and durability, and Hardie Backer Board is your best ally in achieving that perfect finish. But here’s the catch—this board isn’t like ordinary drywall. It requires a specific approach to cut it effectively.
Imagine having the confidence to tackle your tiling project without the fear of uneven edges or wasted materials. By mastering the art of cutting Hardie Backer Board, you ensure that your tiles adhere perfectly, creating a seamless look that will last for years. The good news is, this skill is not as daunting as it sounds. In this guide, you’ll discover straightforward steps and insider tips to help you cut Hardie Backer Board like a pro. Stick with us, and you’ll gain the tools and knowledge to transform your space with ease and finesse. Whether you’re a DIY enthusiast or a home improvement newbie, this article is tailored to empower you with practical skills and confidence. Let’s dive in and explore how you can make your tiling project a stunning success.
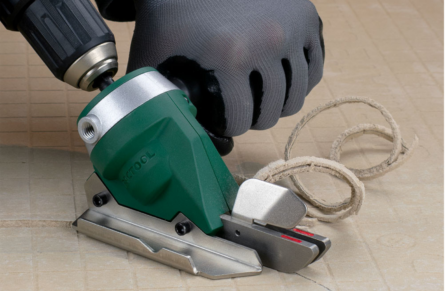
Credit: pactool.us
Tools And Materials
Cutting Hardie Backer Board requires the right tools and materials. Using the correct equipment ensures clean cuts and ease of work. Below, we explore the essential tools and materials needed for this task.
Measuring Tools
Accurate measurements are vital. Use a tape measure for precise dimensions. A pencil helps mark the board where cuts are needed. A straightedge or ruler ensures straight lines.
Cutting Tools
For cutting, a utility knife is handy for scoring. Use a carbide-tipped scoring knife for deeper cuts. A circular saw with a masonry blade works well for large sections. A jigsaw with a carbide blade handles curves and intricate cuts.
Safety Gear
Safety is crucial. Wear safety goggles to protect your eyes from dust. Use gloves to shield your hands from sharp edges. A dust mask helps avoid inhaling particles.
Support Tools
Support tools make cutting easier. A workbench or sawhorse provides stability. Clamps hold the board steady during cuts. These tools prevent unnecessary movement and ensure precision.
Cleaning Materials
Dust accumulates quickly while cutting. A broom or vacuum cleaner helps keep the workspace tidy. Cleaning as you go ensures a safe and efficient working environment.
Choosing The Right Cutting Method
Cutting Hardie Backer Board can seem daunting at first, but with the right method, it becomes a manageable task. Choosing the right cutting method is crucial to ensure a clean cut and reduce waste. Whether you’re a seasoned pro or a DIY enthusiast, understanding the options available will help you make an informed decision.
Scoring And Snapping
Scoring and snapping is the simplest and cleanest way to cut Hardie Backer Board. It’s perfect for straight cuts. You’ll need a carbide-tipped scoring tool for best results. Score the board deeply and consistently along your marked line.
Once scored, apply pressure to snap the board along the line. This method is dust-free, making it ideal for indoor projects. Have you tried scoring and snapping before? You might be surprised at how efficient it can be.
Using A Circular Saw
A circular saw is great for larger pieces and more complex cuts. Equip it with a diamond blade to minimize dust and wear. Cutting with a circular saw is fast but requires precision.
Ensure the board is well-supported as you cut to prevent breakage. This method is louder and messier, but sometimes speed is of the essence. Could a circular saw be your best choice for larger projects?
Jigsaw For Curves
For those intricate curves, a jigsaw is your best friend. It offers flexibility and precision for non-linear cuts. Use a carbide-grit blade for smooth results.
Practice on a scrap piece to get comfortable with handling curves. The jigsaw is perfect for custom fits around fixtures. Are you ready to unleash your creativity with a jigsaw?
Each cutting method has its strengths. Consider your project needs and environment when choosing. Share your experiences and tips in the comments below!
Safety Precautions
Cutting Hardie Backer Board requires careful attention to safety. This material is durable, but handling it wrong can lead to injuries. Before starting your project, understand the necessary precautions. Ensuring safety not only protects you but also makes the cutting process smoother. Explore essential safety measures for cutting Hardie Backer Board.
Protective Gear
Wearing the right gear is crucial. Start with safety goggles. They protect your eyes from dust and debris. Use gloves to shield your hands from sharp edges. A dust mask is also vital. It prevents inhaling harmful particles. Closed-toe shoes keep your feet safe from falling objects. Ensure your clothing fits well. Loose clothes can catch on tools or board edges.
Dust Control
Dust is a major concern. It affects breathing and visibility. Use a wet saw to minimize dust. Wetting the board before cutting helps too. Set up a fan to direct dust away from your workspace. Open windows for ventilation. Place plastic sheets around the area to contain dust. Consider using a vacuum with a HEPA filter. It efficiently captures airborne particles. Regularly clean your workspace to remove accumulated dust.
Step-by-step Cutting Process
Cutting Hardie Backer Board requires precision and care. This guide will simplify the process. Each step ensures your cut is clean and accurate. Follow along to achieve the best results.
Preparing The Work Area
Choose a flat, stable surface for your work. Ensure the area is free of clutter. This minimizes accidents and ensures safety. Wear protective gear, like gloves and goggles. This protects you from dust and sharp edges.
Measuring And Marking
Use a measuring tape for accuracy. Measure the board at least twice. This avoids mistakes. Mark the cut line with a pencil. A straightedge helps keep lines straight. Double-check your measurements before proceeding.
Executing The Cut
Choose the right tool for cutting. A carbide-tipped scoring knife or saw works best. Score along the line with firm pressure. This creates a groove for breaking. Bend the board along the scored line. Apply steady pressure until the board snaps cleanly.
Tips For A Clean Cut
Cutting Hardie Backer Board can be a challenging task if you want to achieve a clean, professional finish. With the right techniques, you can make the process straightforward and successful. Whether you’re renovating your bathroom or adding a new backsplash in your kitchen, these tips will help you make precise cuts without any hassle.
Maintaining Blade Sharpness
Keeping your blade sharp is crucial for a clean cut. Dull blades can lead to rough edges and uneven surfaces. Regularly check your blade before use. A sharp blade slices through the board smoothly, saving you time and effort.
Consider investing in a diamond-tipped saw blade. These blades not only stay sharp longer but also handle the toughness of Hardie Backer Board effectively. If you’ve ever struggled with a manual cutter, you know how frustrating it can be. A sharp blade changes the game.
Avoiding Edge Chipping
Edge chipping can ruin the look of your cut Hardie Backer Board. To prevent this, use a slow and steady cutting motion. Rushing through the cut increases the likelihood of chipping.
Think about the last time you worked on a project in a hurry. The mistakes can be costly. By taking your time, you ensure a smoother finish. Another tip is to support the board properly while cutting. This minimizes vibrations that can lead to chipping.
Have you ever paused during a project to reconsider your technique? Sometimes, stepping back for a moment can lead to better results. What’s your best trick for cutting Hardie Backer Board cleanly? Share your thoughts in the comments below!
Common Mistakes To Avoid
Cutting Hardie Backer Board needs precision to avoid common mistakes. Ensure tools are sharp for clean cuts and avoid using excessive force. Measure twice to prevent incorrect cuts, saving time and material.
Cutting Hardie Backer Board can be a rewarding DIY project, but it’s easy to fall into common pitfalls that can lead to costly mistakes. Understanding these errors can save you time, money, and frustration. Let’s dive into these common mistakes and how you can avoid them to achieve a perfect cut every time.1. Not Using The Right Tools
Many people attempt to cut Hardie Backer Board with tools not suited for the job. Using a standard saw blade can result in rough edges and excessive dust. Always opt for a carbide-tipped scoring knife or a circular saw with a diamond blade. These tools ensure a clean cut and reduce harmful dust.2. Skipping Safety Precautions
Safety is often overlooked when cutting Hardie Backer Board. Neglecting to wear safety gear like goggles and a mask can expose you to dust particles. This can be harmful to your health. Always prioritize safety by wearing the proper equipment and working in a well-ventilated area.3. Ignoring The Importance Of Measurements
Accurate measurements are crucial. Rushing through this step can lead to misaligned pieces and wasted material. Double-check your measurements before making any cuts. Have you ever cut a piece only to find out it’s too short? Avoid this by measuring twice and cutting once.4. Cutting Too Quickly
Speed can be tempting when you’re eager to finish a project. However, cutting too fast can lead to mistakes and uneven edges. Take your time to ensure precision. Slow and steady cutting helps maintain control and results in a cleaner finish.5. Neglecting To Support The Board Properly
Without proper support, the board can break or crack during cutting. Always support both sides of the cut. Use a workbench or sawhorses to keep the board stable. This simple step can make a significant difference in the quality of your cut.6. Overlooking The Clean-up Process
After cutting, leaving debris and dust scattered can pose hazards. It also makes your workspace less efficient. Clean up regularly to maintain a safe and tidy work area. This habit not only helps prevent accidents but also keeps you organized and focused on the task at hand. Have you made any of these mistakes before? Recognizing and avoiding these common errors can make your Hardie Backer Board cutting experience smoother and more successful. Keep these tips in mind, and you’ll be on your way to mastering your next DIY project.After-cut Finishing Touches
Perfect edges and smooth surfaces complete your project. Sand the edges gently after cutting Hardie Backer Board. This step ensures a neat finish and helps prevent chipping.
Once you’ve successfully cut your Hardie Backer Board, the job isn’t quite done. The next crucial step involves perfecting your cut pieces to ensure a seamless fit and a professional-looking finish. These after-cut finishing touches can make all the difference in your project, transforming rough edges into smooth surfaces and ensuring your work area is tidy and ready for the next task.Smoothing The Edges
After cutting, the edges of your Hardie Backer Board might feel rough or jagged. It’s important to smooth them out to prevent any potential damage to surrounding materials or injury to your hands. Use a sanding block or a piece of sandpaper to gently rub along the edges. A medium-grit sandpaper works well for this task, offering enough grit to smooth the surface without damaging the board. Remember to sand in one direction to maintain a consistent edge. If you’ve ever sanded wood before, you’ll find this process quite similar. Take your time to ensure each edge is as smooth as possible.Cleaning The Work Area
Once you’ve smoothed all the edges, it’s time to clean up. Cutting Hardie Backer Board can create a lot of dust and debris, which can be hazardous if left unattended. Start by sweeping up large pieces with a broom. For the finer dust, use a vacuum with a HEPA filter to ensure you’re capturing all particles. Not only does a clean workspace help keep you safe, but it also makes it easier to see your progress and identify any potential mistakes. Plus, a tidy work area can be a great morale booster. Have you ever noticed how much more productive you feel in a clean environment? Taking these simple steps ensures that your project is not only executed well but also sets you up for success in future tasks. By focusing on these finishing touches, you’re investing in the quality and longevity of your work.
Credit: www.youtube.com
Credit: www.jameshardie.co.uk
Frequently Asked Questions
What’s The Best Way To Cut A Hardie Backer?
Use a carbide-tipped scoring knife to cut Hardie Backer. Score deeply along your marked line. Snap the board along the scored line. Smooth rough edges with sandpaper or a rasp. Always wear protective gear for safety during cutting.
What Is The Best Tool To Cut Hardie Board With?
Use a carbide-tipped scoring knife for straight cuts on Hardie board. For circular cuts, opt for a jigsaw with a carbide blade. A circular saw with a diamond blade is ideal for larger projects, providing precision and efficiency. Ensure proper ventilation and wear protective gear when cutting.
Do You Need A Special Saw Blade To Cut A Hardie Board?
Yes, you need a special saw blade for cutting Hardie board. Use a carbide-tipped blade designed for fiber cement. This ensures clean cuts and prolongs the blade’s life. Make sure the saw blade is suitable for the specific thickness of the Hardie board you’re working with.
What’s The Best Way To Cut Tile Backer Board?
Use a carbide-tipped scoring knife to cut tile backer board. Score deeply along a straightedge. Snap the board by applying pressure on the scored line. For curved cuts, use a jigsaw with a carbide-grit blade. Always wear safety goggles and a dust mask for protection.
Conclusion
Cutting Hardie Backer Board can seem tough at first. But with the right tools, it’s manageable. Start with a clean workspace. Measure twice, cut once. Use a carbide-tipped scoring knife for best results. Wear safety goggles and gloves. Protect yourself from dust.
Practice makes perfect. So, take your time and be patient. Remember, precision is key for a smooth finish. Follow these steps, and you’ll have a well-cut board. Your DIY project will look professional and polished. Now, get ready to enjoy your handiwork.
Happy building!

Hi, I’m Daniel Brooks—a food lover and kitchen gear enthusiast. I enjoy testing cookware, utensils, and gadgets to see what really works in everyday cooking. At PlugChef.com, I share honest reviews, comparisons, and simple guides to help you choose the best tools for a safer, smarter, and more enjoyable kitchen.
Related posts:
 What Type of Cooking Utensils are Safe: Expert Picks
 What Innovations Could Blenders Make: Unleashing Future Tech
 Smart Strategies to Organize a Small Kitchen: Maximize Space
 How to Organize a Kitchen Cabinet: Expert Tips & Tricks
 How to Organize Kitchen Drawers: Expert Tips and Tricks
 How to Organize a Corner Kitchen Cupboard: Expert Tips

