Have you ever reached for a tool, only to find it covered in rust? It’s frustrating, isn’t it?
Rust can make your tools less effective and even ruin them if not addressed. But don’t worry, there’s a simple solution hiding right in your kitchen. You can clean those rusty tools with vinegar and baking soda. Imagine the satisfaction of seeing your tools restored to their former glory, without spending a fortune on expensive rust removers.
This method is not only effective but also environmentally friendly. You’ll be amazed at how easy it is, and you’ll wonder why you haven’t tried it sooner. Get ready to reclaim your tools and make them shine like new. Keep reading to discover the step-by-step process and tips that will ensure your tools are rust-free and ready to tackle any project.
Materials Needed
Cleaning rusty tools might seem like a daunting task, but with the right materials, it’s a breeze. Imagine transforming those old, neglected tools into shiny, functional pieces again. You don’t need a lot, just some vinegar, baking soda, a soft cloth or brush, a container or bucket, and protective gear. These materials are easy to find and probably already sitting in your home. Let’s dive into why each of these is essential for the task.
Vinegar
Vinegar is the hero in this rust-removal process. Its acidic nature helps dissolve rust without damaging the metal. White vinegar is the most effective and affordable choice. Have you ever used vinegar to clean your kitchen? You know it’s powerful and safe. Grab a bottle and get ready to see your rusty tools transform.
Baking Soda
Baking soda complements vinegar perfectly. It acts as a gentle abrasive to scrub off rust once the vinegar has loosened it. It’s like using a magic eraser on your tools. Mix it into a paste with a little water, and you’ll witness how effective it can be. Have you tried baking soda for stubborn stains before? Your tools will thank you for this gentle touch.
Soft Cloth Or Brush
A soft cloth or brush is crucial for scrubbing away loosened rust. Choose one that won’t scratch your tools. A toothbrush can be ideal for those tricky spots. Ever thought a toothbrush could clean more than teeth? It’s great for reaching into crevices. How about giving your tools the careful attention they deserve with a gentle scrub?
Container Or Bucket
You need a container or bucket to soak your tools in vinegar. The right size ensures your tools are fully submerged. Look around your home; you might have an unused bucket or container. Remember using a bucket for chores? It’s just as handy for cleaning tools. Consider if your container is deep enough for complete immersion.
Protective Gear
Protective gear, like gloves and goggles, is essential for safety. Vinegar and baking soda are mild, but it’s better to be safe. Imagine handling corrosive substances without protection—it’s a risk you can easily avoid. You wouldn’t want vinegar splashes in your eyes, right? Ensure you’re protected and ready for a safe cleaning session.
Now that you have all the materials ready, are you excited to see your tools shine? Give this method a try, and share your experience. Could these simple materials transform your rusty tools into gleaming, ready-to-use pieces again?
Preparing The Tools
Cleaning rusty tools with vinegar and baking soda is simple. Before you start, prepare your tools well. Proper preparation leads to better results and saves time. Let’s explore the key steps.
Assessing The Rust
First, examine the rust on your tools. Check how deep and widespread it is. Light rust is easy to remove. Heavy rust may need more effort and time. Take note of all the rusty areas.
Disassembling The Tool
Disassemble the tool to clean it properly. Separate parts that are easy to remove. This helps in reaching hidden rusty spots. Keep track of all parts to reassemble them later.
Safety Precautions
Safety is very important when cleaning tools. Wear gloves to protect your hands. Use safety goggles to shield your eyes from rust particles. Work in a well-ventilated area for fresh air. Ensure all safety measures are in place before starting.
Vinegar Soak Method
Cleaning rusty tools can be a breeze with the vinegar soak method. It’s a simple and effective way to restore your tools to their former glory. Vinegar’s acidic nature helps dissolve rust, making it easy to scrub off. This method is cost-effective and uses items you likely have in your kitchen.
Submerging The Tools
Begin by gathering your rusty tools and a container. Ensure the container is large enough to hold all the tools. Pour enough vinegar to completely submerge them. White vinegar works best for this task. Its acidity levels are perfect for breaking down rust.
Duration Of Soaking
Let the tools soak in vinegar for a few hours. For stubborn rust, leave them overnight. The vinegar will work its magic, loosening the rust. Check them periodically to see the progress. The longer they soak, the easier it is to remove the rust.
Rinsing Off The Vinegar
After soaking, remove the tools from the vinegar. Rinse them thoroughly with water. This step is crucial to wash away loosened rust particles. Dry the tools with a clean cloth to prevent new rust from forming. You might need a brush for stubborn areas.

Credit: www.youtube.com
Baking Soda Paste Method
Clean rusty tools easily with a paste of baking soda and vinegar. Apply the paste, let it sit, then scrub away rust with a brush for best results. This simple method restores tools effectively.
Cleaning rusty tools can feel like a daunting task, but the baking soda paste method offers a simple and effective solution. This method is perfect for those who prefer a gentle approach that avoids harsh chemicals. You might be surprised at just how powerful this natural cleaner can be. It’s an easy process that allows you to restore your tools to their former glory with items you likely already have at home. Let’s dive into the step-by-step process to transform those rusty surfaces with baking soda.Creating The Paste
Start by grabbing a small bowl and some baking soda. Slowly add water, stirring until it forms a thick paste. You want it to be spreadable but not too runny. Think of the consistency of toothpaste. This paste is your rust-fighting agent. You might find that adjusting the ratio of baking soda to water helps achieve the perfect texture.Applying To Rusty Areas
Once your paste is ready, take a cloth or an old toothbrush and apply it directly to the rusty spots. Ensure you cover the entire area well. The paste should sit on the surface for about 15 minutes. This allows the baking soda to break down the rust particles. Have you ever noticed how satisfying it is to watch grime dissolve before your eyes?Scrubbing And Rinsing
After waiting, it’s time to scrub. Use a brush or sponge to work the paste into the rust. Apply pressure but be mindful not to damage the tool. As you scrub, you’ll see the rust fading away. Once the rust is removed, rinse the tool with clean water. Dry it thoroughly to prevent future rusting. Did you know that moisture is a common culprit for rust formation? Cleaning rusty tools with baking soda is straightforward and rewarding. Have you tried this method before? What were your results?Final Cleaning Steps
Vinegar and baking soda effectively clean rusty tools. Soak tools in vinegar overnight. Scrub with baking soda paste. Rinse thoroughly and dry completely.
Cleaning rusty tools with vinegar and baking soda is a straightforward process, but the final cleaning steps are crucial for ensuring your tools are not only rust-free but also ready for future use. After the initial soak and scrub, it’s time to perfect your work and make sure every piece shines like new. Here are the essential final steps to get your tools in tip-top shape.Drying The Tools
Once you’ve scrubbed away the rust, it’s time to dry your tools thoroughly. Moisture is your enemy now, as it can lead to new rust formation. Use a clean, dry towel to wipe down each tool, paying special attention to joints and crevices where water might hide. If you have a hairdryer, use it to blow dry those tricky spots. A tip from my garage days: leaving tools out to air dry can lead to rust reappearing quickly, so don’t skip this step!Inspecting For Remaining Rust
Even after a thorough cleaning, some stubborn rust might remain. Inspect each tool carefully. Look for those tiny spots that might be hiding in corners or under handles. Use a magnifying glass if needed. If you find any, it’s back to the vinegar and baking soda for another round. Remember, the smallest rust spot can grow quickly, so be meticulous.Polishing And Oiling
Polishing is the secret to making your tools look as good as new. Use a metal polish to bring out the shine. Apply it with a soft cloth, and buff each tool until it gleams. Once polished, oil your tools to prevent future rust. A light coat of machine oil works wonders. It’s like putting a protective shield over your hard work. Consider this: if your tools could talk, they’d thank you for the extra care! Have you ever felt the satisfaction of seeing a rusty old tool transform into a gleaming masterpiece? That’s the feeling you get when you follow these final steps. Keep your tools in prime condition, and they’ll serve you well for years. What other methods have you tried for keeping your tools rust-free? Share your thoughts in the comments!:max_bytes(150000):strip_icc()/homemade-rust-remover-recipes-1387936_FINAL-6c6543826627420ba5152b7ad0ea67c7.png)
Credit: www.thespruce.com
Preventing Future Rust
Clean rusty tools easily with vinegar and baking soda. Soak tools in vinegar to loosen rust. Scrub with baking soda for a sparkling finish. Prevent future rust by drying tools thoroughly and storing them in a dry place.
Cleaning your rusty tools with vinegar and baking soda can be a game-changer, but how can you ensure those tools stay rust-free in the future? Preventing rust isn’t just about wiping them down after each use. It’s about creating an environment where rust struggles to form. Let’s dive into practical steps that you can take to keep your tools in top shape.Proper Storage
Proper storage is crucial. Have you ever noticed how moisture seems to find its way into everything? Keeping tools in a dry, well-ventilated area can dramatically reduce rust. Using a dedicated toolbox or wall-mounted rack helps keep tools off the ground, away from damp surfaces. Consider adding silica gel packs in your toolbox. These little packs absorb moisture and can be a lifesaver. Also, remember to always dry your tools completely before storing them.Regular Maintenance
Regular maintenance is your best friend. Are you checking your tools frequently? A simple wipe-down after each use can prevent rust from developing. Set a reminder to inspect your tools weekly. Look for early signs of rust and address them immediately. A light sanding can stop rust in its tracks before it becomes a bigger issue.Using Rust Inhibitors
Using rust inhibitors can add an extra layer of protection. Have you ever tried a rust-preventative spray? These sprays create a thin film on the tool’s surface, blocking moisture. Choose a product that’s easy to apply, preferably one that dries quickly. Apply it after cleaning and drying your tools. This simple step can extend the life of your tools significantly. — Taking these steps not only preserves your tools but also saves you time and money. What small changes can you make today to protect your tools from rust? By being proactive, you can enjoy your tools for many projects to come.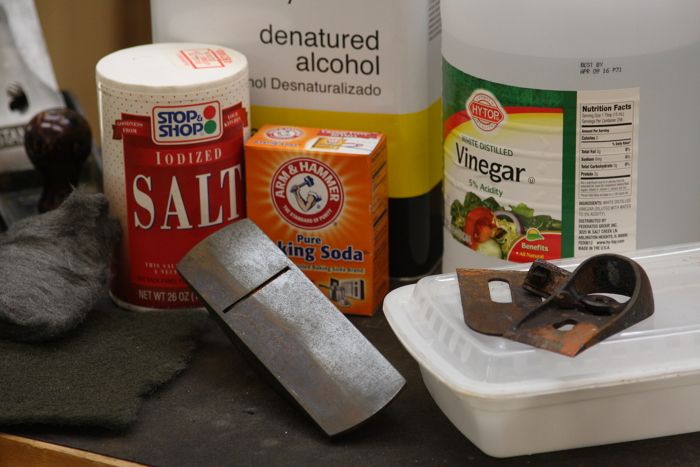
Credit: www.finewoodworking.com
Frequently Asked Questions
Does Baking Soda And Vinegar Remove Rust From Tools?
Yes, baking soda and vinegar can remove rust from tools. Apply vinegar to the rusted area, then sprinkle baking soda. Scrub gently with a brush, rinse, and dry thoroughly. This method is effective and eco-friendly, helping restore tools efficiently. Ensure tools are completely dry to prevent future rusting.
How Long To Soak Tools In Vinegar To Remove Rust?
Soak tools in vinegar for 12 to 24 hours to effectively remove rust. Check progress periodically. For stubborn rust, extend soaking time. After soaking, scrub the tools with a brush to remove loosened rust. Rinse and dry thoroughly to prevent further rusting.
How Long Do You Let Vinegar And Baking Soda Sit?
Let vinegar and baking soda sit for 10-15 minutes. This allows the reaction to effectively clean surfaces.
Does White Vinegar Actually Remove Rust?
Yes, white vinegar effectively removes rust. It contains acetic acid, which dissolves rust particles. Soak the rusty item in vinegar for several hours, then scrub and rinse it. This method is simple, eco-friendly, and cost-effective for small rust removal tasks.
Conclusion
Cleaning rusty tools is easy with vinegar and baking soda. These household items effectively remove rust. Soak tools in vinegar. Wait a few hours. Then scrub with baking soda. Rust disappears quickly. Your tools look new again. No need for expensive products.
Save money with this method. Keep tools working well. Regular cleaning prevents rust. Extend tool life with simple care. Try this method today. Enjoy clean, rust-free tools. Perfect for DIY enthusiasts. Simple steps, great results. Always use gloves for safety.
Feel proud of your clean tools. Happy cleaning!

I’m Abby Lu, a passionate home cook who loves simplifying everyday meals. At PlugChef.com, I share product reviews and cooking guides to help you find the best tools for your kitchen.
Related posts:
 What Type of Cooking Utensils are Safe: Expert Picks
 What Innovations Could Blenders Make: Unleashing Future Tech
 Smart Strategies to Organize a Small Kitchen: Maximize Space
 How to Organize a Kitchen Cabinet: Expert Tips & Tricks
 How to Organize Kitchen Drawers: Expert Tips and Tricks
 How to Organize a Corner Kitchen Cupboard: Expert Tips

