

Have you ever felt that your kitchen is bursting at the seams? Do you struggle to find space for your pots, pans, and pantry items?
Imagine transforming your kitchen into a well-organized haven where everything has its place. Building your own kitchen storage cabinet might just be the solution you need. Not only will this project add valuable storage space, but it will also give your kitchen a personal touch that store-bought options can’t match.
The idea of crafting your own cabinet might seem overwhelming at first, but with a bit of guidance and the right tools, you can create a functional and stylish addition to your home. You’ll discover straightforward steps to build a kitchen pantry storage cabinet, along with creative variations like kitchen bench seating with storage and kitchen nook bench seating. Whether you’re a DIY enthusiast or a beginner, you’ll find this guide packed with tips and tricks to help you succeed. Get ready to unlock the secrets of maximizing your kitchen space and enhancing its aesthetic appeal. Let’s dive in!

Credit: www.theyummylife.com
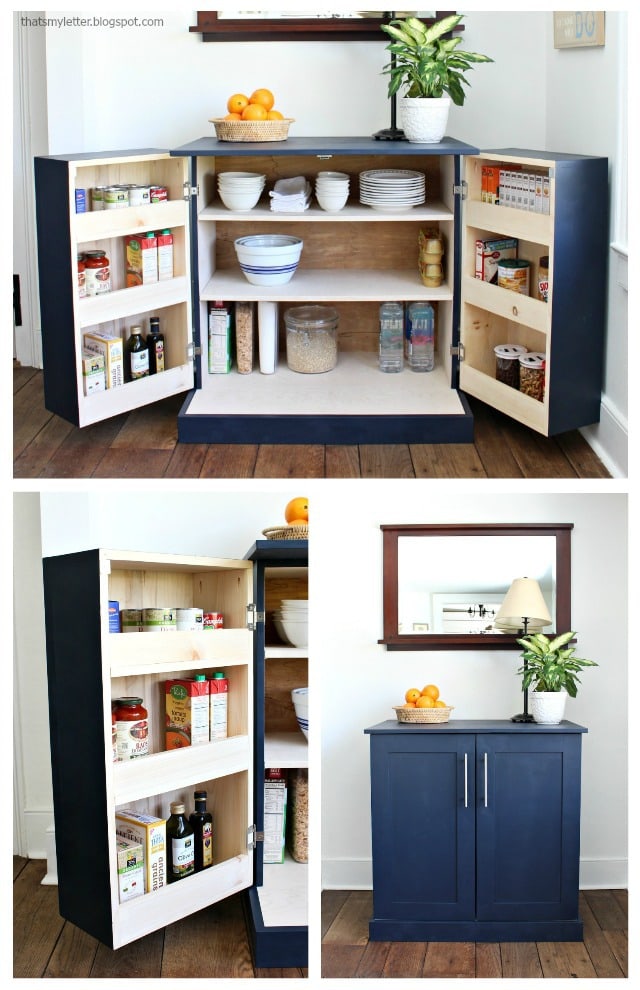
How To Build A Kitchen Pantry Storage Cabinet
Create a functional kitchen storage cabinet with basic tools and materials. Start by measuring your space for the perfect fit. Assemble the frame using sturdy wood, then add shelves and doors for optimal storage.
Crafting your own kitchen pantry storage cabinet can be a rewarding experience. It adds functionality and style to your kitchen. You might wonder how to start this project. Below, you’ll find a step-by-step guide to help you. Measuring Space and Materials Begin by assessing your kitchen space and gathering materials.
– Measure available space: Ensure the cabinet fits well in your kitchen. – Choose quality wood: Solid wood offers durability and strength. – Pick suitable hardware: Opt for hinges and knobs that match your kitchen decor. Designing the Cabinet Layout The design phase requires careful planning.
Consider the layout for optimal storage efficiency. Decide on the number of shelves and their placement. This ensures easy access to pantry items. Also, think about the cabinet’s aesthetic appeal. Match it with your kitchen’s existing style. Cutting and Assembling Now it’s time to cut and assemble your cabinet.
– Cut wood pieces: Follow your design measurements closely. – Assemble frame: Use screws to secure the structure. – Attach shelves: Ensure they are level and sturdy. Painting or Staining Personalize your cabinet with a finish. Choose paint or stain that complements your kitchen.
This adds a protective layer to the wood. It also enhances the cabinet’s appearance. Apply evenly for a smooth, professional look. Installing the Cabinet Finally, install the cabinet in its designated spot. – Position cabinet: Align it with other kitchen elements.
– Secure to wall: Use brackets for added stability. – Check balance: Ensure the cabinet is level for safe storage. With these steps, your kitchen pantry cabinet will be both functional and beautiful.
How To Build Kitchen Bench Seating With Storage
Create a functional kitchen bench with storage by using sturdy wood and simple tools. Build a strong frame, attach a comfortable seat, and add hinges for easy access to storage. Maximize space by organizing essentials underneath the seating.
Creating kitchen bench seating with storage is a practical solution. It enhances functionality while adding charm. Imagine sitting on a cozy bench that also stores your kitchen essentials. Let’s explore how to build this multi-purpose piece in simple steps. Gathering Materials and Tools To start, gather all necessary items.
Having everything ready makes the process smoother. – Plywood sheets: These form the structure. – Wood screws and brackets: Ensure stability. – Hinges: Allow the seat to open for storage. – Paint or wood stain: Finish the look. – Saw and drill: Essential for cutting and assembling.
– Measuring tape and level: Ensure accuracy. Planning the Design First, decide on your bench’s design. Consider size, style, and functionality. Think about the space it will occupy. Measure carefully to ensure it fits well. Decide if the bench will have a backrest or just a seat.
Consider the storage type—drawers or a lift-up seat. This planning phase is crucial for a successful build. Assembling the Frame Next, construct the frame. This forms the bench’s backbone. Cut the plywood to size. Use the saw for precise cuts.
Assemble the base using wood screws and brackets. Ensure the frame is sturdy and level. Attach the side panels, leaving space for storage. This step forms the base of your bench. Adding the Seat and Storage Now, focus on the seating area.
This is where functionality meets comfort. – Cut the top plywood piece: It will serve as the seat. – Attach hinges: Allow the seat to open easily. – Secure the seat to the frame: Ensure it aligns perfectly. – Consider cushioning: Add pads for extra comfort.
Finishing Touches Finally, finish your bench with a touch of style. This step personalizes your creation. Sand any rough edges for a smooth finish. Apply paint or stain to match your kitchen decor. Allow it to dry completely before use.
Add handles or knobs if using drawers. These final touches complete your project, making it both functional and attractive.
How To Build A Kitchen Bench With Storage
Crafting a kitchen storage cabinet involves careful planning and precise measurements. Choose durable materials for a sturdy structure. Assemble the pieces with attention to detail, ensuring ample space for storage. With the right tools, create a functional and stylish addition to your kitchen.
Building a kitchen bench with storage is a practical way to maximize space. It combines seating with storage, offering convenience and style. This project is perfect for anyone wanting to enhance their kitchen’s functionality. Choosing the Right Materials Selecting materials is crucial for durability and aesthetics.
Consider the following: – Wood type: Choose sturdy options like oak or maple for longevity. – Finish: Opt for waterproof finishes to protect from spills. – Hardware: Use quality hinges and screws for stability. Designing Your Bench Crafting the design sets the foundation for your project.
Here’s what to consider: – Size: Measure your space to determine the bench’s dimensions. – Style: Decide on a design that complements your kitchen theme. – Functionality: Include features like drawers or open shelves. Assembling the Bench Frame The frame is the backbone of your bench.
Follow these steps: – Cut wood pieces: Use a saw to cut according to your design. – Assemble frame: Connect pieces with screws for strength. – Test stability: Ensure the frame is sturdy before proceeding. Adding Storage Compartments Storage compartments enhance usability.
Consider these ideas: – Drawers: Add drawers for hidden storage options. – Shelves: Install shelves for easy access to items. – Baskets: Use baskets for flexible storage solutions. Finishing Touches Finishing touches complete the look. Here’s how: – Sand surfaces: Smooth out any rough edges for safety.
– Apply paint: Choose colors that match your kitchen decor. – Install cushions: Add cushions for comfort and style. Creating a kitchen bench with storage is a rewarding project. It offers space-saving solutions while adding charm to your kitchen.
How To Build A Kitchen Nook Bench Seating With Storage
Create a cozy kitchen nook bench with storage by building a functional cabinet. Start with choosing durable wood and cutting to size. Assemble the frame, ensuring it’s sturdy. Add storage compartments below the seating area. Finish by painting or staining for a polished look.
Creating a cozy kitchen nook bench with storage is a practical project. It adds seating while optimizing space. Follow these steps to craft your perfect nook. Gathering Materials Before starting, collect necessary materials. You’ll need wood, screws, and tools. Here’s a list to consider: – Wood panels: Choose durable wood for longevity.
– Screws and nails: Secure pieces together firmly. – Drill and screwdriver: Essential for assembly. – Saw: Cut wood panels to size. – Measuring tape: Ensure accurate dimensions. Designing the Bench Sketch a simple design for your bench. Consider the space available and the style you prefer.
Keep in mind the dimensions that fit well in your kitchen nook. Think about the height and depth for comfortable seating. A well-thought-out design ensures functionality and aesthetics. Assembling the Frame Begin with the frame. Assemble the base using wood panels and screws.
Ensure stability by checking each connection. A strong frame supports weight and maintains shape. Keep the corners square for a neat finish. Test for wobbling and adjust as needed. Adding Storage Incorporate storage under the seating. This can be a simple box structure.
It’s ideal for storing kitchen items or extra linens. Secure the bottom panel tightly. Make sure the lid opens smoothly. Utilize the space efficiently for practical storage solutions. Finishing Touches Consider painting or staining the bench. Choose a color that complements your kitchen.
Add cushions for comfort. Ensure they’re easy to clean. Personalize with decorative pillows. Small touches enhance the bench’s appeal and functionality.
How To Build A Kitchen Nook With Storage
Create a cozy kitchen nook with storage by crafting a practical kitchen storage cabinet. Use simple materials like plywood and screws for sturdy shelves. Add cushions for comfort and incorporate drawers or bins underneath for extra storage space. This DIY project maximizes small spaces while providing functionality and style.
Creating a cozy kitchen nook with storage can transform your space. It’s a perfect blend of comfort and functionality. Imagine a spot where you can enjoy breakfast while storing kitchen essentials. Let’s explore how to bring this idea to life.
Planning Your Kitchen Nook Start by defining your needs and space. Consider the size and location. Measure the area where you want to build the nook. Identify what you want to store. This will guide your design choices. Choosing the Right Materials Selecting the best materials is crucial.
Here’s a quick guide: – Wood: Classic look and sturdy for long-lasting use. – Plywood: Affordable and easy to work with. – MDF: Smooth surface, great for painting. Designing the Layout Think about how the nook will fit into your kitchen.
Keep in mind the flow and accessibility. Design a layout that complements your kitchen’s style. Consider built-in seating with storage underneath. This adds both comfort and utility. Building the Frame Constructing a solid frame is essential. Use durable materials for stability.
Follow these steps: – Cut the wood: Use a saw for precise measurements. – Assemble the frame: Secure corners with screws. – Check alignment: Ensure everything is level. Adding Storage Solutions Maximize the nook’s storage potential. Here are a few ideas: – Drawers: Perfect for utensils and small items.
– Shelves: Store cookbooks or decorative pieces. – Baskets: Great for organizing loose items. Finishing Touches Give your nook a polished look. Sand the surfaces for a smooth finish. Paint or stain to match your kitchen’s theme. Add cushions for comfort.
Personalize with decorative pillows or throws. Building a kitchen nook with storage is a rewarding project. It combines style with practicality, enhancing your kitchen space.
How To Make A Kitchen Bench Seat With Storage
Creating a kitchen bench seat with storage involves building a sturdy cabinet base. Start by measuring the space and cutting plywood to size. Assemble the pieces, ensuring the cabinet is strong enough to support seating. Add storage compartments inside for extra organization, making the most of your kitchen space.
Creating a kitchen bench seat with storage is a rewarding project. It combines functionality with style, making the most of your space. Imagine a cozy nook where you can sit, store, and enjoy meals. Let’s explore how to craft this practical piece of furniture.
Selecting the Right Materials Choosing materials is key to durability and style. Here’s what you’ll need: – Plywood or solid wood: Provides strength and a natural look. – Paint or wood stain: Enhances appearance and protects the surface. – Cushion foam: Offers comfort for seating.
– Fabric: Adds color and texture to the seat. Measuring and Cutting Accurate measurements ensure a perfect fit. Follow these steps: – Measure the space: Determine the length, width, and height of your bench. – Mark your cuts: Use a pencil or chalk for clear guidelines.
– Saw the wood: Cut the pieces to match your measurements. Assembling the Bench Frame Building the frame forms the base of your bench. Here’s how: Use screws and brackets to secure the wood. Ensure the frame is sturdy and level.
Attach the backrest, if desired, for added comfort. Adding Storage Space A bench with storage maximizes utility. Consider these features: – Hinged lid: Provides easy access to storage beneath. – Dividers: Organize items and prevent clutter. – Shelves: Store shoes, baskets, or other kitchen essentials.
Upholstering the Seat Comfort is key for a bench seat. Follow these steps: Place foam on the top surface. Cover with fabric and staple tightly underneath. Trim excess material for a neat finish.
Credit: jaimecostiglio.com
Frequently Asked Questions
Is It Cheaper To Build Your Own Kitchen Cabinets?
Building your own kitchen cabinets can be cheaper, depending on materials and tools costs. DIY projects save labor costs, but require time and skill. By sourcing budget-friendly materials and dedicating time to the project, you can significantly reduce expenses compared to purchasing pre-made or custom cabinets.
Which Is Better, Mdf Or Pvc For Kitchen Cabinets?
MDF is affordable and offers a smooth finish, ideal for painted cabinets. PVC is durable and water-resistant, perfect for humid kitchens. Choose MDF for design flexibility; select PVC for durability and easy maintenance. Each material has its strengths, so consider your kitchen’s needs and budget.
How Do I Create Storage Space In My Kitchen?
Maximize kitchen storage by using vertical space with shelves. Install hooks for utensils and pots. Use drawer organizers for better space management. Consider multi-functional furniture like an island with storage. Utilize clear containers for pantry items to save space and improve accessibility.
How Much Does It Cost To Build A Pantry Cabinet?
Building a pantry cabinet costs between $500 and $3,000. Factors like materials, size, and design complexity influence the price. Custom cabinets are generally more expensive than pre-made options. Consider labor costs if hiring professionals. Always compare quotes from different suppliers for the best deal.
Conclusion
Crafting a kitchen storage cabinet brings practicality and style to your space. You now have the skills to build a pantry or bench with storage. These projects enhance your kitchen’s functionality and keep it organized. Remember, measure carefully and choose durable materials.
Your cabinet will serve you well for years. Invite family to enjoy meals in your new cozy nook. With patience and creativity, your kitchen transforms into a welcoming hub. Building these cabinets is rewarding and adds personal touch. Dive into your next project and enjoy the process.
Your kitchen awaits its new addition.

I’m Abby Lu, a passionate home cook who loves simplifying everyday meals. At PlugChef.com, I share product reviews and cooking guides to help you find the best tools for your kitchen.
Related posts:
 What Type of Cooking Utensils are Safe: Expert Picks
 What Innovations Could Blenders Make: Unleashing Future Tech
 Smart Strategies to Organize a Small Kitchen: Maximize Space
 How to Organize a Kitchen Cabinet: Expert Tips & Tricks
 How to Organize Kitchen Drawers: Expert Tips and Tricks
 How to Organize a Corner Kitchen Cupboard: Expert Tips

