
Picture this: you’re halfway through a multi-day hiking trek, trip on a root, and scrape your knee raw. Or your child breaks out in hives after trying a street food snack in a new city, with no pharmacy for 50 miles. In these moments, a first aid kit in your bag isn’t just a convenience—it’s the difference between a minor, 10-minute fix and a stressful, trip-derailing emergency.
Many travelers write off first aid kits as extra weight or unnecessary clutter, but a compact, well-stocked kit takes up less space than a spare pair of socks and weighs under 8 ounces. In practice, most travelers will face at least one minor medical issue on a trip before they return home, and having the right supplies on hand lets you handle problems quickly, before they escalate. This guide covers everything you need to build, pack, and maintain a first aid kit in your bag that fits your unique travel style, destination, and health needs.
Choosing the Right First Aid Kit for Your Travel Needs
Not all first aid kits are built for travel. The right kit for your needs balances portability, durability, and comprehensive supplies without adding unnecessary bulk to your bag.
Size and Portability
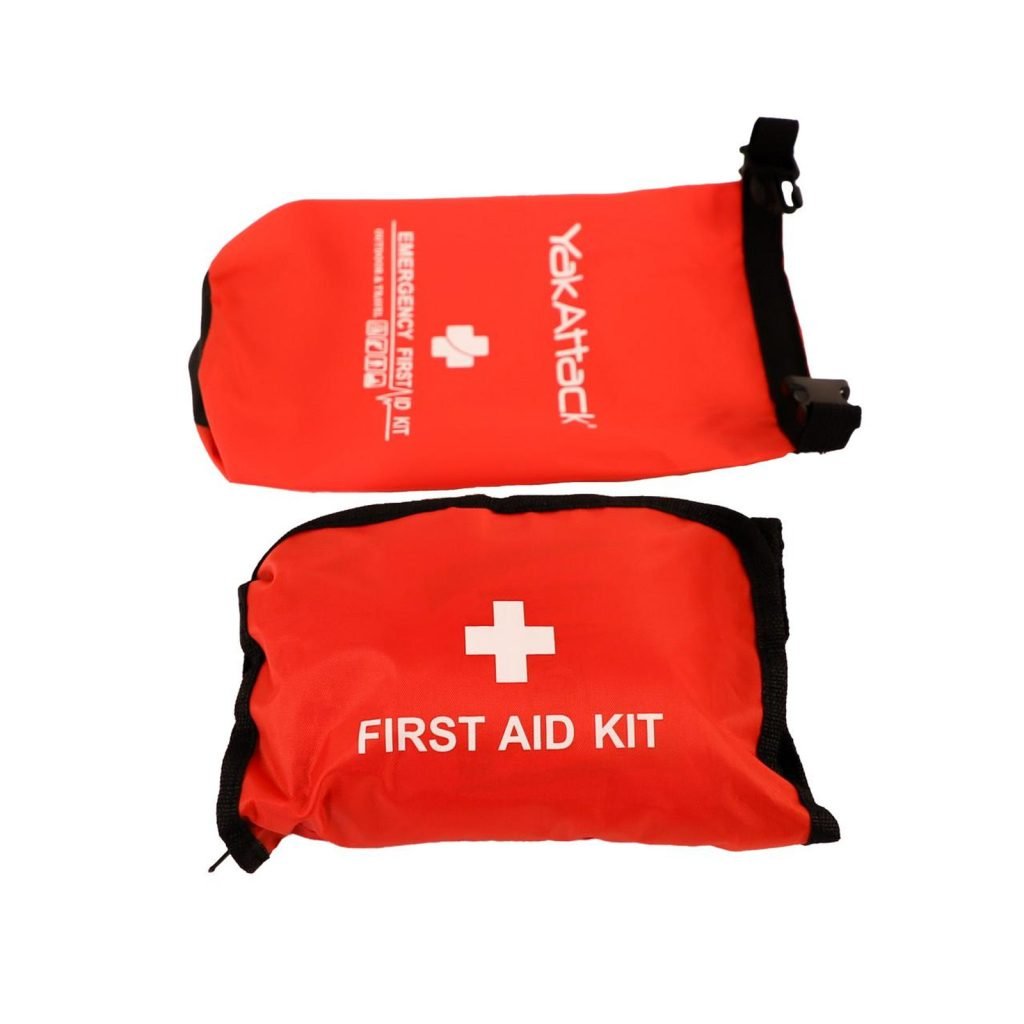
For day trips and urban travel, opt for a kit that fits in a jacket pocket or backpack side pocket, measuring no larger than 6×4 inches and weighing less than 8 ounces. For multi-week international trips or adventure travel, a slightly larger 10×8 inch kit works, as long as it fits in your personal item (not checked luggage, where you won’t have access during transit). Hard-shell kits are ideal for checked luggage to protect supplies from being crushed, while soft, waterproof pouches work best for carry-ons and day bags. A common mistake is buying an oversized kit that you’ll leave behind rather than carry every day—prioritize a size you’ll actually bring with you on every outing.
 Credit: www.amazon.com
A compact, waterproof first aid kit designed to fit in standard travel bags without adding bulk
Credit: www.amazon.com
A compact, waterproof first aid kit designed to fit in standard travel bags without adding bulk
Pre-Assembled vs. Custom Kits
Pre-assembled travel first aid kits are convenient, but they often include unnecessary items like burn gel and tweezers you’ll never use, while missing supplies tailored to your needs. A custom-built kit lets you prioritize the items you’ll actually use, avoid wasted space, and ensure you have enough of your personal medications. For most travelers, a hybrid approach works best: start with a high-quality pre-assembled kit as a base, then add or remove items to match your trip and health requirements.
Core Quality Standards
Look for kits made from waterproof, rip-resistant nylon or hard plastic, with a secure zipper or latch to keep supplies from spilling. Avoid kits with cheap plastic components that break easily, and opt for blunt-tip scissors and tweezers to reduce the risk of accidental injury when rummaging through your bag. If you’re traveling to remote areas, choose a kit with a bright, high-visibility color so you can find it quickly in an emergency.
Essential Supplies to Pack in Your Travel First Aid Kit
A well-stocked kit covers the most common travel-related injuries and ailments, from minor cuts to allergic reactions. Below are the non-negotiable items every traveler should carry, plus optional add-ons for specific trip types.
Wound Care Basics
Wound care supplies make up the bulk of your kit, as cuts, scrapes, and blisters are the most common travel injuries. Pack:
- 10+ assorted adhesive bandages, including waterproof varieties for water activities and large 4×4 sterile gauze pads for bigger wounds
- 1 small tube of antibiotic ointment to prevent infection
- 10 individually wrapped alcohol wipes for cleaning skin around wounds, plus sterile saline wipes for rinsing out debris (alcohol can damage healthy tissue, so avoid using it directly on open cuts)
- 1 roll of 1-inch medical tape to secure gauze and bandages
- 1 pack of hydrocolloid blister pads (more effective than standard moleskin for active travelers, as they stay in place even when sweaty or wet)
- 2 pairs of nitrile gloves (non-latex to accommodate latex allergies)
 Credit: www.amazon.com
Lightweight, portable first aid kits are ideal for day trips and urban travel
Credit: www.amazon.com
Lightweight, portable first aid kits are ideal for day trips and urban travel
Over-the-Counter Medications
Over-the-counter meds treat the most common travel ailments without a prescription. Pack:
- Pain relievers: Ibuprofen for inflammation (sprains, headaches, muscle soreness) and acetaminophen for people with stomach sensitivities
- Anti-diarrheal medication, one of the most frequently needed travel supplies as digestive issues are common when visiting new regions
- Antihistamines for allergic reactions, insect bites, and hay fever
- Motion sickness pills for road trips, boat rides, or flights
- Anti-nausea medication for food poisoning or motion sickness
- Any personal prescription medications, packed in original labeled packaging with a copy of your prescription for customs
Specialized Tools
Small tools make it easier to administer first aid correctly. Add:
- 1 pair of blunt-tip, rust-resistant scissors for cutting tape, gauze, or clothing (prioritize the same sharp, durable quality you’d look for in everyday kitchen tools to avoid frustration during emergencies)
- 1 pair of fine-tipped tweezers for removing splinters, ticks, or glass shards
- 1 small CPR face shield for hands-only CPR, if you’re trained to use it
- 1 instant cold pack for sprains, bruises, and burns
- 1 small digital thermometer
- 1 elastic bandage for sprains and strains
- A compact headlamp or flashlight for administering first aid in low-light conditions
Activity-Specific Add-Ons
Tailor your kit to your planned activities to avoid overpacking while staying prepared:
- Hikers and campers: Tick removal tool, water purification tablets, snake bite kit (for venomous snake regions), and extra moleskin
- Beach travelers: Aloe vera gel for sunburn, hydrocortisone cream for rashes, swimmer’s ear drops, and waterproof bandages
- Families with young children: Children’s weight-dosed pain reliever, fever reducer suppositories (for kids who refuse oral meds), and fun-themed bandages to make treatment less scary
- Winter travelers: Hand warmers, lip balm with SPF, and supplies to treat frostnip (warm water, not direct heat, to avoid tissue damage)
Personalize Your Kit for Your Unique Needs
Everyone’s health needs are different, so your first aid kit should reflect your personal medical history, allergies, and travel plans. Personalizing your kit ensures you’re prepared for the emergencies most likely to affect you.
Chronic Condition Supplies
If you manage a chronic condition like diabetes, asthma, or heart disease, pack enough medication for your entire trip plus 3-5 extra days in case of delays. Keep medication in its original labeled packaging, and carry a doctor’s note explaining your condition and need for the medication to avoid issues at security checkpoints or customs. For temperature-sensitive medication like insulin, pack a small cold pack to keep it from spoiling in hot climates, and store it in your personal item, not checked luggage.
Allergy and Sensitivity Items
If you have severe allergies, pack epinephrine auto-injectors (EpiPens) at the recommended temperature (room temperature, not in a hot car or frozen luggage). Carry a doctor’s note explaining your allergy and need for the auto-injector, as some countries require documentation to carry it through security. Add extra antihistamines, hydrocortisone cream, and a list of your allergens written in the local language of your destination, in case you need to communicate with medical staff.
Family and Pet Travel Additions
If you’re traveling with kids or pets, add age-appropriate supplies: children’s fever reducers, child-safe bandages, and teething gel for infants; for pets, bring any prescription medications, a tick removal tool, and a small bottle of pet-safe antiseptic for minor cuts. Keep a copy of your pet’s vaccination records in your first aid kit if you’re traveling internationally, as many countries require them for entry.
Storage, Maintenance, and Pre-Trip Checks
A first aid kit is only useful if its supplies are intact, unexpired, and easy to access when you need them. Follow these steps to keep your kit in top condition.
Regular Inventory and Expiration Checks
Check your kit every 3 months, even if you haven’t used any supplies. Mark expiration dates directly on the exterior of your kit with a permanent marker so you don’t have to dig through pouches to find them. Replace expired medications, used items, and anything that has been exposed to moisture or extreme temperatures immediately. Discard expired medications properly: use local drug take-back programs when available, rather than flushing them down the toilet.
Proper Storage to Protect Supplies
Store your first aid kit in a waterproof pouch inside your bag, away from direct sunlight, extreme heat, and freezing temperatures. Never leave your kit in a parked car on a hot day, as heat can degrade medications and ruin sterile supplies. If you’re traveling to rainy or humid destinations, pair your first aid pouch with leak-proof food storage containers to protect sensitive items from water damage. Small, sealable 16 oz food storage containers work perfectly for separating medication from bandages, preventing moisture transfer that can ruin sterile gauze.
Pre-Trip Restock Routine
One week before every trip, do a full inventory of your kit. Replace any used or expired items, and add any destination-specific supplies (like anti-malarial medication or altitude sickness pills). Make a printed checklist of your kit’s contents to keep in your bag, so you can quickly mark off used items and restock as needed during long trips.
Travel-Specific First Aid Considerations
Your first aid kit should match the unique demands of your trip, from climate to destination to length of travel. Adjusting your kit accordingly ensures you’re prepared for the specific risks you’ll face.
Climate and Environment Adjustments
Hot, humid climates call for extra antifungal powder, insect repellent with DEET, and extra aloe vera for sunburn. Cold, high-altitude environments require hand warmers, lip balm with SPF, and supplies to treat frostnip (warm water, not direct heat, to avoid tissue damage). For rainy or coastal destinations, store all sterile supplies in watertight glass food storage containers inside your main first aid pouch to keep them dry. If you’re traveling in regions with high UV exposure, add a small tube of broad-spectrum sunscreen to your kit for emergency reapplication.
Destination and Duration Planning
Short weekend trips only require basic supplies for minor cuts, headaches, and allergies. For multi-week trips or remote adventures, pack extra dressings, medication, and a compact splint or tourniquet (only if you’ve been trained to use it correctly, per American Red Cross guidelines). If you’re traveling to a remote area with no cell service and more than 2 hours from medical care, add a satellite messenger or personal locator beacon to your kit, along with extra supplies to stabilize serious injuries until help arrives.
International Travel Rules and Resources
If you’re traveling abroad, research local regulations on carrying medications—some countries ban common over-the-counter meds like pseudoephedrine or certain pain relievers, and you may need a doctor’s note to carry prescription medication or epinephrine auto-injectors through customs. For reference, review the CDC’s travel medication guidelines to avoid denied entry or fines. Also, confirm that your health insurance covers emergency medical care and evacuation abroad, and carry a physical copy of your policy details and emergency hotline number in your first aid kit.
Ensure Quick Access When Every Second Counts
A first aid kit is only useful if you can find and use its supplies quickly during an emergency, especially if you’re injured or helping someone else. Strategic placement and organization cut down on fumbling time when it matters most.
Strategic Bag Placement
Never store your first aid kit at the bottom of a suitcase or deep inside a packed backpack. Place it in a top outer pocket of your daypack, or in the side pocket of your personal item for easy reach. For air travel, keep it in the mesh pocket under the seat in front of you so you can access it during the flight without rummaging through overhead bins. If you’re traveling with a group, make sure all members know where the kit is located.
Internal Organization for Speed
Organize your kit by priority and category to avoid fumbling for supplies in a high-stress moment. Use small, labeled pouches to separate items into groups: wound care, medication, tools, and allergy supplies. Put the most commonly used items (antiseptic wipes, bandages, pain reliever) in the top of the pouch for instant access. For extra speed, use color-coded food storage containers to sort supplies by type, so you can grab what you need without thinking. Label each section clearly, even if you’re the only one using the kit, in case a bystander needs to assist you in an emergency.
Basic First Aid Skills Every Traveler Should Know
Your first aid kit is only as useful as your ability to use its supplies correctly. You don’t need to be a certified EMT to handle common travel injuries, but a few core skills can make the difference between a minor issue and a serious emergency. For evidence-based, step-by-step guidance on these life-saving techniques, refer to the American Red Cross first aid curriculum.
Life-Saving Core Skills
Hands-only CPR is recommended for untrained bystanders, and can double or triple a person’s chance of survival after cardiac arrest. Perform compressions at a rate of 100-120 per minute (the beat of the Bee Gees’ "Stayin’ Alive" is the perfect rhythm) until emergency help arrives. If you’re traveling with someone who has a severe allergy, learn how to use an epinephrine auto-injector correctly: remove the safety cap, press the tip firmly against their outer thigh, and hold it in place for 3 seconds before calling emergency services.
Treating Common Minor Injuries
Most travel injuries are minor and can be handled with supplies from your kit:
- Cuts and scrapes: Rinse with clean water for 5-10 seconds, apply antibiotic ointment, and cover with a bandage. Avoid using hydrogen peroxide or iodine on open wounds, as they can damage healthy tissue.
- Blisters: Clean the area, apply a hydrocolloid blister pad, and cover with a bandage if needed. Don’t pop blisters, as this increases the risk of infection.
- Sprains: Use the RICE method—rest, ice (with an instant cold pack), compression (with an elastic bandage), and elevation—to reduce swelling.
- Minor burns: Run cool (not cold) water over the burn for 10-15 minutes, cover with a clean non-stick gauze pad, and avoid applying ice, butter, or antibiotic ointment directly to the burn.
Recognizing Warning Signs of Serious Issues
Not all injuries are minor. Learn to spot the signs of serious conditions that require immediate medical attention:
- Stroke: Use the FAST test—look for Face drooping, Arm weakness, Speech difficulty, and Time to call emergency services immediately.
- Severe allergic reaction: Look for hives, swelling of the face or throat, difficulty breathing, or dizziness after an insect sting or food exposure. Use an epinephrine auto-injector immediately and call emergency services.
- Heat exhaustion or heat stroke: Look for dizziness, nausea, confusion, or a body temperature above 103°F (39.4°C). Move the person to a cool place, apply cool wet cloths, and call emergency services if symptoms don’t improve within 10 minutes.
Common First Aid Kit Packing Mistakes to Avoid
Even experienced travelers make avoidable mistakes when packing their first aid kit. Avoid these common errors to ensure your kit is ready when you need it:
- Skipping regular checks: A common mistake is packing your kit once and never checking it again, leading to expired meds and missing supplies when you need them most. Check your kit every 3 months, and do a full check 1 week before every trip.
- Overpacking unnecessary items: Pre-assembled kits often include supplies you’ll never use, taking up space for more useful items. Stick to the essentials, and only add items tailored to your specific trip and health needs.
- Ignoring temperature sensitivity: Insulin, some antibiotics, and epinephrine auto-injectors can spoil if left in extreme heat or cold. Always carry temperature-sensitive medications in your personal item, not checked luggage or a hot car.
- Not learning how to use your supplies: A tourniquet or epinephrine auto-injector is useless if you don’t know how to operate it correctly. Take a basic first aid course before your trip to build confidence.
- Forgetting to pack for others: If you’re traveling with kids, pets, or friends with chronic conditions, make sure their specific supplies are included in your kit.
 Credit: www.walmart.com
Pre-assembled travel first aid kits come with pre-sorted supplies for quick access in emergencies
Credit: www.walmart.com
Pre-assembled travel first aid kits come with pre-sorted supplies for quick access in emergencies
Frequently Asked Questions
What essential items should be in a first aid kit in a bag for travel?
A well-stocked travel first aid kit should include: assorted adhesive bandages (including waterproof varieties), sterile gauze pads, medical tape, nitrile gloves, antiseptic wipes, antibiotic ointment, pain relievers (ibuprofen, acetaminophen), anti-diarrheal medication, antihistamines, blister pads, a small pair of scissors, tweezers, a CPR face shield, an instant cold pack, and an emergency blanket. Add personal medications, allergy supplies, and activity-specific items as needed.
How often should I check my first aid kit in my bag?
Check your kit every 3 months, even if you haven’t used any supplies. Replace expired medications, used items, and anything that has been exposed to moisture or extreme temperatures. Do a full check 1 week before any trip to make sure everything is in good condition.
Can a first aid kit in a bag help during travel emergencies?
Yes, a properly packed first aid kit lets you handle minor injuries (cuts, scrapes, blisters, allergic reactions, headaches) immediately, preventing them from escalating into more serious issues. For more serious emergencies, it gives you the tools to stabilize the situation while you wait for professional medical help.
Where is the best place to keep a first aid kit in a bag?
Store your kit in an easily accessible outer pocket of your bag—never at the bottom of a suitcase or deep inside a packed backpack. For carry-on travel, keep it in the mesh pocket under the seat in front of you for quick access during flights. If you’re traveling with others, make sure everyone in your group knows where the kit is located.
Do I need a special first aid kit for international travel?
Yes, international travel often requires additional supplies, including extra prescription medication (pack 2x the amount you need in case of delays), anti-malarial medication if traveling to high-risk regions, motion sickness pills, and a doctor’s note for any controlled substances or epinephrine auto-injectors to show customs officials.
Conclusion
A compact first aid kit in your bag is one of the simplest, most high-impact preparedness steps you can take as a traveler. It takes up less space than a spare pair of socks, but it can turn a stressful, trip-derailing emergency into a minor inconvenience. Take 15 minutes this week to build or restock your kit, check the expiration dates on your medications, and brush up on basic first aid skills. If you haven’t taken a first aid course in the last 2 years, sign up for a free or low-cost session through your local Red Cross chapter to build the confidence to act when it matters most. Safe travels, and may your kit stay untouched—but always be ready to use it.

I’m Abby Lu, a passionate home cook who loves simplifying everyday meals. At PlugChef.com, I share product reviews and cooking guides to help you find the best tools for your kitchen.
Related posts:
 Is Nylon Cooking Utensils Safe? Unveiling the Truth
 Is Bamboo Good for Cooking Utensils: Discover the Benefits
 Can You Cut Raw Meat on a Wood Cutting Board Safely?
 Harbor Freight First Aid Kit: Essential Safety Gear for Emergencies
 First Aid Kit Supplies Refills: Essential Items You Must Restock
 10 Person First Aid Kit: Essential Gear for Emergencies

