
When a sudden paper cut bleeds through your work shirt, a blister forms mid-hike, or a kid skips their knee on the sidewalk, having first aid supplies within arm’s reach can turn a minor annoyance into a 2-minute fix instead of a hours-long hassle. The problem? Most pre-made first aid kits are bulky, overstuffed with supplies you’ll never use, and too big to tuck in a pocket, glove compartment, or gym bag.
The Altoids tin first aid kit solves that problem entirely: it’s a DIY, ultra-portable emergency solution that fits 12–15 core medical supplies in a 3.5 x 2.5 x 0.75 inch crush-resistant metal tin, small enough to slip in any pocket or backpack pocket. Perfect for hikers, commuters, travelers, parents, and anyone who wants to be prepared for minor injuries without carrying extra weight, this compact kit is one of the most practical, low-cost life-saving gear hacks you can build in 10 minutes or less.
Why Altoids Tins Are the Ultimate DIY First Aid Container
Altoids tins have become the go-to container for mini first aid kits for good reason: their small footprint, durable construction, and low cost make them far more practical than bulky plastic first aid boxes or overpriced pre-made mini kits. Unlike flimsy plastic pouches, they protect supplies from being crushed in a bag, and their hinged lid stays closed even when jostled in a pocket or backpack.
Built for Portability and Durability
The standard Altoids tin is small enough to fit in the smallest jeans pocket, jacket pocket, or car glove compartment, making it accessible in almost any scenario. Its stamped metal construction is crush-resistant, so supplies won’t get damaged if you sit on your bag or drop it on a hard surface. The only trade-off to note is that Altoids tins are water-resistant but not fully submersible: they’ll protect supplies from light rain or a spilled water bottle, but they won’t hold up if you drop them in a lake or leave them in a downpour unless you store them in a separate waterproof pouch.
A common mistake new builders make is overstuffing the tin so the lid won’t close fully. To avoid this, leave 1/8 inch of space between your top layer of supplies and the lid — this small gap ensures you can open and close the kit quickly in an emergency, even if you’re wearing gloves or have slippery hands.
Cost-Effective and Fully Customizable
An empty Altoids tin costs just $1–2, compared to $15–30 for pre-made mini first aid kits that are often filled with supplies you don’t need. You can fill your kit with items you already have at home, and swap out supplies as your needs change: if you develop a seasonal allergy, add an antihistamine; if you start hiking regularly, add blister pads; if you have young kids, add children’s pain reliever doses. This flexibility makes it far more useful than a one-size-fits-all pre-made kit.
Core Supplies to Pack in Your Mini First Aid Kit
The small size of an Altoids tin means you have to prioritize essentials, but you can still cover 90% of common minor injuries with 12–15 well-chosen supplies. Avoid bulk items, and opt for single-use or travel-sized versions of everything to save space.
Wound Care Essentials
For wound care, the CDC recommends including sterile gauze pads, adhesive bandages in multiple sizes, and antiseptic wipes to reduce infection risk CDC's official first aid kit recommendations. For an Altoids tin, opt for 1×1 inch gauze pads instead of full-size pads, blister-sized adhesive bandages instead of large strips, and single-use antiseptic wipes instead of bulk bottles to save space. Add 2–3 butterfly wound closures for small cuts that need extra hold, and a 1-inch roll of medical tape for securing gauze.
- 5–6 adhesive bandages (various sizes, including blister-sized)
- 2 1×1 inch sterile gauze pads
- 5 single-use antiseptic wipes
- 2–3 butterfly wound closures
- 1-inch roll of medical tape
- 2–3 blister prevention pads
Pain, Allergy, and Illness Relief
For over-the-counter pain and allergy relief, the American Red Cross suggests packing single-dose ibuprofen, acetaminophen, and antihistamines to address common minor ailments without taking up extra space American Red Cross first aid kit guidelines. Opt for blister packs of 2–3 tablets each instead of full bottles, and add a small packet of anti-diarrheal medication if you travel frequently. If you have a prescribed EpiPen or inhaler, remove the outer packaging (if safe to do so) to fit it in the tin, or store it in a small attached pouch.
- 2 doses ibuprofen
- 2 doses acetaminophen
- 2 doses antihistamine (for allergic reactions or hay fever)
- 1 dose anti-diarrheal medication (optional, for travel)
- Personal prescription medications (as needed)
Minor Emergency Tools
Small tools make all the difference when treating injuries on the go. Pack a pair of pointed-tip tweezers for removing splinters, ticks, or glass shards, a pair of 3-inch folding scissors for cutting tape or gauze, and 2–3 small safety pins for securing bandages or making an impromptu sling. A mini LED keychain light is also useful for treating injuries in low-light conditions, like at a concert or on a night hike.
- Pointed-tip tweezers
- 3-inch folding scissors
- 2–3 small safety pins
- Mini LED keychain light (optional)
What to Skip to Avoid Overstuffing
A common mistake is packing non-essential items that take up valuable space and make the lid impossible to close. Skip full-size bottles of liquid antiseptic, large rolls of gauze, bulky trauma shears, and items you don’t know how to use safely (like a tourniquet, which requires formal training to use without causing harm). Stick to 12–15 core items max to keep the kit lightweight and functional.
Tailor Your Kit to Your Lifestyle and Activities
The best mini first aid kits are customized to match how you’ll use them. A kit for a weekend hiking trip will look very different from a kit you keep in your office desk drawer, and adjusting your supplies to match your routine ensures you’re prepared for the specific risks you face.
For Hiking, Camping, and Outdoor Adventures
If you use your kit for backcountry trips, add blister prevention pads (like moleskin or Compeed), a small tick removal card, insect sting relief wipes, and a compact whistle to signal for help if you get lost. For campers, add a small burn gel packet for campfire burns, and a pack of water purification tablets in case you run out of drinking water. If you’re packing energy bars and trail mix for your hike, compact snack containers pair perfectly with your mini first aid kit for all-day preparedness.
For Commuting, Travel, and On-the-Go Use
For daily commutes or city travel, add an instant cold pack for headaches or sprains, a small pack of electrolyte tablets for dehydration, and a few extra adhesive bandages for blisters from new shoes. For air travel, ensure all liquid supplies are under 3.4oz to comply with TSA regulations, and pack a small pack of motion sickness tablets if you get car or air sick. For road trips, tuck your tin in your glove compartment or a small pouch next to your large cooler storage so you have both first aid and fresh snacks within reach.
For Household, Work, and Everyday Emergencies
If you keep a kit in your kitchen or office drawer for everyday use, add a small burn gel packet for kitchen burns, a child-safe dosing syringe for liquid children’s medications, and a few extra bandages for paper cuts or small kitchen nicks. If you keep your kit in a kitchen drawer for quick access while cooking, you can store it next to your everyday prep knives to treat minor cuts from chopping vegetables immediately. For gym-goers, add a small pack of antiseptic cream for mat burns or small scrapes from equipment, and pair your kit with portion-controlled food storage to keep post-workout meals fresh until you get home.
Seasonal Adjustments to Stay Prepared Year-Round
Your first aid needs shift with the seasons, so update your kit every 3 months to match the weather. In winter, add SPF lip balm, small disposable hand warmers, and extra gauze for frost-nipped skin. In summer, add aloe vera gel packets for sunburn, insect sting relief wipes, and waterproof bandages for beach or pool trips. For summer picnics, pair your first aid kit with glass meal prep containers to keep cold salads and sandwiches fresh in the heat. In spring and fall, add extra antihistamines for seasonal allergies, and a small pack of tissues for runny noses or allergy symptoms.
Organize Your Tin for Fast, Stress-Free Access
A well-organized kit cuts down on response time during emergencies, which is critical when you’re injured or helping someone else. Simple layout and labeling hacks will ensure you can find the supplies you need in 10 seconds or less, even in high-stress situations.
Layout Hacks for Quick Retrieval
In practice, the fastest way to organize your tin is to layer supplies by how often you use them. Put bandages, antiseptic wipes, and pain relievers on the top layer for instant access, and stash less-used items like gauze, tools, and medications on the bottom layer. Use a small piece of adhesive-backed foam or a folded piece of cardboard to create a shallow divider between layers, so items don’t shift around when you move the tin. Avoid overstuffing: leave 1/8 inch of space between the top layer and the lid to make it easy to open and close quickly.
Waterproofing for All Weather Conditions
Altoids tins are water-resistant but not fully submersible, so they’ll protect supplies from light rain or a spilled water bottle, but they won’t hold up if you drop them in a lake or leave them in a pouring rain. To add extra protection, store the tin inside a small zippered nylon pouch, and add a 1-gram silica gel packet (the kind that comes in shoe boxes or electronics packaging) to absorb any excess moisture. Wrap paper items like gauze pads in wax paper or a small plastic bag to keep them dry if the tin does get wet.
Labeling for High-Stress Emergencies
When you’re injured or helping someone else, fumbling through an unlabeled tin wastes precious time. Use a permanent marker to write a short list of contents on the inside of the tin’s lid, or add a small adhesive label with large, easy-to-read text (e.g., “Bandages,” “Antiseptic,” “Pain Relief”) to the outside of the tin. If you have multiple kits (e.g., one for your car, one for your gym bag), label each one clearly so you don’t grab the wrong one in a hurry.
Keep Your Kit Ready: Maintenance and Restocking Tips
A first aid kit is only useful if the supplies inside are intact, unexpired, and fully stocked. A 2-minute monthly check and a habit of restocking immediately after use will ensure your kit is always ready when you need it.
Monthly Quick Checks for Expired Supplies
Spend 2 minutes at the start of each month checking your kit for expired items: antiseptic wipes dry out after 1–2 years, pain medications expire after 1–3 years, and adhesive bandages lose their stickiness if they get too hot or damp. Write the expiration dates of all perishable items on a small piece of paper taped to the inside of the lid, so you can check them at a glance. Throw away any expired or damaged supplies immediately, and replace them with fresh stock.
Restock Immediately After Any Use
The biggest mistake people make with mini first aid kits is waiting to restock them until they need them again, only to find half the supplies are missing. After you use any item from your kit, replace it that same day. Keep a small stash of spare supplies (bandages, wipes, pain relievers) in a kitchen drawer or bathroom cabinet so you can refill your kit in 2 minutes flat. This habit ensures you’re never caught without the supplies you need in an emergency.
Long-Term Storage Best Practices
Store your Altoids tin in a cool, dry place out of direct sunlight, like a kitchen drawer, bathroom cabinet, or car glove compartment. Avoid leaving it in a hot car for long periods, as heat can degrade medications and weaken the adhesive on bandages. If you have young children, store the kit out of their reach but in a place you can access quickly if needed. For long-term storage (e.g., if you keep a kit in your emergency go-bag), add a fresh silica gel packet every 6 months to keep moisture out.
Real-World Scenarios Where This Kit Makes a Difference
The Altoids tin first aid kit is useful far more often than you might think: most minor injuries happen in everyday scenarios, not on extreme outdoor adventures, and having supplies on hand can save you time, pain, and money.
Backcountry and Outdoor Emergencies
On a typical weekend hike, a sharp rock can cause a deep scrape that, if left untreated, can lead to infection. A mini first aid kit lets you clean the wound with an antiseptic wipe, cover it with a sterile gauze pad, and secure it with medical tape, preventing infection until you can get proper medical care if needed. For longer backcountry trips, a mini first aid kit can treat minor cuts, insect bites, and headaches without taking up valuable space in your already heavy pack.
Travel and Public Space Incidents
At a crowded music festival, a stranger might cut their hand on a broken glass and struggle to stop the bleeding. A quick antiseptic wipe and butterfly closure from a pocket-sized first aid kit stops the bleeding and prevents infection before event medical staff can arrive. For international travel, a mini kit is especially useful, as many countries don’t have easily accessible first aid supplies in public spaces, and pharmacies may be far from tourist areas.
Everyday Home and Workplace Injuries
Most minor injuries happen at home or work, not on a hiking trail: a paper cut that won’t stop bleeding, a small burn from a hot stovetop, a splinter from a wooden deck, or a headache that hits mid-workday. Keeping a mini first aid kit in your desk drawer, kitchen cabinet, or gym bag means you can treat these injuries in 2 minutes flat, instead of spending 10 minutes rummaging through a bulky first aid box or running to the pharmacy. In practice, keeping a kit in your most-used spaces cuts down on small injury downtime by 90%.
Frequently Asked Questions
What exactly is an Altoids tin first aid kit?
An Altoids tin first aid kit is a DIY, ultra-portable emergency solution that repurposes the iconic peppermint tin to hold 12–15 core medical supplies for minor injuries. It’s designed for people who want to be prepared for cuts, scrapes, blisters, headaches, and allergic reactions without carrying a bulky pre-made kit, and fits easily in pockets, bags, glove compartments, and desk drawers.
What are the non-negotiable items to include?
The core non-negotiable supplies are: 5–6 adhesive bandages in various sizes, 2 1×1 inch sterile gauze pads, 5 single-use antiseptic wipes, 2–3 butterfly wound closures, a 1-inch roll of medical tape, 2–3 blister pads, 2 doses each of ibuprofen, acetaminophen, and an antihistamine, pointed-tip tweezers, and 3-inch folding scissors. You can add 2–3 custom items based on your needs, but avoid overstuffing the tin beyond 15 total items.
How do I build a kit in 10 minutes or less?
Building a kit takes less than 10 minutes with these steps:
- Empty and clean your Altoids tin, wiping the inside with an alcohol wipe to disinfect it.
- Add a small piece of adhesive-backed foam to the bottom of the tin to hold items in place.
- Layer your supplies: put bandages, antiseptic wipes, and pain relievers on the top layer for instant access, and tools and medications on the bottom layer.
- Tuck a 1-gram silica gel packet in the corner of the tin to absorb moisture.
- Close the lid and test that it fits easily in your pocket or bag.
Are Altoids tin first aid kits allowed on airplanes?
Yes, as of 2026, TSA allows mini first aid kits in carry-on luggage as long as all liquid or gel supplies (like antiseptic wipes, burn gel, or aloe vera) are under 3.4oz, and no sharp tools (like scissors) are longer than 4 inches. It’s always a good idea to check the latest TSA guidelines before your flight, as rules can change.
Conclusion
An Altoids tin first aid kit is one of the simplest, most cost-effective ways to stay prepared for minor injuries no matter where you are. It takes 10 minutes and less than $10 to build, fits in any pocket or bag, and can save you time, pain, and money by letting you treat small injuries immediately instead of waiting for help or running to the pharmacy.
To build your own kit today, grab an empty Altoids tin, gather the core supplies listed above, and customize it to match your daily routine. Keep one in your pocket, bag, car, and desk for all-day preparedness — you’ll never regret having it on hand when you need it most.

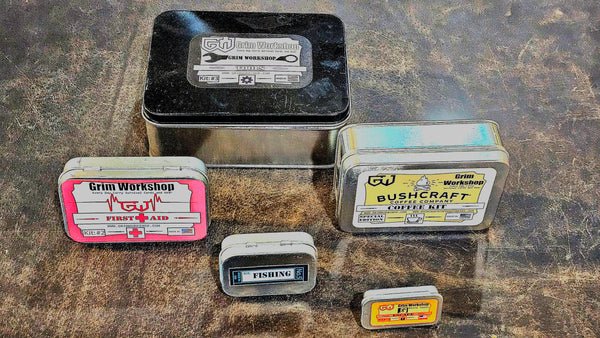
- A well-stocked Altoids tin first aid kit fits easily in a pocket for on-the-go access. Credit: grimworkshop.com
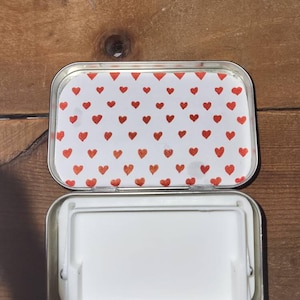
- Customize your kit with activity-specific supplies for hiking, travel, or daily use. Credit: www.etsy.com

- Labeling compartments ensures you can find supplies quickly in high-stress situations. Credit: www.ebay.ca For more ways to build out your emergency and everyday carry kits, explore our range of rugged food storage containers and in-depth kitchen gear guides.
Frequently Asked Questions
What is the difference between a DIY Altoids tin first aid kit and a pre-made mini first aid kit?
A DIY Altoids tin kit costs $1–$2 for the tin plus the cost of supplies you likely already have at home, compared to $15–$30 for most pre-made mini kits that are stuffed with low-quality, unnecessary items you’ll never use. DIY kits are fully customizable: you can swap in supplies that match your specific allergies, activity level, and household needs, whereas pre-made kits are one-size-fits-all. In practice, most pre-made mini kits include cheap, flimsy bandages that fall off after 10 minutes of movement, and low-quality antiseptic wipes that are already dry when you open the package — building your own ensures every item is high-quality and tailored to your actual needs.
Can I store an Altoids tin first aid kit in my car’s glove compartment?
Yes, as long as you place it in a cool, dry spot away from direct sunlight and extreme heat. Avoid leaving it on the dashboard in summer, as temperatures inside a parked car can exceed 150°F (65°C) in as little as 30 minutes, which degrades medications, weakens bandage adhesive, and dries out antiseptic wipes in under an hour. For glove compartment storage, tuck a 1-gram silica gel packet in the corner of the tin to absorb moisture from temperature swings, and check the kit every month for expired or damaged supplies.
How often should I restock my Altoids tin first aid kit?
Spend 2 minutes at the start of every month checking your kit for expired items, used supplies, or damaged packaging. Restock any used or expired items immediately, rather than waiting until you need the kit again to find it half-empty. If you use a specific supply regularly (like blister pads for daily hikes), keep a small backup stash of that item in a kitchen drawer or bathroom cabinet so you can refill the tin in under 2 minutes. A common mistake is waiting to restock until after an emergency, when you’re already injured and don’t have time to run to the pharmacy.
Are Altoids tin first aid kits sufficient for serious or life-threatening injuries?
No — an Altoids tin first aid kit is designed exclusively to treat minor, non-life-threatening injuries like cuts, scrapes, blisters, headaches, mild allergic reactions, and small first-degree burns. It is not a replacement for a full-size first aid kit or professional medical care for serious injuries like deep lacerations, broken bones, chest pain, or severe allergic reactions (anaphylaxis). For serious emergencies, use your mini kit to provide basic care (like stopping bleeding or administering a prescribed EpiPen) while waiting for emergency medical services to arrive. Always keep a fully stocked first aid kit in your home and car for more serious scenarios, and consider taking a basic first aid and CPR course to learn how to respond to life-threatening emergencies.
Can I use a non-Altoids brand tin for my first aid kit?
Absolutely — any small, sturdy, crush-resistant metal tin with a hinged lid works just as well. Look for tins that are roughly 3.5 x 2.5 x 0.75 inches (the standard Altoids size) to fit all core supplies without overstuffing. Repurposed tins from mints, lip balm, or small hardware items work perfectly, and you can find empty mini tins at craft stores or online for $1–$2 each if you don’t want to use an Altoids brand tin. The only requirement is that the tin seals tightly enough to keep supplies dry and protected from being crushed in a bag or pocket.
Conclusion
An Altoids tin first aid kit is one of the most practical, low-cost preparedness hacks you can build in 10 minutes or less. It solves the problem of bulky, overstuffed pre-made kits by fitting 12–15 high-quality, customized supplies in a crush-resistant metal tin small enough to slip in any pocket, bag, glove compartment, or desk drawer. Whether you’re hiking a backcountry trail, commuting to work, traveling abroad, or just want to be prepared for everyday minor injuries at home, this compact kit gives you the tools to treat cuts, scrapes, blisters, headaches, and mild allergic reactions immediately, without wasting time rummaging for supplies or running to the pharmacy.
Building your own kit is as simple as grabbing an empty tin, packing your core supplies, and customizing it to match your daily routine. Keep one in your pocket, bag, car, and office for all-day preparedness — the 2 minutes you spend building it today could save you hours of pain, hassle, and expense down the road. For more tips on building out your everyday carry and emergency kits, check out our guides to rugged food storage for travel and durable kitchen gear for home use.

I’m Abby Lu, a passionate home cook who loves simplifying everyday meals. At PlugChef.com, I share product reviews and cooking guides to help you find the best tools for your kitchen.
Related posts:
 Recipe for Lemon Fluff Dessert: Irresistibly Light & Zesty Treat
 Baked Salmon from Frozen Recipe: Easy, Delicious & Quick Guide
 Clean Grill With Oven Cleaner: Effortless Sparkle in Minutes!
 How to Cook Beef Chateaubriand: Perfectly Tender & Juicy Every Time
 Make Yogurt in Instant Pot: Easy, Creamy, Homemade Delight
 Navy Beans And Ham Recipes: Delicious, Easy, and Hearty Meals

