
If you’ve ever wanted to make your own kombucha at home, growing a healthy SCOBY is the first step. But how do you actually grow one from scratch?
It might seem tricky, but with the right tips and a little patience, you can create a strong SCOBY that will keep your kombucha brewing batch after batch. You’ll learn simple, clear steps to grow your SCOBY successfully. By the end, you’ll feel confident to start your own kombucha adventure and enjoy fresh, homemade drinks anytime you want.
Keep reading to discover exactly how to get started!
Credit: loismelkonian.medium.com
What Is A Scoby
A SCOBY, short for “Symbiotic Culture Of Bacteria and Yeast,” is the heart of kombucha brewing. It might look like a simple, rubbery pancake, but it’s actually a living community that transforms sweet tea into tangy kombucha. Understanding what a SCOBY is will help you grow it successfully and enjoy delicious homemade kombucha.
Scoby’s Role In Kombucha
The SCOBY acts as a natural fermenting agent. It consumes the sugar in the tea and produces acids, vitamins, and probiotics that give kombucha its unique flavor and health benefits.
Without a SCOBY, you won’t get the fermentation process needed to create kombucha. It also forms a protective layer on top of the liquid, keeping out harmful bacteria and yeast.
Think about it like a tiny ecosystem working hard to craft your refreshing drink.
Characteristics To Look For
When you’re growing or buying a SCOBY, certain features tell you it’s healthy and ready to use.
- Color:Healthy SCOBYs are usually creamy white or light tan. Dark spots or mold (black, green, or fuzzy patches) mean trouble.
- Texture:It should feel firm and slightly rubbery, almost like a thick jelly.
- Shape:A round, flat disc that covers the surface of the tea is ideal.
- Smell:It should have a slightly vinegary, tangy scent but never a rotten or foul odor.
Have you ever wondered why your SCOBY looks different from photos online? Each batch grows uniquely depending on your environment and tea blend. That’s perfectly normal and part of the fun in brewing your own kombucha.
Gathering Ingredients
Gathering the right ingredients is the first step to growing a healthy SCOBY. Each component plays a vital role in creating the perfect environment. The quality and type of tea, sugar, and starter liquid affect the SCOBY’s growth speed and strength. Choose ingredients carefully to ensure success.
Tea Selection
Choose pure tea without added oils or flavors. Black tea is the most common choice. It provides nutrients that help the SCOBY grow strong. Green tea also works well and adds a different flavor profile. Avoid teas with artificial flavors or herbs that might harm the culture.
Sugar Type
Use plain white sugar for the best results. It feeds the bacteria and yeast inside the SCOBY. Organic cane sugar is a good alternative. Avoid honey, brown sugar, or artificial sweeteners. These can affect fermentation and slow down SCOBY growth.
Starter Liquid
The starter liquid is a batch of brewed kombucha from a previous fermentation. It lowers the pH and protects the SCOBY from harmful bacteria. Use raw, unpasteurized kombucha. Avoid store-bought kombucha with added flavors or preservatives. The starter liquid kickstarts the SCOBY’s formation and keeps it healthy.
Preparing The Sweet Tea
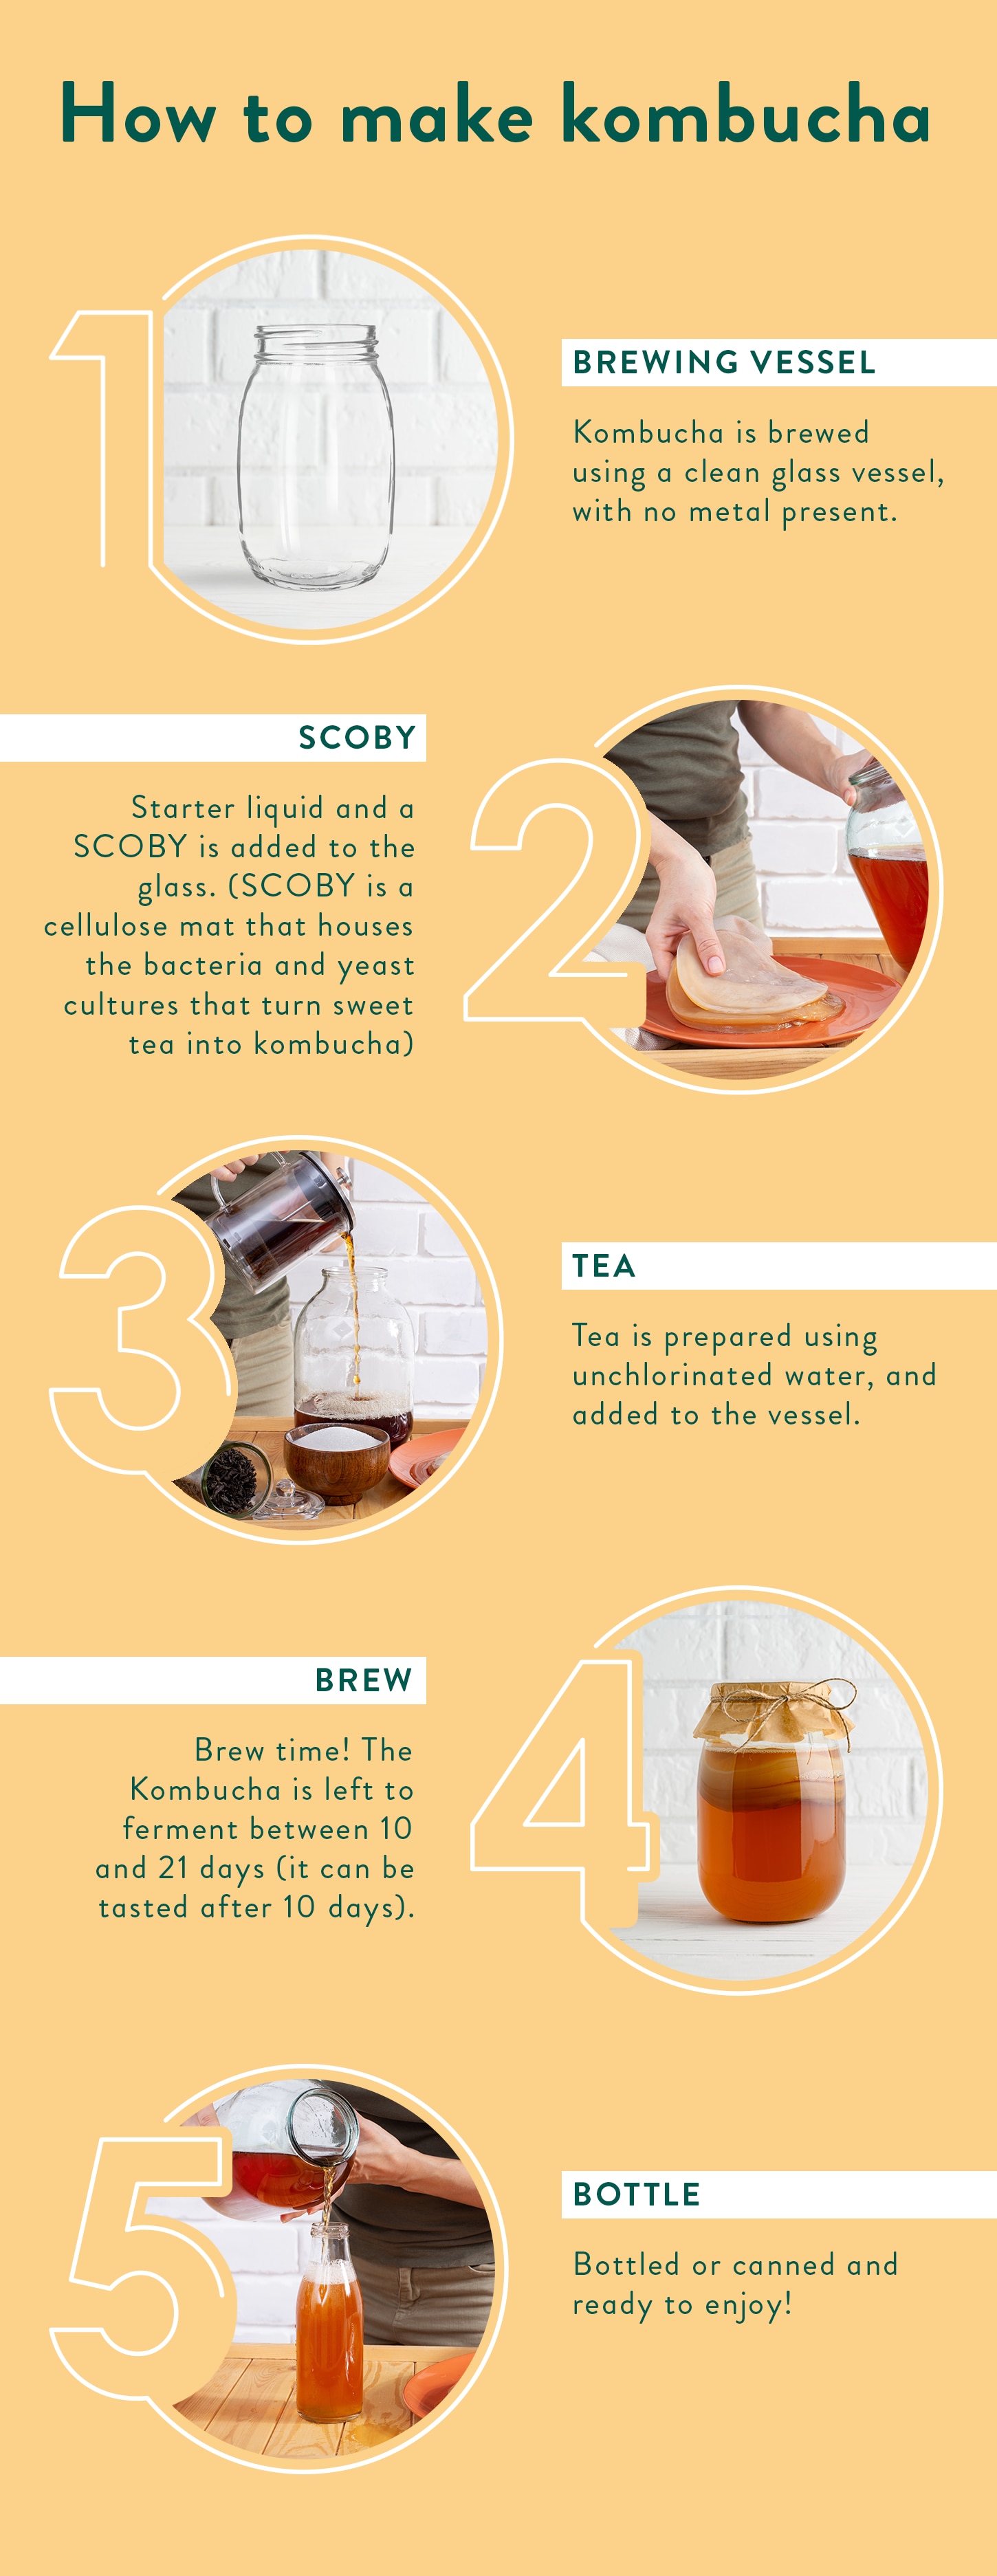
Sweet tea is made by dissolving sugar in hot water and then cooling it. This sugar water feeds the bacteria and yeast needed to grow a healthy SCOBY. Preparing the tea carefully ensures a strong and active SCOBY for fermentation.
Preparing the sweet tea is a crucial step in growing a healthy and vibrant SCOBY. This process lays the foundation for the fermentation environment your SCOBY will thrive in. A well-prepared sweet tea ensures that your SCOBY has all the nutrients it needs to grow robustly.Brewing The Tea
Start with choosing a good-quality black or green tea. The tea’s tannins contribute to the SCOBY’s health. Boil about 4 cups of water and steep 2-3 tea bags for 10-15 minutes. This allows the tea to release its rich flavors and nutrients. Are you using loose tea leaves? A teaspoon per cup works perfectly.Dissolving Sugar
While the tea is still hot, stir in one cup of granulated sugar. The heat helps dissolve the sugar quickly and completely. Sugar is essential as it serves as food for the yeast, spurring fermentation. Ever tried adding sugar to cold tea? It clumps and refuses to mix well.Cooling Process
Let the sweet tea cool to room temperature. Hot tea can harm your SCOBY, which prefers a milder environment. You can speed up the process by adding cold water or ice cubes. Is your tea too hot to touch? It’s not ready for the SCOBY yet. Preparing the sweet tea might seem simple, but it sets the stage for your SCOBY’s success. Are you ready to see it flourish?Starting Your Scoby Culture
Starting your SCOBY culture is an exciting first step toward brewing your own kombucha. This process sets the foundation for a healthy, thriving SCOBY that will help ferment your tea. Paying attention to the details here can save you from common pitfalls and speed up the growth of your culture.
Adding Starter Liquid
The starter liquid is essential because it contains the right balance of acids and live bacteria to kickstart SCOBY growth. Use about 1 to 2 cups of unpasteurized, raw kombucha from a previous batch or a store-bought bottle labeled “raw” and “unflavored.”
Avoid using pasteurized kombucha as it lacks the live cultures needed for fermentation. Pour the starter liquid gently into your sweetened tea to maintain the right environment for the SCOBY to form.
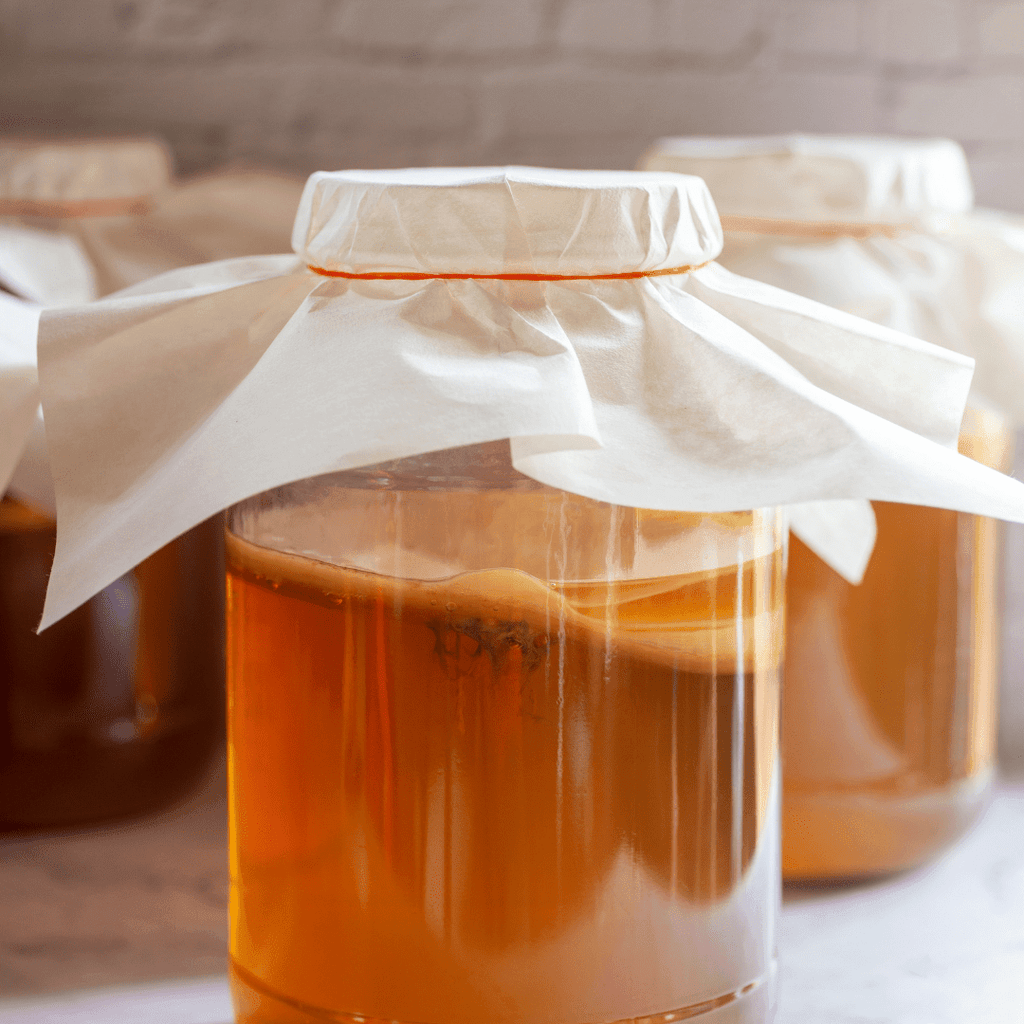
Covering And Storing
Cover your jar with a breathable cloth or coffee filter secured with a rubber band. This prevents dust and insects from contaminating your culture while allowing air to circulate, which the SCOBY needs to grow.
Place the jar in a warm, well-ventilated spot away from direct sunlight. Have you noticed how a dark corner in your kitchen often works better than a sunny windowsill? This small adjustment can make a big difference in your SCOBY’s development.
Ideal Fermentation Conditions
Temperature plays a crucial role in fermentation. Aim for a steady range between 70°F and 85°F (21°C to 29°C). Temperatures outside this range slow down or even stop SCOBY growth.
Also, avoid moving the jar too much during fermentation. A stable environment helps the SCOBY form a thick, healthy layer. Think about how calm and consistent conditions lead to the best results in many natural processes—fermentation is no different.
Monitoring Growth
Watching your SCOBY grow is an exciting part of making kombucha. Careful monitoring helps ensure healthy development. It also lets you catch problems early before they harm your brew. Regular checks keep the process on track and improve your kombucha quality.
Signs Of Scoby Formation
- A thin, translucent film appears on the liquid surface.
- The film thickens and becomes opaque within days.
- Edges of the SCOBY look creamy or white and smooth.
- The SCOBY forms a round, jelly-like layer floating on top.
- A vinegar-like smell develops, showing fermentation is active.
Early signs might be subtle. Patience is key during the first week. The SCOBY grows slowly at first, then speeds up.
Common Issues And Fixes
| Issue | Cause | Fix |
|---|---|---|
| No SCOBY film | Old or weak starter liquid | Use fresh, unpasteurized kombucha |
| Black or green spots | Mold contamination | Discard batch; clean equipment thoroughly |
| Strong unpleasant smell | Too warm or poor ingredients | Maintain 70-85°F; use fresh tea and sugar |
| Thin or patchy SCOBY | Insufficient oxygen or low sugar | Use wider jar; increase sugar amount |
Keep your brewing area clean and well-ventilated. SCOBY health depends on stable, clean conditions. Regular checks prevent most problems and help you grow a strong SCOBY.
Harvesting And Using Your Scoby
Harvesting and using your SCOBY is a key part of making kombucha. It allows you to keep brewing fresh batches. Handling it carefully keeps the SCOBY healthy and ready for new fermentation cycles. Proper care ensures good taste and strong cultures.
Separating The Scoby
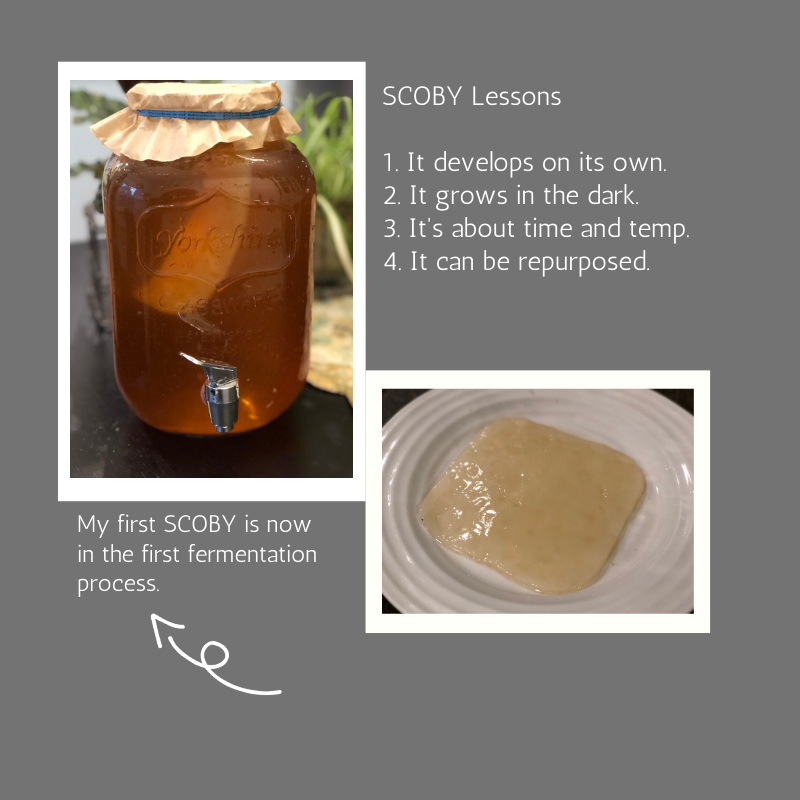
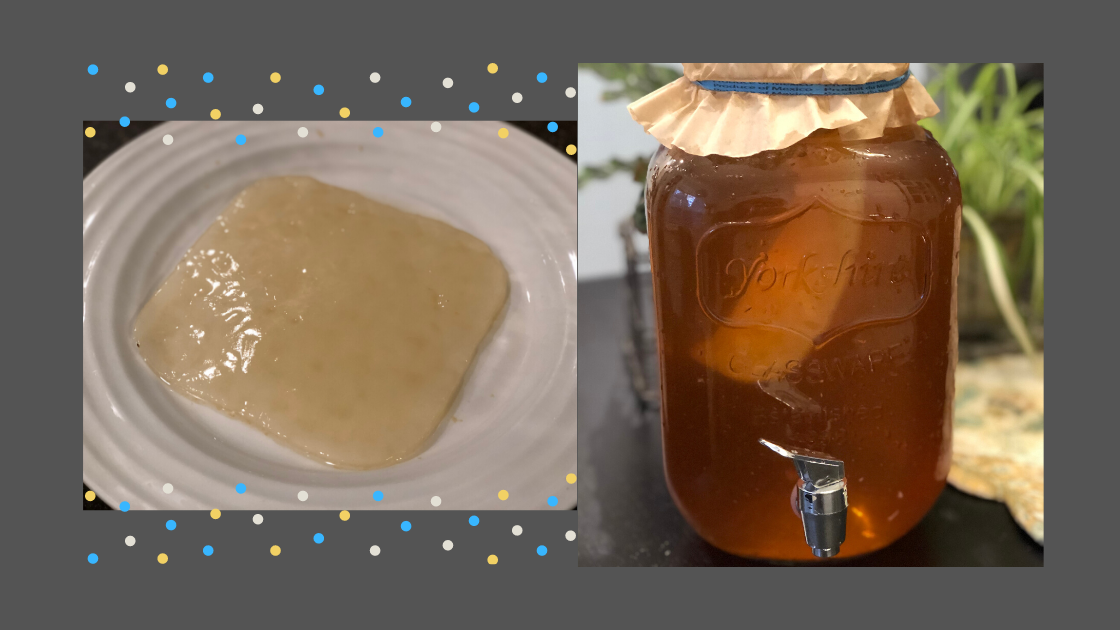
After fermentation, a new SCOBY layer forms on top of the liquid. Gently lift it using clean hands or sterilized tongs. Separate the new SCOBY from the old one by peeling them apart slowly. Avoid tearing or damaging the layers. Keep the new SCOBY for the next batch. The old SCOBY can be used or stored as a backup.
Storage Tips
Store unused SCOBYs in a glass jar with some kombucha liquid. Keep the jar covered with a breathable cloth. Store it at room temperature, away from direct sunlight. Change the liquid every few weeks to keep the SCOBY fresh. Avoid storing SCOBYs in the fridge or sealed containers. These conditions can harm the culture.
Using Scoby For Kombucha
Place the SCOBY into sweet tea to start fermentation. Use clean utensils and containers to avoid contamination. The SCOBY consumes sugar and creates beneficial acids and bubbles. Brew time usually takes 7 to 14 days. Taste the kombucha to check readiness. The SCOBY can be reused many times for continuous brewing.
Troubleshooting Tips
Growing a healthy SCOBY can sometimes come with challenges. Knowing how to spot problems early and fix them can save your batch from spoiling. Let’s look at common issues you might face and how to handle them effectively.
Mold Identification
Mold on your SCOBY is a clear sign that something went wrong. It usually appears as fuzzy spots that are green, black, or white in color. If you see mold, remove the entire SCOBY and discard the batch immediately to avoid health risks.
Keep an eye on the texture too. A healthy SCOBY is smooth or slightly bumpy but never fuzzy. If you’re unsure, trust your senses—if it smells off or looks suspicious, it’s safer to start over.
Dealing With Off-flavors
Off-flavors in your kombucha can be frustrating. Sourness is normal, but if you taste something overly bitter or vinegary, it could mean your SCOBY is stressed or fermentation went too long.
Try reducing the fermentation time or adjusting the temperature. Cooler environments slow fermentation, which might help balance the flavors. Have you experimented with different brewing times to find what suits your taste?
Preventing Contamination
Contamination is the most common cause of SCOBY problems. Always use clean, non-metal containers and utensils. Wash your hands before handling the SCOBY to limit unwanted bacteria.
Cover your brewing jar with a breathable cloth to keep dust and insects out while allowing airflow. Avoid placing your kombucha in direct sunlight or near strong odors, as these can affect fermentation.
Credit: loismelkonian.medium.com
Credit: www.hollandandbarrett.com
Frequently Asked Questions
What Is A Scoby And Why Grow It?
A SCOBY is a symbiotic culture of bacteria and yeast. It’s essential for fermenting kombucha. Growing your own SCOBY ensures fresh, organic batches and saves money.
How Long Does It Take To Grow A Scoby?
Growing a SCOBY usually takes 1 to 4 weeks. Temperature, tea quality, and sugar affect growth speed. Patience and proper conditions are key for a healthy SCOBY.
What Ingredients Are Needed To Grow A Scoby?
You need black or green tea, sugar, and unpasteurized kombucha. Use filtered water and a glass container. These ingredients create the perfect environment for SCOBY growth.
Can I Reuse A Scoby To Grow Another?
Yes, you can reuse a SCOBY multiple times. Each batch produces a new layer, which can be separated and grown independently. Proper care extends your SCOBY’s lifespan.
Conclusion
Growing a SCOBY takes patience and simple steps. Keep your environment clean and warm. Use fresh tea and sugar for best results. Watch for a thin, jelly-like film forming. This is your new SCOBY growing slowly. Avoid disturbing it during the process.
Soon, you will have a healthy SCOBY ready. Perfect for brewing your own kombucha at home. Enjoy the fun of making natural, tasty drinks. Remember, practice makes perfect with each batch. Keep trying and learn as you go.

Hi, I’m Daniel Brooks—a food lover and kitchen gear enthusiast. I enjoy testing cookware, utensils, and gadgets to see what really works in everyday cooking. At PlugChef.com, I share honest reviews, comparisons, and simple guides to help you choose the best tools for a safer, smarter, and more enjoyable kitchen.
Related posts:
 What Type of Cooking Utensils are Safe: Expert Picks
 What Innovations Could Blenders Make: Unleashing Future Tech
 Smart Strategies to Organize a Small Kitchen: Maximize Space
 How to Organize a Kitchen Cabinet: Expert Tips & Tricks
 How to Organize Kitchen Drawers: Expert Tips and Tricks
 How to Organize a Corner Kitchen Cupboard: Expert Tips

