
Have you ever picked up one of your trusty tools, only to find it covered in rust? It’s frustrating, isn’t it?
Rust not only ruins the look of your tools but can also affect their performance. But there’s good news! You don’t need expensive rust removers or toxic chemicals to bring your tools back to life. You can tackle this common problem with simple ingredients you probably already have in your kitchen: vinegar and baking soda.
Imagine transforming your rusty tools into gleaming, efficient instruments without breaking the bank or harming the environment. You’ll discover a straightforward, effective method that uses the power of natural ingredients. Keep reading to see how you can easily restore your tools to their former glory, saving time and money while doing your part for the planet.
:max_bytes(150000):strip_icc()/homemade-rust-remover-recipes-1387936_FINAL-6c6543826627420ba5152b7ad0ea67c7.png)
Credit: www.thespruce.com
Understanding Rust Formation
Rust forms on tools when metal reacts with moisture and oxygen. Remove it using vinegar and baking soda. Soak tools in vinegar to dissolve rust, then scrub with baking soda for a clean finish. This method is simple and effective for restoring your tools.
Understanding how rust forms is essential for maintaining your tools. Rust can damage tools, making them less effective and more prone to breaking. Knowing the causes and effects of rust can help you prevent it and keep your tools in good condition.Causes Of Rust
Rust forms when iron reacts with oxygen and moisture. This reaction creates iron oxide, which appears as a reddish-brown coating. Humid environments accelerate rust formation on metal tools. Exposure to water or damp conditions also increases rust risk. Even the smallest amount of moisture can start the rusting process. Unprotected metal surfaces are most vulnerable. Any scratches or damage to protective coatings can expose the metal. This exposure allows moisture and oxygen to reach the iron. Once rust begins, it can spread quickly across the surface.Effects On Tools
Rust can weaken tools, making them less reliable. As rust eats away at the metal, tools can become brittle and break. This can lead to accidents or failed projects. Rust also affects the precision of tools. Measuring tools with rust may give inaccurate readings. This inaccuracy can affect the quality of your work. Rust can make tools difficult to use. Handles may become slippery or uncomfortable to grip. Moving parts may stick or seize up, requiring more effort to operate. Regular maintenance and rust removal can extend the life of your tools. Keeping them rust-free ensures they perform at their best.Benefits Of Using Vinegar
Vinegar, combined with baking soda, effectively removes rust from tools. Its acidic properties dissolve rust, making cleanup simple. Baking soda adds scrubbing power, enhancing the overall effectiveness of the process.
Removing rust from tools can be challenging. Vinegar offers a natural solution. It’s effective and easy to use. Vinegar, a household staple, provides several benefits.Acidic Properties
Vinegar contains acetic acid. This acid breaks down rust easily. It dissolves the iron oxide layer. This process makes rust removal simple. Vinegar’s acidity is mild. It won’t damage the metal beneath. This makes it ideal for tool maintenance.Safety And Accessibility
Vinegar is safe for home use. It’s non-toxic and environment-friendly. You don’t need special gear to handle it. This ensures a hassle-free cleaning process. Vinegar is also widely available. You can find it in most grocery stores. It’s an affordable option for rust removal. You save money on expensive cleaners.Advantages Of Baking Soda
Baking soda is a versatile household item. It offers several advantages for removing rust from tools. Its natural properties make it an effective choice for cleaning. Discover why baking soda is a valuable ally in the fight against rust.
Neutralizing Effects
Baking soda helps balance pH levels. This neutralizing effect weakens rust’s grip on metal. It turns rust into a powdery form that’s easy to wipe away. No harsh chemicals are needed.
Gentle Abrasive Qualities
Baking soda is a mild abrasive. It scrubs away rust without damaging the tool’s surface. This gentle quality makes it ideal for delicate items. You can clean tools without worrying about scratches.
Preparing Tools For Cleaning
Vinegar and baking soda can effectively remove rust from tools. Soak the tools in vinegar for a few hours. Then scrub with baking soda to reveal a clean surface.
Removing rust from your tools not only extends their lifespan but also enhances their performance. To achieve the best results, it’s crucial to prepare your tools for cleaning correctly. This step lays the foundation for effective rust removal using vinegar and baking soda. Let’s dive into the essentials to ensure your tools are ready for a refreshing makeover.Initial Assessment
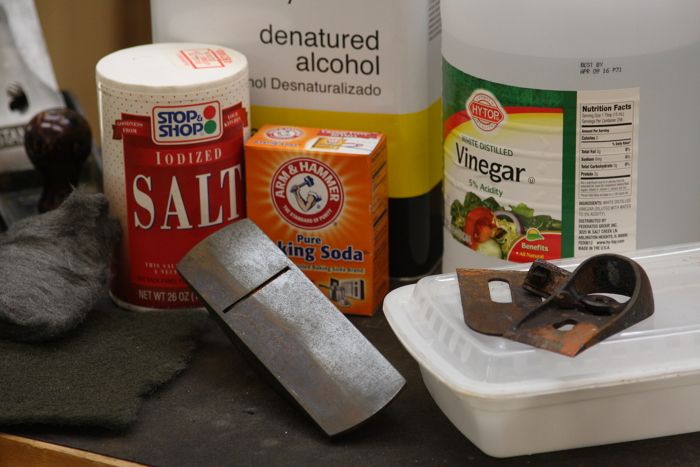
Before you start, take a good look at your tools. Check how much rust is there and which areas are affected the most. This helps you know how intense the cleaning process needs to be. Sometimes, a quick clean will do, but for heavily rusted tools, you may need a more thorough approach.Gathering Necessary Materials
Get all the supplies you need together. You will need white vinegar, baking soda, a container big enough to hold your tools, a brush, and some clean cloths. Make sure you have gloves to protect your hands from the vinegar. Having everything ready makes the process smooth and efficient. Preparing your tools properly is like setting the stage for a great performance. If you overlook this step, you may end up with less than satisfactory results. Think about the last time you tried to cook a meal without the right ingredients. It probably didn’t go as planned. The same goes for rust removal; preparation is key. Have you ever found yourself struggling with a rusty tool right in the middle of a project? It can be frustrating and time-consuming. Proper preparation ensures you can avoid such setbacks. Take a moment to reflect on your last DIY project. How much easier would it have been with tools in perfect condition? Investing a little time in preparation now can save you a lot of time and hassle in the future. Are your tools ready for a makeover? Let’s get started!Vinegar Soaking Method
Rust can transform your shiny tools into relics of neglect. But fear not, there’s a simple solution: the Vinegar Soaking Method. This method is both effective and affordable, making it a favorite among DIY enthusiasts. All you need is some vinegar, a container, and a bit of patience. So, why let rust ruin your tools when a kitchen staple can save the day?
Immersing Tools In Vinegar
Start by choosing a container large enough to fit your rusty tools. You might use a plastic tub or bucket. Fill it with enough vinegar to cover the tools completely. White vinegar is commonly used due to its cleaning strength. If you’re wondering if this really works, you’re not alone. Many people have discovered that vinegar loosens rust effectively. It’s like watching a magic trick unfold right in your garage.
Duration And Monitoring
How long should you soak your tools? Typically, 24 hours is sufficient for light rust. Heavier rust might need 48 hours. During this time, check periodically to see the progress. You can gently scrub the rust spots using a brush, revealing the tool’s true shine. But be careful not to damage the metal. Can you imagine the satisfaction of seeing a tool transform from rusty to robust? It’s like reviving a forgotten treasure.
After soaking, rinse your tools thoroughly with water. This removes the vinegar and any remaining rust particles. Pat them dry immediately to prevent new rust from forming. Consider applying a light coat of oil for added protection. You’ve now restored your tools using the power of vinegar, a task that once seemed daunting but is surprisingly simple.
Baking Soda Paste Application
Rusty tools can look new again with a vinegar and baking soda paste. Soak the tool in vinegar, then apply a paste of baking soda to scrub away the rust. Rinse thoroughly and dry to prevent future rusting.
Cleaning rust from tools using a baking soda paste is a simple yet effective method that many people overlook. If you’ve ever dealt with rusty tools, you know the frustration of trying to restore them to their former glory. Baking soda is not only a kitchen staple but also a powerful cleaning agent. Let’s dive into how you can use it to give your tools a new lease on life.Mixing The Paste
Creating the baking soda paste is straightforward. Start by mixing equal parts of baking soda and water in a small bowl. Stir until you achieve a thick, spreadable consistency, similar to toothpaste. If it feels too runny, just add a bit more baking soda. A quick tip: warm water helps the baking soda dissolve better, making the paste smoother.Applying To Rusted Areas
Once your paste is ready, it’s time to apply it to the rusted areas. Use an old toothbrush or a scrub brush to spread the paste generously over the rust. Ensure every nook and cranny is covered. You might wonder if this will damage your tools. Rest assured, baking soda is gentle and won’t scratch your tools like some abrasive cleaners. Leave the paste on the rusted spots for about 30 minutes. This gives the baking soda enough time to break down the rust particles. During this waiting period, do you feel tempted to scrub the paste immediately? Patience is key here, and it ensures better results. After 30 minutes, scrub the areas again using the same brush. You’ll notice the rust starting to lift away from the metal surface. Finally, rinse the tool thoroughly with water and dry it completely to prevent future rusting. You might be amazed at how effective this simple paste is! Have you ever tried this method, or do you have other rust-removal tricks up your sleeve? Share your thoughts and experiences in the comments!Combining Vinegar And Baking Soda
Discover an easy way to remove rust from tools using vinegar and baking soda. First, soak tools in vinegar to loosen the rust. Then, scrub gently with baking soda for a clean, rust-free finish.
Combining vinegar and baking soda is a simple yet powerful method to remove rust from your tools. This dynamic duo creates a fizzing reaction that can tackle stubborn rust stains. If you’ve ever struggled with rusty tools, using these common household items might just be your solution.Creating An Effervescent Reaction
When vinegar and baking soda meet, they create an effervescent reaction. This bubbling action helps lift rust from the surface of your tools. Imagine the satisfaction of seeing the fizz work its magic as it starts breaking down rust. To start, you need to soak your rusty tool in vinegar. Let it sit for several hours or overnight if the rust is severe. Then, sprinkle baking soda over the surface and watch the reaction unfold. Have you ever tried this at home? It’s a fun experiment that turns into a practical cleaning solution. The bubbling action isn’t just for show; it’s a sign that the rust is loosening its grip.Maximizing Cleaning Power
To make the most of this method, ensure you cover the entire rusted area with vinegar before adding the baking soda. You can use a brush to gently scrub the rust after the fizzing stops. This ensures that the mixture reaches all the crevices. If the rust is particularly tough, repeat the process. Sometimes a second round is necessary for heavier rust. Patience is key, but the results are rewarding. After you’ve scrubbed the tool, rinse it thoroughly with water. Dry it completely to prevent new rust from forming. Now, your tools are not only clean but also ready for their next task. Have you ever thought about how simple ingredients can solve everyday problems? This method is a testament to that. Give it a try and see how effective it can be in restoring your tools.
Credit: www.youtube.com
Scrubbing And Rinsing Tools
Eliminate rust from tools using vinegar and baking soda. Soak tools in vinegar for hours. Scrub gently with baking soda paste. Rinse thoroughly for clean, rust-free tools.
Removing rust from your tools can be a satisfying task, bringing them back to their former glory. After soaking your tools in vinegar and baking soda, the next essential step is scrubbing and rinsing. This not only removes the loosened rust but also ensures your tools are ready for use. Let’s break this down into simple, actionable steps.Choosing The Right Brush
Selecting the correct brush can make all the difference. You want something sturdy enough to remove rust but gentle enough not to scratch your tools. A wire brush is a popular choice. It’s tough on rust but can handle delicate surfaces with care. If you’re working with softer metals, a toothbrush might be your best friend. It’s surprising how a tool you use every day for your teeth can be so effective in removing rust. Do you have an old toothbrush lying around? Try it and watch the rust vanish.Proper Rinsing Techniques
After scrubbing, rinsing is crucial. You don’t want any vinegar or baking soda residue lingering on your tools. Use warm water to rinse thoroughly. If you’re in a hurry, a quick rinse might seem sufficient, but take your time to ensure every trace of rust and solution is gone. Pay special attention to joints and grooves where residue might hide. Ever noticed how skipping this step can lead to residue buildup? This can cause more rust, undoing all your hard work. Make sure your tools are completely dry after rinsing, as moisture is a rust magnet. Cleaning tools can be a therapeutic activity. As you scrub away the rust, you’re not just restoring your tools; you’re learning the value of taking care of what’s yours. Are there other household items you could clean with this method? Give it a try and see what transformations you can achieve.Drying And Protecting Tools
Once you’ve successfully removed rust from your tools using vinegar and baking soda, the next crucial step is drying and protecting them. Leaving any moisture on your tools can lead to more rust, undoing all your hard work. Proper drying and preventive measures ensure your tools stay in top shape for future projects.
Ensuring Complete Dryness
After rinsing your tools, use a clean towel to wipe away every drop of water. Don’t overlook those small crevices where moisture loves to hide. I once left a wrench slightly damp, thinking it was dry enough, only to find rust forming again after a week. A hairdryer or heat gun can be your ally here, reaching those tricky spots and ensuring complete dryness.
Consider laying your tools in a sunny spot for a while. Sunshine can be a natural dryer, but be cautious if you’ve got plastic parts that might warp. Feel the tools; they should be warm and dry to the touch. This ensures no lingering dampness.
Preventive Measures Against Future Rust
Once your tools are bone dry, think about how to keep them rust-free. Apply a light coat of machine oil or WD-40 as a protective layer. This creates a barrier against moisture. I learned this trick after my grandfather shared his secret of keeping his old tools pristine for decades.
Storing tools in a dry place is essential. Humidity is a rust magnet. Use silica gel packets in your toolbox to absorb moisture. They work wonders in keeping the environment dry. Also, consider a dehumidifier for your garage or workshop; it might be a game-changer.
Reflect on how you store your tools. Are they tossed in a heap, or neatly arranged? Proper organization not only looks good but also prevents damage and rust. Keep them elevated and spaced out, ensuring air circulates around them.
So, what methods do you currently use to protect your tools from rust? Have you tried any of these tips before, or do you have your own secret weapon? Let’s make rust a thing of the past.
Alternative Methods And Tips
Rust can be removed from tools using vinegar and baking soda. Soak tools in vinegar overnight, then scrub with baking soda. This method is affordable and effective for restoring metal surfaces to their original shine.
Removing rust from tools can be a satisfying task, revealing their original shine and prolonging their life. While vinegar and baking soda are popular choices, there are alternative methods that may suit your needs better. This section explores different ways to tackle rust, offering practical tips to ensure your tools stay in top condition.Using Lemon Juice
Lemon juice is a natural rust remover. Its acidity can effectively dissolve rust on your tools. Simply squeeze some fresh lemon juice onto the rusty surface and let it sit for a few hours. Afterward, scrub the area with a steel wool or brush. You’ll be surprised how well it works. Lemon juice is a great alternative when vinegar isn’t available, or when you prefer a fresh scent in your workspace.Storing Tools Correctly
After cleaning your tools, proper storage is crucial to prevent rust from returning. Moisture is rust’s best friend, so ensure tools are stored in a dry place. Use silica gel packets or a dehumidifier in your storage area. They can help absorb moisture and keep your tools safe. Consider hanging tools instead of leaving them on the ground. This reduces the risk of moisture accumulation and keeps them easily accessible.Have you ever thought about how simple changes in your storage habits could save you hours of cleaning later? These tips not only keep rust at bay but also contribute to a tidier and more organized space. Remember, taking a few minutes to dry and store your tools properly can save you from future frustrations. It’s the small steps that lead to big results.
Credit: www.finewoodworking.com
Frequently Asked Questions
How Long To Soak Tools In Vinegar To Remove Rust?
Soak rusty tools in vinegar for 12 to 24 hours to effectively remove rust. Check periodically for progress. Use a brush to scrub off loosened rust after soaking. Rinse and dry thoroughly to prevent future rusting. Ensure proper ventilation during the process for safety.
Does White Vinegar Actually Remove Rust?
Yes, white vinegar effectively removes rust due to its acidic properties. Soak the rusty item in vinegar for hours. This process dissolves rust, making it easier to scrub off. Vinegar is a natural, affordable, and eco-friendly rust remover, widely used for household cleaning tasks.
How Long Do You Let Vinegar And Baking Soda Sit?
Let vinegar and baking soda sit for 10 to 15 minutes. This allows them to react effectively. Afterward, scrub or rinse the area for best results. Adjust time based on the cleaning task’s difficulty. This combination works well for unclogging drains and removing stains.
How To Get Rust Off Garden Tools With Vinegar?
To remove rust, soak the garden tools in vinegar for 24 hours. Scrub with a brush, rinse, and dry.
Conclusion
Rust on tools can be frustrating. Vinegar and baking soda offer a simple solution. Easy steps make your tools look new again. First, soak in vinegar. Then, scrub with baking soda. Rust vanishes. Affordable and effective, this method suits everyone.
No special skills needed. Anyone can do it. Clean tools work better. Extend their life with regular maintenance. Try this method today. Keep your tools in top shape. No rust. No fuss. Simple, right? Remember, clean tools make any job easier.
Enjoy using your rust-free tools now!

I’m Abby Lu, a passionate home cook who loves simplifying everyday meals. At PlugChef.com, I share product reviews and cooking guides to help you find the best tools for your kitchen.
Related posts:
 What Type of Cooking Utensils are Safe: Expert Picks
 What Innovations Could Blenders Make: Unleashing Future Tech
 Smart Strategies to Organize a Small Kitchen: Maximize Space
 How to Organize a Kitchen Cabinet: Expert Tips & Tricks
 How to Organize Kitchen Drawers: Expert Tips and Tricks
 How to Organize a Corner Kitchen Cupboard: Expert Tips

