
There’s nothing quite like a warm, cheesy baked pasta dish to comfort a long day, and this baked spaghetti recipe with ricotta takes that classic comfort food to the next level. Unlike traditional baked spaghetti that relies solely on mozzarella for creaminess, the addition of smooth ricotta adds a velvety, mild richness that cuts through the tangy tomato sauce without feeling heavy. Tested and refined for consistent results every time, this recipe comes together in under an hour, serves 6 to 8 people, and is customizable for every dietary preference—making it a go-to for weeknight family dinners, potlucks, or casual date nights in.
Why This Recipe Stands Out
The secret to this dish’s standout texture is the way ricotta is incorporated: rather than blending fully into the sauce, small dollops are left between layers to create soft, creamy pockets that contrast with the tender pasta and savory tomato base. In practice, we’ve found this method delivers a far more luxurious mouthfeel than recipes that mix ricotta entirely into the sauce, which can turn grainy when baked. It’s also far more forgiving than you might expect: even if your layers aren’t perfectly even, the final bake still delivers balanced flavor and that signature bubbly, golden top that makes baked spaghetti so satisfying.
Ingredients
This recipe is scaled for a standard 9×13-inch baking dish, with exact quantities to avoid sogginess or dry spots. Choosing high-quality, whole-milk dairy will yield the creamiest results, but swaps are noted for dietary needs.
Pasta & Dairy
- 12 oz (340g) dry spaghetti (regular, whole-wheat, or gluten-free varieties all work)
- 15 oz (425g) whole-milk ricotta cheese (part-skim works for lower fat, but may have a slightly grainier texture)
- 16 oz (450g) low-moisture shredded mozzarella
- ½ cup (50g) freshly grated Parmesan cheese
Sauce Base
- 2 tbsp extra-virgin olive oil
- 1 medium yellow onion, finely diced
- 3 garlic cloves, minced
- 1 lb (450g) ground beef or mild Italian sausage (optional, for a heartier dish)
- 28 oz (800g) crushed tomatoes (San Marzano variety recommended for sweeter, less acidic flavor)
- 1 tsp dried oregano
- 1 tsp dried basil
- ½ tsp red pepper flakes (optional, for gentle heat)
- Salt and freshly ground black pepper, to taste
Seasonings & Garnishes
- ¼ cup fresh basil leaves, torn (added after baking to preserve bright flavor)
- Extra grated Parmesan, for serving
- Red pepper flakes, for optional spice
For fast, even dicing of onions, garlic, and vegetables, use a sturdy well-engraved cutting board to keep your ingredient sizes consistent for even cooking.
Step 1: Build the Flavor-Packed Sauce
A rich, slow-simmered sauce is the foundation of this dish, and small tweaks to the prep process will deepen its flavor without extra work.
Sauté Aromatics and Meat
Heat olive oil in a large, heavy-bottomed Dutch oven or deep skillet over medium heat. Add the diced onion and cook for 3 to 4 minutes, stirring occasionally, until soft and translucent. Add the minced garlic and cook for 30 seconds more, taking care not to burn it, as burnt garlic will make the sauce bitter. If using ground meat, add it to the pan now, breaking it up with a spoon as it cooks, until no longer pink. Drain all excess fat from the pan to avoid a greasy final dish. If using ground beef, cook it to an internal temperature of 160°F per USDA food safety guidelines to eliminate harmful bacteria like E. coli and salmonella.
Simmer the Tomato Base
Add the crushed tomatoes, dried oregano, dried basil, and red pepper flakes (if using) to the pan, stirring to combine. Season generously with salt and pepper, then reduce the heat to low and let the sauce simmer gently for 20 to 30 minutes, stirring occasionally to prevent sticking. Avoid simmering for longer than 30 minutes, as extended cooking can cause the tomatoes to turn overly acidic and lose their bright flavor.
Incorporate Ricotta
Remove the pan from the heat. Add dollops of the whole-milk ricotta directly to the warm sauce, then use a wooden spoon to gently fold it in just 2 to 3 times—stop while streaks of ricotta are still visible. Overmixing will create a uniform, thick sauce, but those small, unincorporated pockets of ricotta are what create the signature creamy swirls in the final baked dish. Set the sauce aside while you cook the pasta.
If you’re cooking with little ones in the kitchen, secure low cabinets and drawers with child-safe drawer locks to keep curious hands away from hot stovetops and sharp utensils.
Step 2: Cook the Pasta Perfectly
Undercooking the pasta slightly is the key to avoiding mushy, overcooked noodles in the final bake, and skipping the post-boil rinse will help every bite hold onto sauce and cheese.
Bring a large pot of water to a rolling boil, then add 1 tablespoon of kosher salt (this seasons the pasta from the inside out, reducing the need for extra salt in the sauce). Add the spaghetti and cook for 1 to 2 minutes less than the package directions for al dente pasta—it should have a slight bite when you taste it, as it will finish cooking in the oven. Drain the pasta in a colander, but skip rinsing it entirely: the starchy coating on the noodles helps the ricotta and sauce cling to every strand, ensuring even flavor distribution. Rinsing washes away this starch, leading to soggy, separate noodles that don’t hold sauce well.
Step 3: Assemble for Optimal Texture
Proper layering ensures the dish cooks evenly, with no dry spots or overly soggy layers in the center.
Preheat your oven to 350°F (175°C) while you assemble. Lightly grease your 9×13-inch baking dish with a thin layer of olive oil or cooking spray to prevent sticking. Spread 1 cup of the tomato sauce in an even layer on the bottom of the dish—this creates a barrier that stops the pasta from sticking to the pan. Top with ⅓ of the cooked spaghetti, followed by ⅓ of the remaining sauce, ⅓ of the ricotta dollops, and ⅓ of the shredded mozzarella. Repeat the layers two more times, ending with a final layer of mozzarella and a sprinkle of grated Parmesan on top.
A common mistake is overpacking the layers, which prevents heat from circulating properly and leaves the center undercooked. Leave a small gap between the pasta and the top of the dish to allow for bubbling as it bakes. If your sauce feels thick, stir in ¼ cup of reserved starchy pasta water to loosen it slightly, which will keep the final dish moist.
Before assembling, make sure your 9×13 baking dish is clean and scratch-free; use a non-scratch scrub brush to remove any baked-on residue from previous uses without damaging the surface.
Step 4: Bake to Golden Perfection
Cover the baking dish tightly with aluminum foil and bake for 20 minutes, which locks in moisture to keep the ricotta creamy and the pasta tender. Remove the foil and bake for an additional 5 to 10 minutes, until the cheese is melted, lightly golden, and bubbling around the edges. For food safety, the internal temperature of the dish should reach 165°F in the center when tested with a food thermometer.
Let the baked spaghetti rest for 10 minutes after removing it from the oven before serving—this lets the ricotta set slightly so it doesn’t run everywhere when you scoop it. If the top is browning too quickly before the center is heated through, tent the dish loosely with foil for the remaining bake time.
For extra peace of mind, install no-drill cabinet locks on upper cabinets to prevent toddlers from climbing and pulling down heavy hot dishes while the oven is in use.
Serving & Pairing Ideas
This dish is hearty enough to serve on its own, but the right sides and garnishes will elevate it to a full restaurant-quality meal.
Side Dishes
- Crispy garlic bread, toasted right before serving to avoid sogginess
- Bright, acidic green salad with lemon vinaigrette to cut through the richness
- Roasted seasonal vegetables like zucchini, bell peppers, or broccoli for added nutrients
- Caesar salad with crunchy croutons for a classic Italian-American pairing
Garnishes
- Fresh torn basil added after baking to preserve its bright, aromatic flavor
- Extra grated Parmesan for a sharp, nutty boost
- A drizzle of extra-virgin olive oil for added richness and shine
- Red pepper flakes for spice lovers
Wine Pairings
| Wine Type | Flavor Notes | Why It Works |
|---|---|---|
| Chardonnay | Buttery, oaky | Matches the creamy texture of ricotta without overpowering the dish |
| Sangiovese | Bright cherry, herbal | Its natural acidity cuts through the richness of cheese and tomato sauce |
| Pinot Grigio | Light, crisp | Refreshes the palate between rich, cheesy bites |
| Chianti | Medium-bodied, fruity | Complements the savory, tangy notes of the marinara and herbs |
For a fuller meal, pair this baked spaghetti with a charcuterie board featuring perfectly sliced round cheese for an elegant, balanced spread.
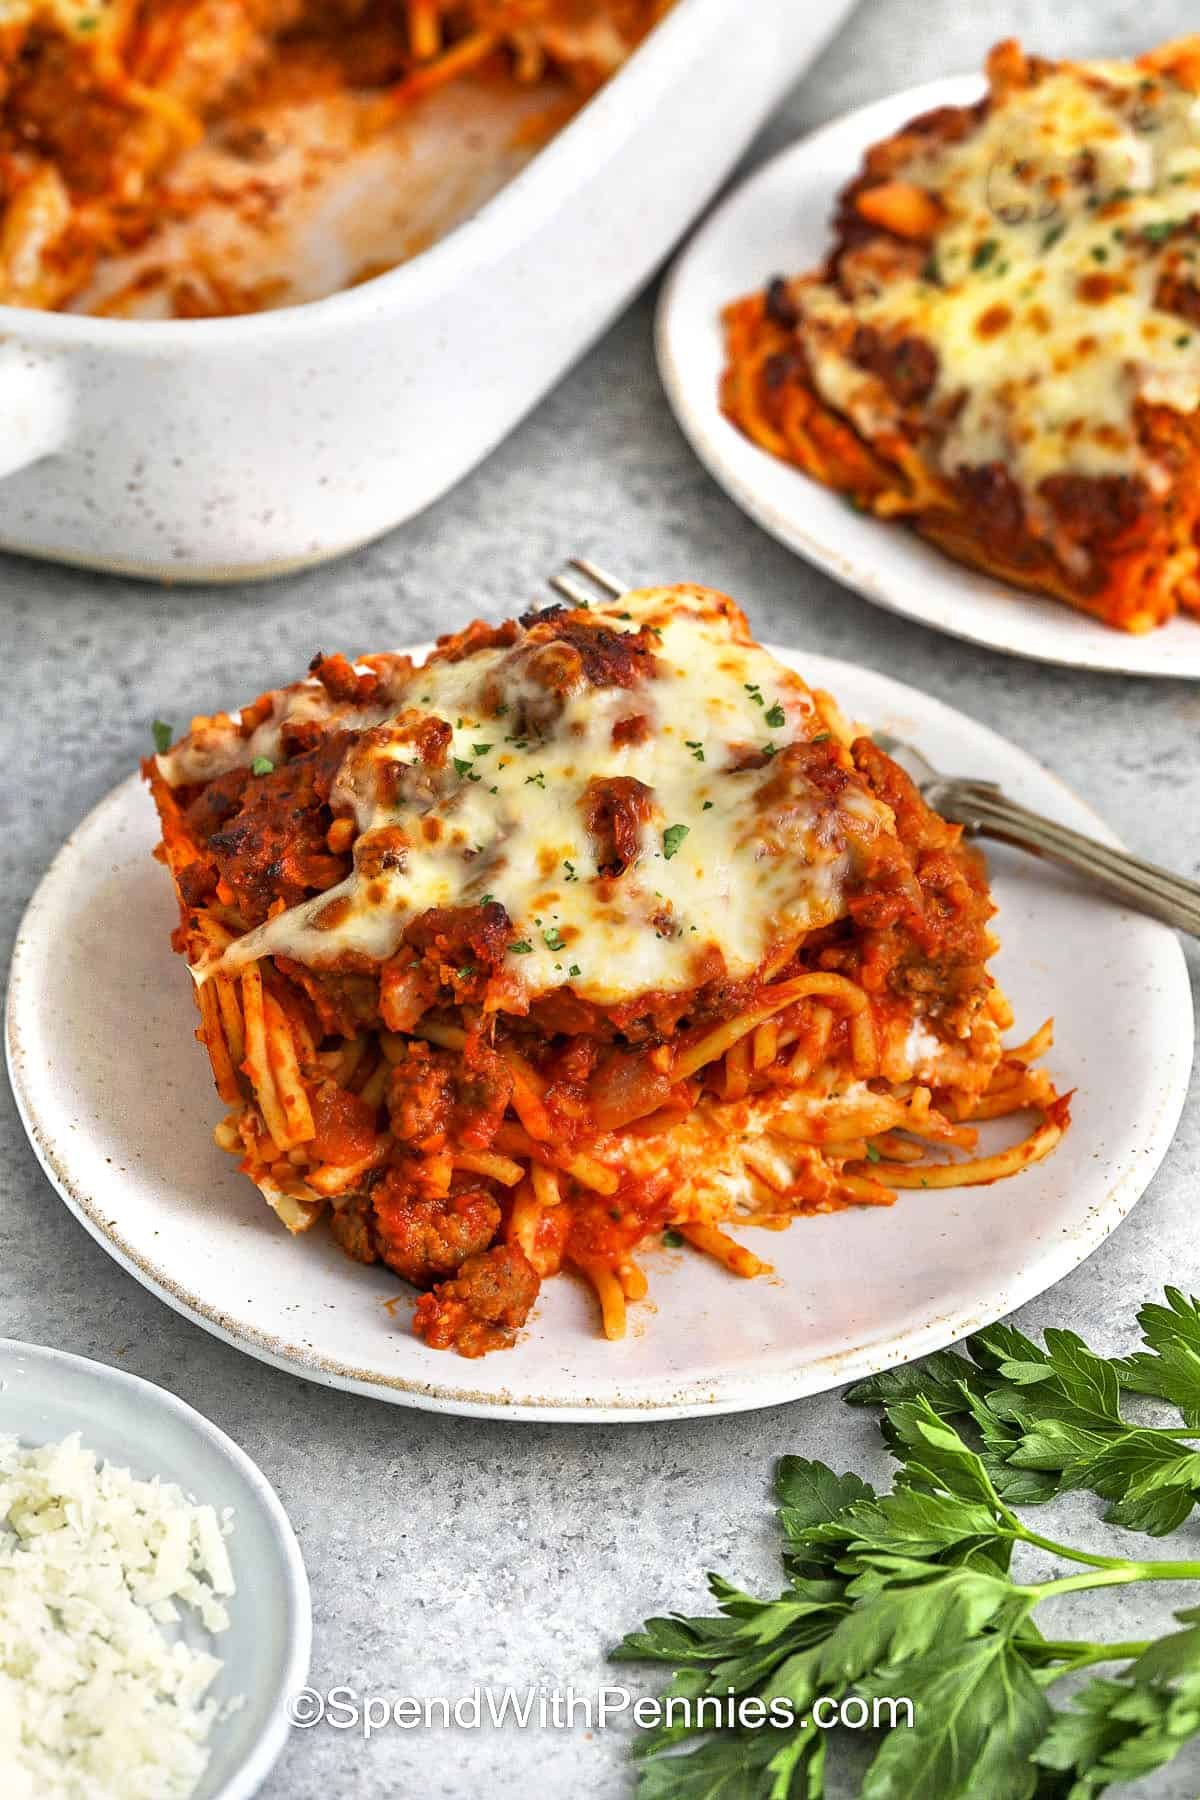 A close-up shot showing the creamy ricotta pockets and melted cheese throughout the dish.
Customization Variations
This recipe is incredibly flexible, so you can adapt it to your taste preferences or dietary needs with minimal adjustments.
Meat Additions
Ground beef and Italian sausage are classic choices, but you can also use shredded rotisserie chicken for a leaner option, or crumbled cooked bacon for a smoky, salty kick. For a richer flavor, mix two types of meat, like beef and pork, but be sure to cook the meat thoroughly and drain all excess fat before adding it to the sauce.
Vegetarian & Dietary Swaps
Skip the meat and add roasted vegetables like eggplant, artichoke hearts, or caramelized onions for a hearty vegetarian version. For extra protein, mix in cooked lentils or plant-based crumbles. For gluten-free diets, use any dry gluten-free spaghetti variety, and ensure your marinara sauce is certified gluten-free to avoid cross-contamination. Vegan swaps include dairy-free ricotta and mozzarella alternatives, which work equally well in the bake.
Spice Level Adjustments
For a milder dish, omit the red pepper flakes and use sweet Italian sausage instead of hot. For extra heat, add a pinch of cayenne to the sauce, or top the baked dish with pickled jalapeños for a tangy kick. Layering spice—adding a small amount to the sauce and a light sprinkle on top before baking—lets you control the intensity for all diners.
 A single serving of baked spaghetti with ricotta, topped with fresh basil and extra Parmesan.
Storage & Reheating
Proper storage will keep your leftovers tasting fresh for days, and the right reheating method will preserve the dish’s creamy texture.
Refrigeration Tips
Let the baked spaghetti cool to room temperature (no more than 2 hours, per food safety guidelines) before transferring it to an airtight container. Store in the refrigerator for 3 to 4 days at or below 40°F (4°C) following USDA food safety guidance to prevent bacterial growth.
Freezing Guidelines
For ultimate make-ahead convenience, assemble the entire dish up to the baking step, cover tightly with plastic wrap and foil, and freeze for up to 3 months. To bake from frozen, add 10 to 15 minutes to the total bake time, and keep it covered with foil for the first 30 minutes to prevent the top from burning before the center thaws. Thaw pre-baked leftovers overnight in the refrigerator before reheating.
Best Reheating Methods
- Oven: Preheat to 350°F (175°C), cover with foil, and bake for 20 to 25 minutes. Add a splash of water or extra marinara to the top to prevent drying out.
- Microwave: Place a portion on a microwave-safe plate, cover with a damp paper towel, and heat in 30-second intervals, stirring between each, until warm.
- Stovetop: Heat a portion in a covered pan over low heat, stirring occasionally, and add a small splash of sauce or water to keep it moist.
After serving, clean up sauce splatters and buttery garlic bread crumbs with a comfort-grip dish brush to avoid getting your hands sudsy while scrubbing stuck-on food.
Frequently Asked Questions
Can I use no-boil spaghetti for this recipe?
Yes, no-boil (instant) spaghetti works perfectly for this recipe, and cuts down on prep time. Keep in mind that no-boil noodles absorb more liquid, so add an extra ½ cup of marinara sauce to the layers to prevent the dish from drying out during baking.
Why is my baked spaghetti gritty after baking?
Grittiness usually comes from two sources: low-quality ricotta that has a grainy texture to start, or overcooking the tomato sauce, which causes natural sugars to break down and separate. Use whole-milk, fresh ricotta for the smoothest results, and simmer the sauce for no longer than 30 minutes to preserve its silky texture.
Can I substitute cottage cheese for ricotta?
Cottage cheese can be used as a substitute in a pinch, but it has a tangier, wetter texture that will make the dish slightly runny. For a closer match, blend low-fat cottage cheese in a food processor until smooth before adding it to the sauce, or use a 1:1 mix of cottage cheese and cream cheese to mimic ricotta’s richness.
What’s the best baking dish to use for this recipe?
A 9×13-inch ceramic or heavy-gauge metal baking dish works best, as it distributes heat evenly to avoid hot spots that can burn the cheese. Avoid thin glass dishes, which are more prone to thermal shock and cracking when exposed to sudden temperature changes.
Can I make this recipe ahead of time?
Yes! You can assemble the entire dish up to 24 hours in advance, cover it tightly with plastic wrap, and store it in the refrigerator. Add 5 minutes to the bake time if baking from cold, and follow the same covering and uncovering steps as the fresh version.
Final Tips for Success
This baked spaghetti with ricotta is the ultimate hands-off comfort meal that delivers restaurant-quality flavor with minimal effort. Its creamy, cheesy texture and savory tomato base make it a hit with kids and adults alike, and the flexible customization options mean you can adapt it to whatever ingredients you have on hand. Give this recipe a try for your next family dinner or gathering, and don’t forget to share your custom variations and photos with us—we’d love to see how you make it your own.

I’m Abby Lu, a passionate home cook who loves simplifying everyday meals. At PlugChef.com, I share product reviews and cooking guides to help you find the best tools for your kitchen.
Related posts:
 How to Make a Fruit Basket for a Gift: Easy DIY Guide
 Do You Need a Basket? Essential Guide for Air Fryers
 How to Adjust Syrup Dispenser Pressure: Expert Tips
 Appliance Play Food Kitchen Toys: Ignite Imaginative Play
 How Long Do Beauty Blenders Last: Expert Tips Unveiled
 Philips Kitchen Appliances Compact Pasta And Noodle Maker: Effortless Homemade Pasta

