
Are your trusty tools starting to show signs of rust? Don’t worry, you’re not alone.
Rust can sneak up on anyone, leaving your once reliable gear looking worn and weary. But there’s good news: you can bring them back to life with a couple of household items you probably already have. Imagine transforming your rusty tools into shiny, efficient companions once more using simple vinegar and baking soda.
This method is not only effective but also budget-friendly and environmentally safe. Picture this: your tools gleaming as if they were brand new, ready to tackle any task you throw at them. The best part? You don’t need any fancy equipment or harsh chemicals. Just a bit of elbow grease and some pantry staples. Want to know how it’s done? Keep reading to discover the step-by-step process that will make rust a thing of the past. Your tools deserve the best care, and with this guide, you’ll be giving them just that.
:max_bytes(150000):strip_icc()/homemade-rust-remover-recipes-1387936_FINAL-6c6543826627420ba5152b7ad0ea67c7.png)
Credit: www.thespruce.com
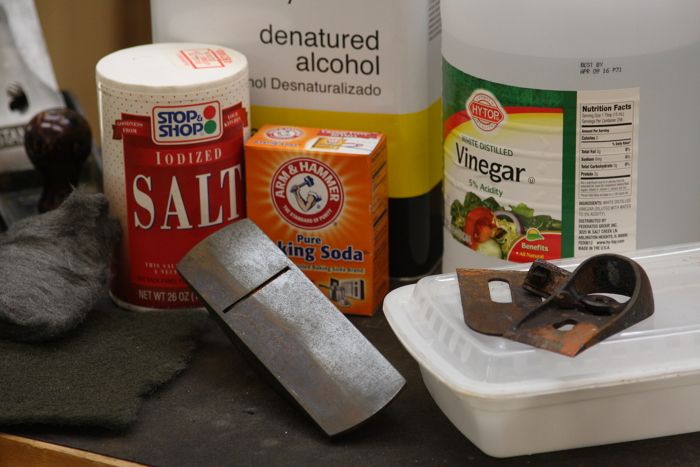
Materials Needed
Cleaning rusty tools can feel like a daunting task. With the right materials, it becomes straightforward and effective. Vinegar and baking soda are natural solutions that work wonders on rust. These household items are gentle on tools while being tough on rust. Let’s dive into the essential materials needed to restore your tools to their former glory.
Vinegar
White vinegar is ideal for rust removal. Its acidic properties dissolve rust efficiently. You need a generous amount to soak the tools. Ensure the vinegar covers every rusty part. This allows the acid to work effectively. Choose a container that fits your tool and holds enough vinegar.
Baking Soda
Baking soda acts as a gentle abrasive. It helps scrub away rust after soaking. Mix it with a little water to form a paste. This paste enhances scrubbing power. Baking soda also neutralizes vinegar, making it safe for tools. You’ll need enough to cover all rusty areas.
Tools For Cleaning
Gather essential cleaning tools for the process. A wire brush is great for scrubbing. It removes stubborn rust easily. Use a toothbrush for smaller areas. It reaches tight spots where rust hides. Have clean rags or sponges on hand. They help wipe away residue after cleaning.
Credit: www.finewoodworking.com
Preparing The Tools
Removing rust from tools is simple with vinegar and baking soda. Soak tools in vinegar to dissolve rust. Then, scrub gently with baking soda paste for a shiny finish.
Preparing your rusty tools for cleaning might seem like a tedious task, but a little effort here can save you time and ensure effective results. Before diving into the cleaning process with vinegar and baking soda, it’s essential to assess each tool’s condition. This step is crucial for determining the extent of rust damage and deciding whether disassembly is necessary.Assessing Rust Damage
Start by examining your tools under good lighting. Look for signs of rust that could affect their functionality. Is there just a light surface rust, or are there deeper, more damaging spots? Consider the age and quality of the tool. A vintage tool might require more delicate handling compared to a newer one. Think about the effort you’re willing to put into restoration—some tools might be beyond saving, while others just need a little elbow grease.Disassembling Tools If Necessary
Some tools might need to be taken apart before cleaning. This allows you to reach hidden areas where rust can hide. Are there screws, bolts, or other removable parts that need attention? Disassembly isn’t always required, but it can be incredibly beneficial. For instance, a wrench with rusted joints might work better if cleaned separately. Keep track of all parts to ensure an easy reassembly later. Having personally dealt with an old set of gardening tools, I found that disassembling them before cleaning helped access hard-to-reach areas. This small step made a significant difference in the final outcome. What tools in your collection might benefit from a little extra attention? Taking the time to prepare them adequately can lead to better results and extend their lifespan.Vinegar Soak Method
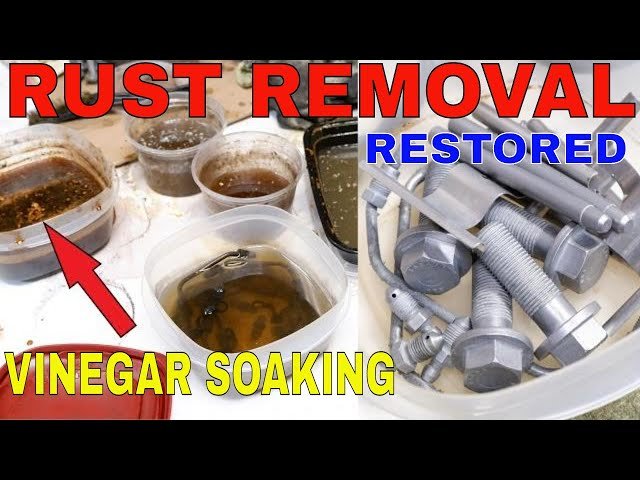
Transform rusty tools using a vinegar and baking soda soak. Submerge tools in vinegar for hours to dissolve rust. Scrub with baking soda for extra shine and rinse thoroughly.
Cleaning rusty tools doesn’t have to be a daunting task. The vinegar soak method is a simple yet effective way to revive your tools without breaking the bank. This method utilizes the natural acidity of vinegar to dissolve rust, leaving your tools looking almost brand new. The process is straightforward, and you might be surprised at how easily rust can disappear with just a little patience and care.Submerging Tools In Vinegar
Start by filling a container with enough vinegar to fully submerge your rusty tools. White vinegar is typically recommended due to its potent acidity and widespread availability. You can use any container, but ensure it’s large enough for your tools to be completely covered. Gently place your tools into the vinegar bath, ensuring they are entirely submerged. This ensures even exposure to the vinegar, which is crucial for effective rust removal. You might notice bubbles forming as the vinegar starts to work its magic on the rust. Have you ever wondered why vinegar works so well on rust? It’s all about the acid breaking down the rust molecules. Next time you look at those bubbles, remember—they’re a sign of progress!Duration Of Soaking
Patience is key when soaking tools in vinegar. Depending on the level of rust, you might need to leave your tools submerged for anywhere between 12 to 48 hours. Light rust will generally require less time, while heavily rusted tools might need the full 48 hours. Check your tools periodically. You might be surprised at how quickly the vinegar starts to lift the rust away. If you’re short on time, try scrubbing the rust gently with a brush midway through the soaking period. This can accelerate the process. Are you worried about leaving your tools in vinegar for too long? Don’t be. Vinegar is gentle enough not to damage your tools, but powerful enough to remove rust effectively. It’s a balance that makes this method both efficient and safe. By the end of the soaking period, your tools should look significantly cleaner. Take them out, rinse with water, and marvel at the results. This simple method might just save you a trip to the store for new tools!Scrubbing With Baking Soda
Cleaning rusty tools is easy with vinegar and baking soda. First, soak tools in vinegar overnight to loosen rust. Then, scrub gently with baking soda to remove remaining residue. This combination restores shine without harsh chemicals.
Rust on tools can be a real nuisance, but with a simple scrub using baking soda, you can restore them to their former glory. Baking soda is a household staple that, when combined with a bit of elbow grease, can effectively remove rust. It’s affordable and eco-friendly, making it the perfect solution for your rusty tool dilemma. Here’s how you can get started on reviving your tools with baking soda.Creating A Baking Soda Paste
Start by mixing baking soda with a little water to form a paste. You want it thick enough to cling to the tool but not so thick that it’s hard to spread. A tablespoon of baking soda with a few drops of water usually does the trick. This paste acts as a gentle abrasive. It’s perfect for scrubbing away rust without damaging your tools. If the paste feels too thin, simply add more baking soda until it feels right.Applying Paste To Rusty Areas
Once your paste is ready, apply it generously to the rusty spots. Use a brush or your fingers to spread it evenly over the affected areas. Ensure the paste covers all the rust for maximum effectiveness. Leave the paste on for about 10-15 minutes. This allows it to penetrate the rust and loosen its grip on the metal. You’ll notice that the rust starts to dissolve slightly. As you work through your rusty tools, consider the last time you gave them a good cleaning. Would you say regular maintenance could prevent future rusting? Your tools might be telling you something. Scrubbing with baking soda is a straightforward process that yields impressive results. Have you tried this method before? If not, grab your baking soda and give it a shot today!Rinsing And Drying
Rinse tools thoroughly with water after scrubbing off rust. Ensure all vinegar and baking soda residue is gone. Let them dry completely to prevent further rusting.
Cleaning rusty tools with vinegar and baking soda is effective. Yet, the process isn’t complete without proper rinsing and drying. These steps ensure no residue remains on the tools. They also prevent future rust. Let’s explore how to rinse and dry tools thoroughly.Rinsing Off Residue
After soaking, rinse the tools with warm water. This removes vinegar and baking soda residue. Use a brush to scrub off any remaining particles. Pay attention to small crevices and corners. They can trap residues. Rinse until the water runs clear. This guarantees no substances are left behind.Ensuring Complete Drying
Drying is crucial to prevent new rust. Use a clean towel to wipe the tools. Make sure they are completely dry. Air drying is also effective. Place tools in a well-ventilated area. Ensure no moisture remains. Moisture is the enemy of metal tools. Double-check every surface for dampness. Dry tools last longer and work better.Final Polishing
For a shiny finish on rusty tools, use vinegar and baking soda. Soak the tools in vinegar, scrub gently, then rinse. A paste of baking soda and water helps tackle stubborn spots. Rinse again and dry thoroughly to prevent future rust.
Cleaning rusty tools with vinegar and baking soda is effective. After removing rust, tools need a final polish. This step ensures they shine and function well. Polishing restores their original luster. It also offers a protective layer against future rust. Let’s explore how to give your tools that final touch.Using A Polishing Cloth
Start with a soft polishing cloth. It helps remove any leftover residue. Gently rub the tool with the cloth. Focus on areas with dull spots. Use circular motions for best results. This step enhances the tool’s shine and appeal.Applying Metal Polish If Needed
Some tools might need extra shine. Use metal polish for those. Apply a small amount to a clean cloth. Rub the tool gently with the cloth. Follow the instructions on the polish bottle. This step gives the tool a mirror-like finish. Remember to wipe off any excess polish. Final polishing not only makes tools look new. It also helps maintain their quality. Regular polishing can extend their lifespan. Keep them looking and working their best.Preventing Future Rust
Cleaning rusty tools can be simple with vinegar and baking soda. Soak tools in vinegar to dissolve rust. Use baking soda to scrub off remaining residue. This easy method helps prevent future rust and keeps your tools shiny.
When you’ve successfully cleaned your rusty tools with vinegar and baking soda, the last thing you want is for rust to reappear. Rust can be prevented with some simple habits and precautions. Let’s look at practical ways to keep your tools rust-free and in top condition.Storage Tips
Proper storage is key to preventing rust. Keep your tools in a dry place. Moisture is rust’s best friend, so ensure your garage or shed is well-ventilated. Consider investing in a dehumidifier if you live in a particularly humid area. A small investment now can save your tools in the long run. You might also use silica gel packs in your toolbox to absorb moisture.Regular Maintenance Practices
Regular maintenance can extend the life of your tools. After using your tools, wipe them down with a clean cloth. This removes any dirt or moisture that can cause rust. Oil your tools occasionally to create a protective barrier. A light coating of mineral oil or machine oil works wonders. Remember to check for rust periodically and take immediate action if you spot any. Have you considered setting a reminder on your phone for routine tool maintenance? It could be the difference between shiny tools and rusted ones. Engaging in these practices not only saves money but also keeps your tools ready for action. What are your go-to methods for maintaining your tools rust-free?
Credit: www.youtube.com
Frequently Asked Questions
Does Baking Soda And Vinegar Remove Rust From Tools?
Yes, baking soda and vinegar can remove rust from tools. Apply a paste of baking soda and water. Scrub the rusted area, then rinse. For tougher rust, soak the tool in vinegar for a few hours. Rinse thoroughly and dry the tool to prevent further rusting.
How Long To Soak Tools In Vinegar To Remove Rust?
Soak tools in vinegar for 12 to 24 hours to effectively remove rust. Check progress periodically and scrub remaining rust with a brush. Rinse tools thoroughly with water and dry them completely to prevent future rust.
How Long Do You Let Vinegar And Baking Soda Sit?
Let vinegar and baking soda sit for 10 to 15 minutes. This allows the chemical reaction to effectively break down grime and unclog drains. Rinse thoroughly with water afterwards for best results.
Does White Vinegar Actually Remove Rust?
Yes, white vinegar effectively removes rust. Its acetic acid dissolves rust, making it easy to scrub off. Soak rusty items in vinegar for a few hours, then scrub with a brush. It’s a natural, cost-effective solution for rust removal.
Conclusion
Cleaning rusty tools with vinegar and baking soda is simple. First, soak your tools in vinegar overnight. Then scrub them with a baking soda paste. This method effectively removes rust without harsh chemicals. Plus, it’s cost-effective and eco-friendly. Both vinegar and baking soda are easy to find.
Try this method for a quick fix. It helps extend your tool’s life and keeps them looking new. Regular maintenance prevents rust buildup. So, keep your tools clean and ready for use. Happy cleaning!

I’m Abby Lu, a passionate home cook who loves simplifying everyday meals. At PlugChef.com, I share product reviews and cooking guides to help you find the best tools for your kitchen.
Related posts:
 What Type of Cooking Utensils are Safe: Expert Picks
 What Innovations Could Blenders Make: Unleashing Future Tech
 Smart Strategies to Organize a Small Kitchen: Maximize Space
 How to Organize a Kitchen Cabinet: Expert Tips & Tricks
 How to Organize Kitchen Drawers: Expert Tips and Tricks
 How to Organize a Corner Kitchen Cupboard: Expert Tips

