
Are you tired of struggling with inaccurate measurements in Adobe? Feeling like your projects never quite fit the way you envisioned?
You’re not alone. The key to precision lies in mastering the scale ratio of Adobe’s Measure Tool. Imagine the confidence you’ll feel knowing every detail is spot-on, saving you time and elevating your creative work. You’ll discover simple, actionable tips to adjust the scale ratio like a pro.
Get ready to enhance your designs and boost your productivity. You won’t want to miss these insights—your projects deserve accuracy. Dive in and unleash the true potential of your Adobe tools!

Credit: community.adobe.com
Why Adjusting Scale Ratio Matters
Adjusting the scale ratio in Adobe’s Measure Tool is crucial. It ensures accurate measurements in design projects. By fine-tuning the scale ratio, designers can maintain the integrity of their work. This adjustment affects the overall quality and precision of any design.
Impact On Measurements
The scale ratio directly influences measurement accuracy. An incorrect ratio leads to distorted dimensions. This can result in flawed designs. By adjusting the scale ratio, you ensure measurements align with real-world dimensions. Consistency in measurements is vital for design accuracy.
Precision In Design
Precision is key in design work. A correct scale ratio maintains this precision. It helps in creating detailed and exact designs. Designers can rely on accurate data for their projects. This results in professional and high-quality designs.
Basics Of Adobe Measure Tool
Understanding the basics of Adobe Measure Tool can transform how you interact with digital designs. Have you ever wondered how you can accurately measure dimensions within your creative projects? The Adobe Measure Tool could be your answer. This tool helps you maintain precision, ensuring every element is perfectly sized. Let’s delve into the essentials that make this tool a must-have in your design toolkit.
Tool Overview
The Adobe Measure Tool is designed to provide accurate measurements within your digital workspace. It’s not just for professionals; even if you are new to design, you’ll find it easy to use. Think of it as a digital ruler that helps you ensure your projects are on point.
Imagine working on a design and needing exact dimensions for an element. The Measure Tool makes this process straightforward. Click, drag, and measure—it’s that simple. You can quickly adjust scale ratios, ensuring every part of your design aligns perfectly.
Key Features
One of the standout features is its ability to adjust scale ratios. This means you can measure elements relative to other parts of your design. It saves time and reduces errors. You might have tried measuring manually with a ruler; the Measure Tool does this digitally with more precision.
Another significant feature is the ability to measure angles. Have you faced a situation where you needed to ensure an element was perfectly angled? This tool can do that. You can easily measure and adjust angles, ensuring your design maintains its intended aesthetics.
It also lets you measure distances between points. Whether you’re working on web layouts or print designs, knowing the exact distance between elements can be crucial. This feature ensures your design is as you envisioned, without any guesswork.
So, how can these features enhance your workflow? Imagine saving time by avoiding repetitive corrections. The Measure Tool helps you work smarter, not harder, ensuring your designs are precise from the start. How often have you wished for such accuracy in your projects?
These features collectively make the Adobe Measure Tool an indispensable asset for designers at any level. Have you tried using it yet? If not, why not give it a shot and see how it transforms your design process?
Steps To Adjust Scale Ratio
Adjusting the scale ratio in Adobe Measure Tool involves selecting the tool, choosing the measurement unit, and entering the desired ratio. Ensure accurate measurements by calibrating the scale to match real-world dimensions. Follow these simple steps to enhance precision in your digital projects.
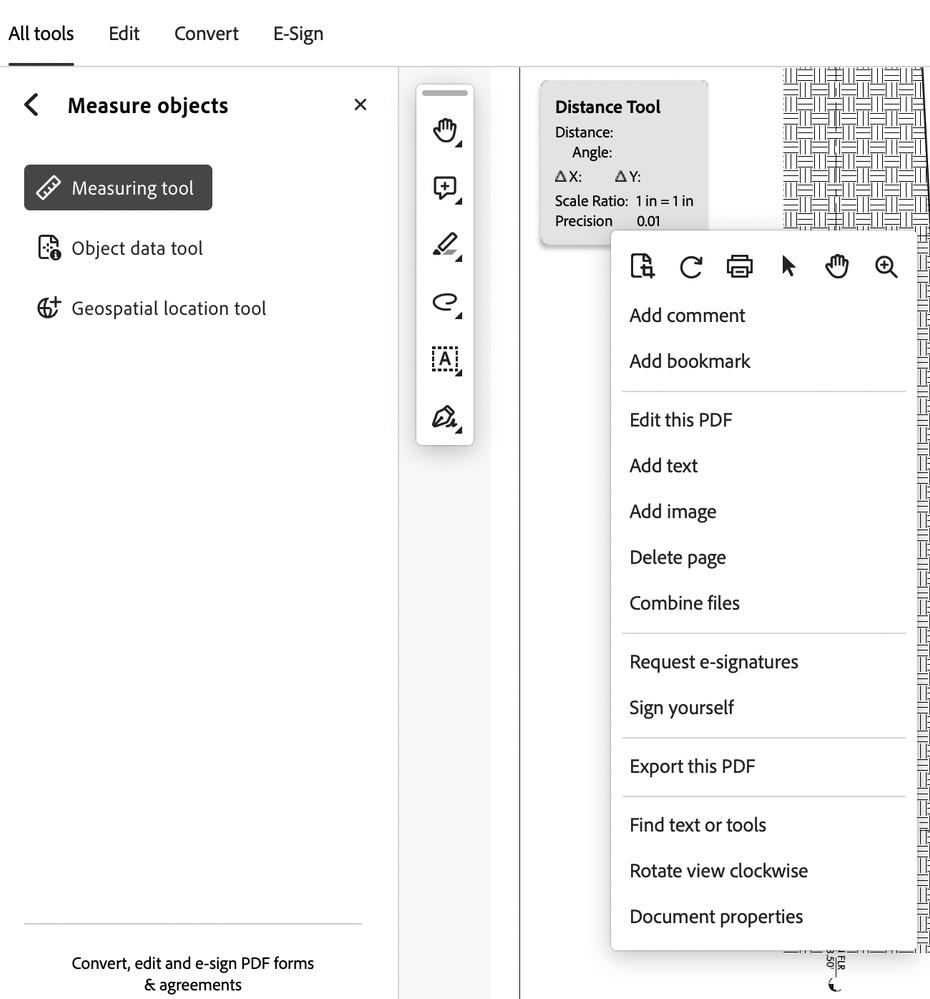
Adjusting the scale ratio of Adobe’s Measure Tool enhances accuracy. It is essential for precise measurements in digital designs. Following a few simple steps can make this process easy. This guide will help you understand the necessary adjustments. By following these steps, you can ensure your design’s accuracy.Accessing The Measure Tool
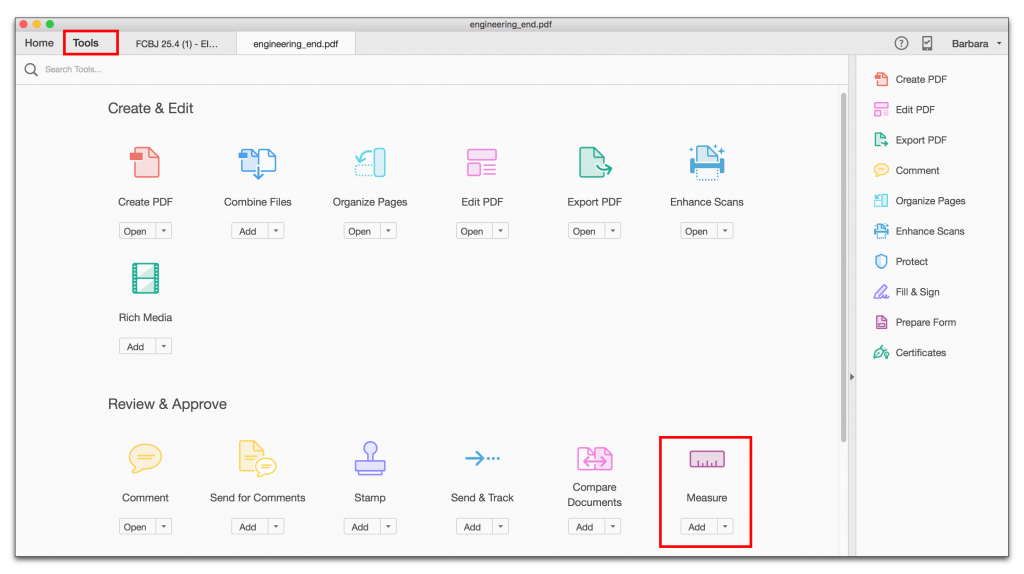
First, open your Adobe software. Navigate to the tools panel on the left side. Find the Measure Tool icon. It looks like a ruler. Click on it to activate the tool. The tool is now ready to use.Changing Scale Settings
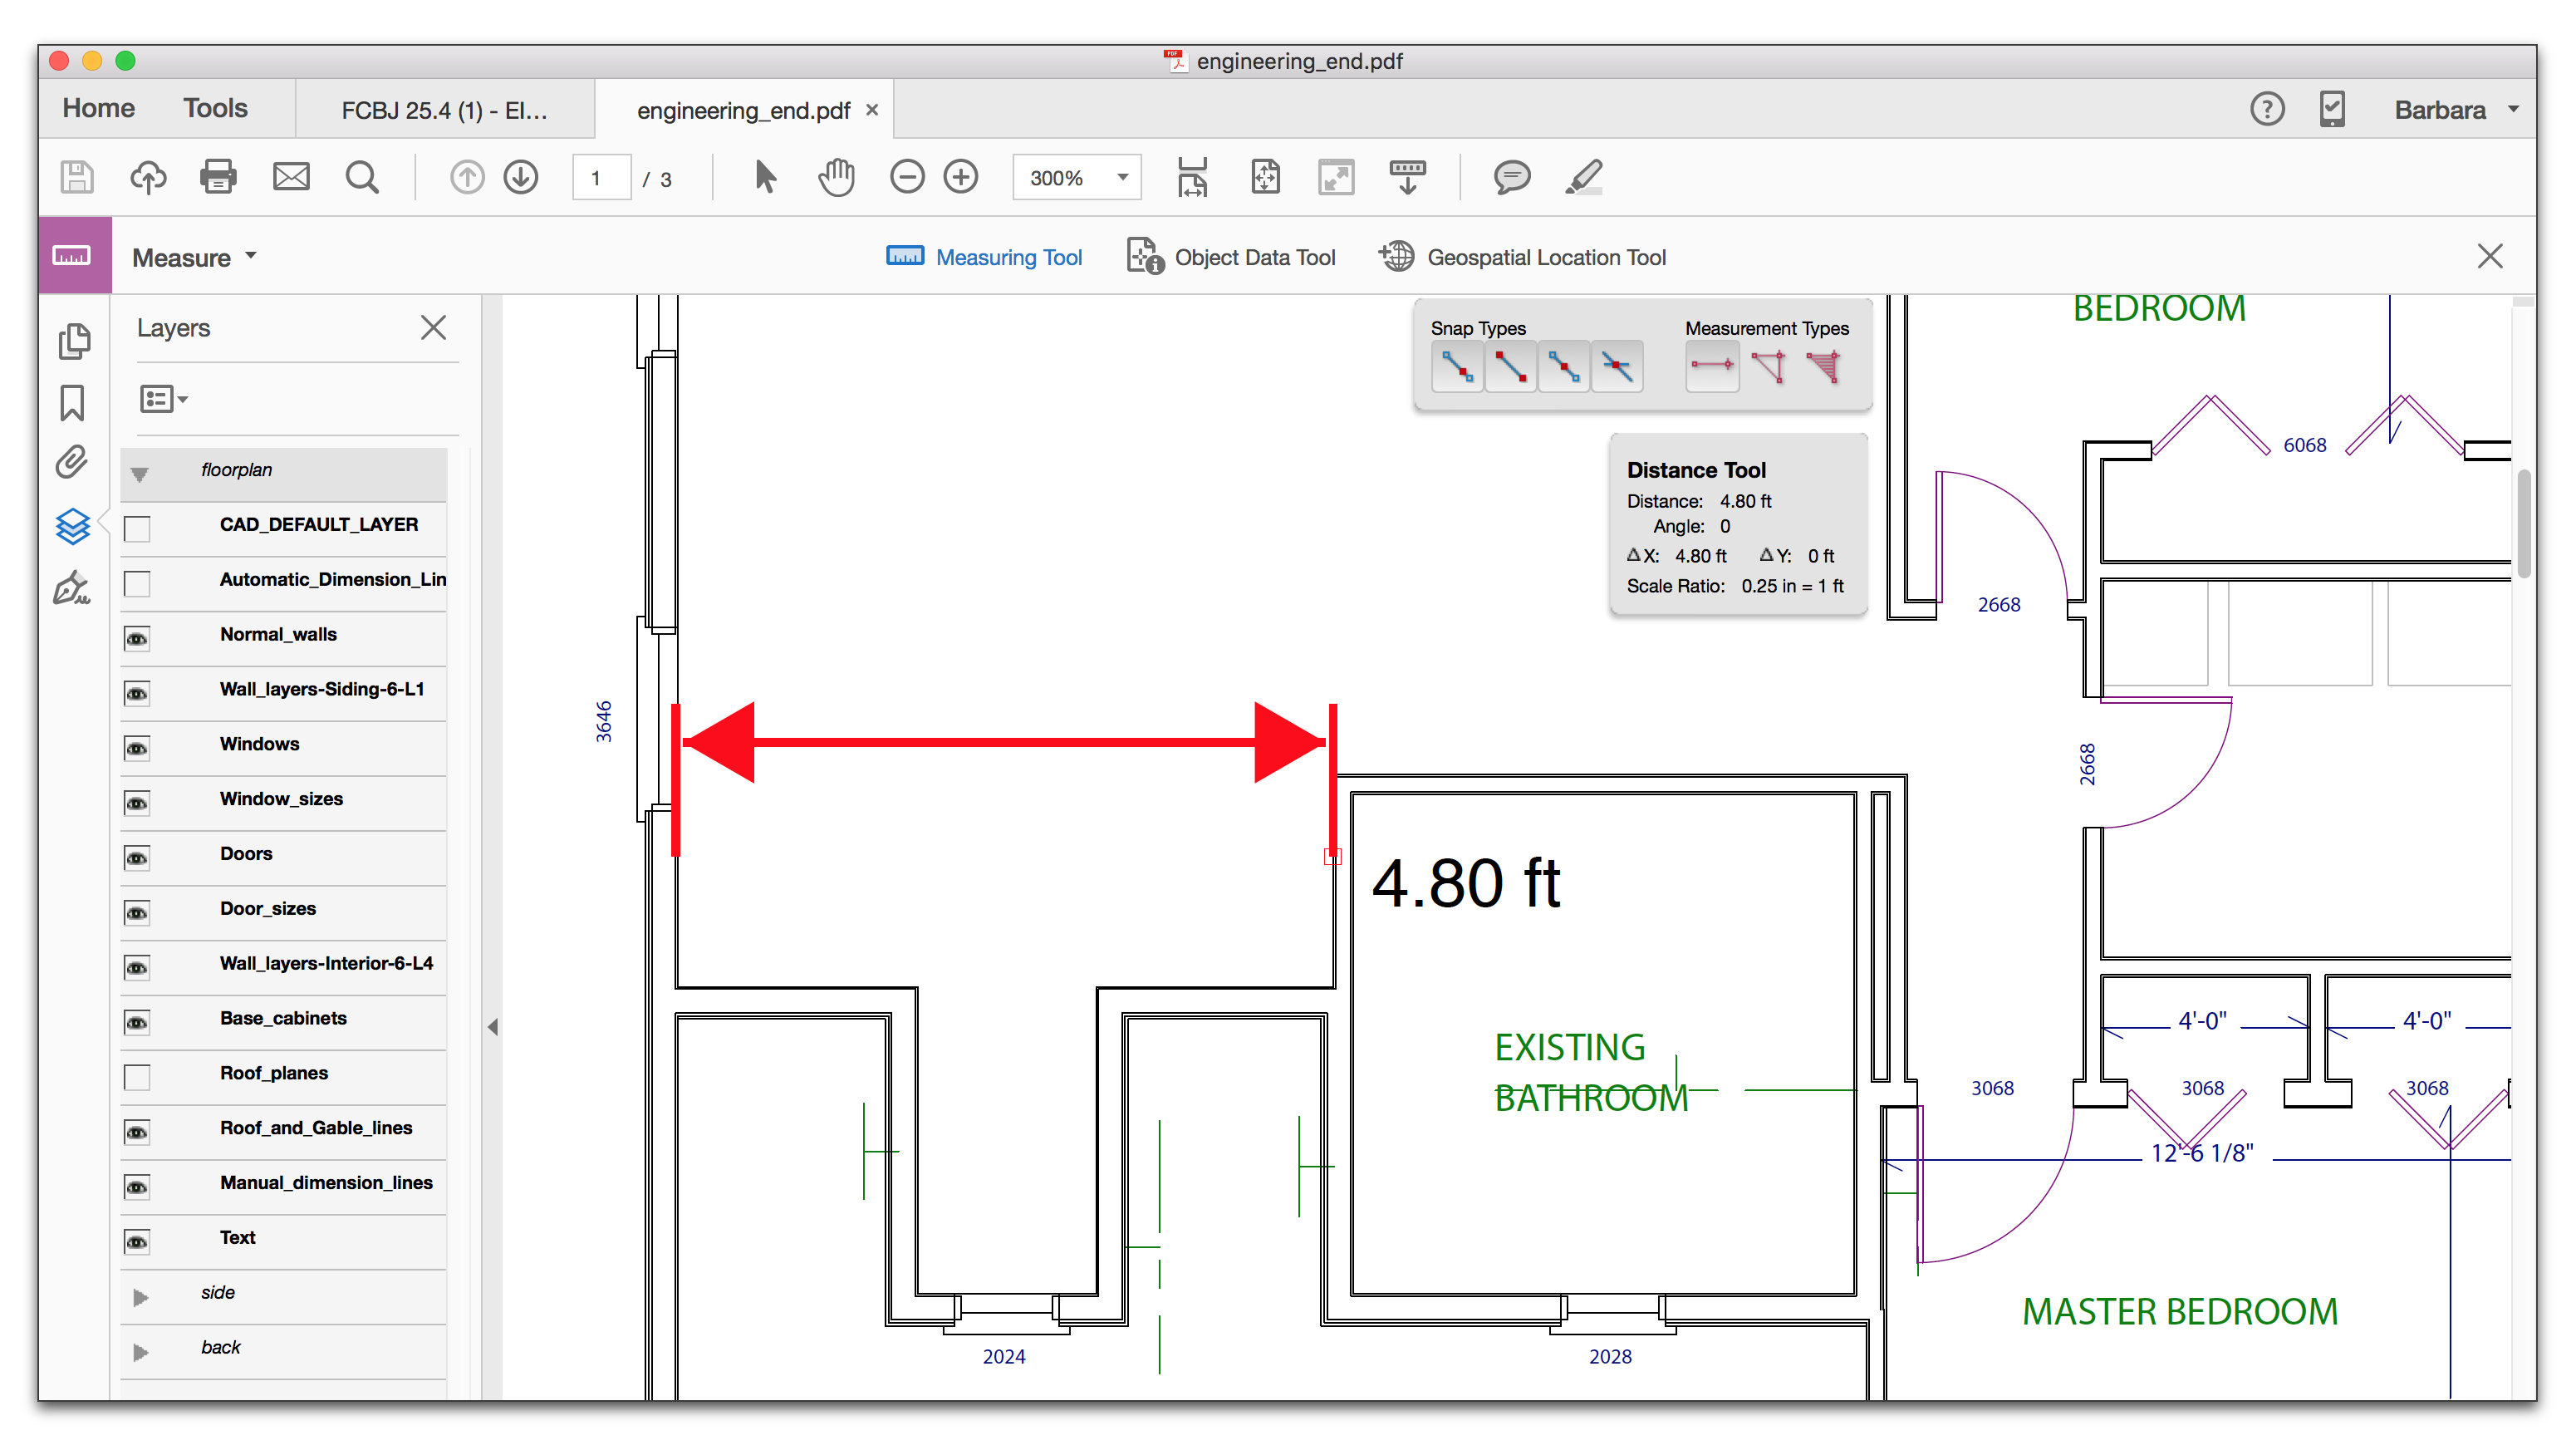
With the Measure Tool active, look for the options bar at the top. Here, you will see the scale settings. Click on the scale ratio field. Enter the desired scale ratio. For example, 1 cm to 1 meter. Confirm your entry by pressing Enter. Your scale ratio is now adjusted.Common Challenges
Adjusting the scale ratio in Adobe Measure Tool often confuses users. Incorrect settings can lead to inaccurate measurements. Ensuring precise calibration requires attention to detail and understanding of units.
Adjusting the scale ratio of the Adobe Measure Tool can be tricky. Many users encounter common challenges that can slow down their workflow. Understanding these challenges can save you time and frustration.Troubleshooting Scale Issues
You might find that your measurements seem off after adjusting the scale. This is often due to incorrect scale settings. Double-check your input values to ensure they match your project’s specifications. Sometimes, the software doesn’t respond as expected. Restarting Adobe can resolve unresponsive behavior. If issues persist, verify that your software is up-to-date, as updates often fix bugs.Avoiding Common Mistakes
It’s easy to make mistakes when setting the scale ratio. One common error is using the wrong unit of measurement. Always confirm whether you need inches, centimeters, or another unit before adjusting the scale. Another frequent mistake is overlooking the original scale of the document. Ensure you know the document’s starting scale to avoid miscalculations. Have you ever been halfway through a project and realized your measurements were wrong? Avoid this by double-checking your scale settings before diving into detailed work. Taking a moment to verify can save you hours of rework. Navigating these challenges might seem daunting at first, but with careful attention, you can ensure accurate measurements and a smoother workflow. What other strategies do you use to prevent scale-related issues in Adobe?Tips For Accurate Measurements
Accuracy in measurement can be the difference between a successful project and a frustrating ordeal. You might have found yourself scratching your head, wondering why your Adobe Measure Tool isn’t quite hitting the mark. It’s not just about knowing the tool; it’s also about mastering the art of measurement. Let’s dive into some practical tips that will help you fine-tune your skills and make your measurements more precise.
Calibration Techniques
Calibration is your first step to ensure accurate measurements. Start by checking if your scale ratio matches the real-world dimensions. A simple way to do this is to compare your measurement tool against a known reference object, like a ruler. Make small adjustments until they align perfectly.
Consider tweaking your tool settings based on the environment. Different screen resolutions can impact your scale ratio. Ensure your settings are optimized for the device you’re using. This small tweak can eliminate potential errors.
Using Reference Points
Reference points can be your best friend in measurement accuracy. Think about landmarks in your design that are easy to identify. Align your measure tool with these points to create a more reliable scale.
Don’t forget to use points that are clearly defined and consistent. This will help you avoid common pitfalls like distortion or misalignment. For example, edges of tables or walls can serve as excellent reference points.
Ask yourself: Are the reference points visible and consistent enough to ensure precision? If not, adjust your approach. Your project’s success might depend on it.
Accurate measurements can transform your work from good to great. Implementing these tips may require a bit of practice, but the payoff is worth the effort. Are you ready to take your measurement skills to the next level?
Benefits Of Correct Scale Adjustment
Adjusting the scale ratio of Adobe Measure Tool ensures accurate measurements in design projects. Precise scale adjustments improve drawing accuracy and enhance project outcomes. Correct scaling is essential for maintaining design consistency and reducing errors.
Correctly adjusting the scale ratio of Adobe’s Measure Tool is crucial for ensuring precision and efficiency in your projects. It’s a small tweak with a significant impact, enhancing how you work and the results you deliver. Whether you’re crafting detailed designs or preparing intricate plans, the benefits of proper scale adjustment can transform your workflow.Enhanced Project Accuracy
Accuracy in your work builds trust and showcases professionalism. By adjusting the scale ratio correctly, you ensure your measurements align perfectly with real-world dimensions. This means fewer errors and adjustments down the line, saving you time and frustration. Have you ever found yourself second-guessing measurements or redoing work due to inaccuracies? Precise scale settings can be your best ally, safeguarding against such setbacks.Improved Workflow Efficiency
Efficiency is key in any creative or technical process. With the Measure Tool set to the correct scale, you can glide through projects with ease. Imagine not having to double-check each measurement, confident that your tool is calibrated just right. This not only speeds up the workflow but also reduces mental clutter, allowing you to focus on the creative aspects of your task. What could you achieve with a little extra time and a lot less stress? Adjusting your scale could be the simple change that makes all the difference. Incorporating these adjustments into your routine can elevate the quality and efficiency of your work significantly. By doing so, you lay the groundwork for success, one project at a time.Advanced Features And Customizations
The Adobe Measure Tool offers powerful advanced features for precise measurements. Customizing the scale ratio is one of these standout options. This feature allows users to adjust the tool to fit their specific needs. With personalization and integration capabilities, the tool can be tailored to enhance user experience.
Personalized Settings
Personalized settings enable users to adjust the scale to their projects. You can set a custom unit of measurement for better accuracy. This feature supports a range of units like inches, centimeters, and points. Users can also save their settings for future use. This saves time and effort, allowing for a more efficient workflow.
Integrating With Other Tools
The Adobe Measure Tool integrates seamlessly with other design tools. Users can import and export measurements to software like Photoshop and Illustrator. This integration ensures consistency across various design platforms. It also enhances collaboration among team members. Sharing measurements with others becomes easier and more efficient.
Credit: www.rockymountaintraining.com
Credit: www.rockymountaintraining.com
Frequently Asked Questions
How Do You Change The Scale Ratio In Adobe Acrobat Measuring Tool?
Open the Measuring Tool in Adobe Acrobat. Right-click, choose “Change Scale Ratio”, enter your desired ratio, and click “OK”.
How To Change Ratio In Adobe?
Open Adobe software. Select the object or image. Find “Transform” or “Resize” in the menu. Adjust the ratio by entering new dimensions or using the corner handles. Ensure “Constrain Proportions” is checked to maintain aspect ratio. Apply changes and save your work.
How To Calibrate A Measuring Tool In Adobe?
Open Adobe, select the measuring tool. Click on “Calibrate” in the tool options bar. Enter a known measurement length. Confirm to set the scale. Save your settings to ensure accurate future measurements.
How To Calibrate Scale On Pdf?
Open the PDF in a compatible viewer. Use the measure tool to set a known distance. Adjust the scale using the calibration settings to match the actual measurement. Save the changes.
Conclusion
Mastering the Adobe Measure Tool scale ratio is essential. It helps create precise designs. Adjusting the scale ratio ensures accurate measurements. This leads to better project outcomes. With practice, this tool becomes intuitive. Users can feel confident in their design work.
Experiment with settings to find what fits best. Always check measurements twice to avoid errors. Being detail-oriented pays off in design. Stay patient and keep learning. Your skills will improve over time. Accurate design tools make projects easier. A well-adjusted scale ratio saves time and effort.
Happy designing!

I’m Abby Lu, a passionate home cook who loves simplifying everyday meals. At PlugChef.com, I share product reviews and cooking guides to help you find the best tools for your kitchen.
Related posts:
 What Type of Cooking Utensils are Safe: Expert Picks
 What Innovations Could Blenders Make: Unleashing Future Tech
 Smart Strategies to Organize a Small Kitchen: Maximize Space
 How to Organize a Kitchen Cabinet: Expert Tips & Tricks
 How to Organize Kitchen Drawers: Expert Tips and Tricks
 How to Organize a Corner Kitchen Cupboard: Expert Tips

