
Have you ever dealt with a sink that just won’t drain properly? It’s frustrating, isn’t it?
Luckily, there’s a simple solution that can turn your kitchen woes into a smooth, flowing experience. Installing a sink basket might sound like a daunting task, but it’s easier than you think. Imagine the satisfaction you’ll feel once you see water draining effortlessly, without the annoying clogs.
This guide is crafted to help you install a sink basket with ease, saving you both time and money. Ready to take control of your kitchen and enjoy a hassle-free sink? Let’s dive into the simple steps you need to follow.
Tools And Materials Needed
Installing a sink basket might seem daunting, but it’s doable with the right tools and materials. A proper setup ensures a secure and leak-free installation. Gather everything before starting to make the process smoother and more efficient.
Tools You’ll Need
Having the right tools makes the job easier and faster. A basic set will do for most installations.
- Adjustable Wrench:Useful for tightening and loosening nuts.
- Plumber’s Putty:Seals gaps and prevents leaks.
- Screwdriver:Necessary for securing screws in place.
- Pliers:Handy for gripping and twisting parts.
- Basin Wrench:Ideal for hard-to-reach areas under the sink.
Materials Required
Ensure you have all materials ready before you begin. This avoids interruptions during the installation process.
- Sink Basket:The centerpiece of the installation.
- Rubber Gasket:Provides a watertight seal.
- Lock Nut:Secures the basket to the sink.
- Drain Pipe:Connects to the sink basket for water flow.
- Sealant Tape:Additional protection against leaks.
Safety Gear
Safety should never be overlooked. Protect yourself while working.
- Gloves:Prevents cuts and keeps hands clean.
- Safety Goggles:Shields eyes from debris.
Preparing with these tools and materials ensures a smooth installation. Proper planning saves time and effort.
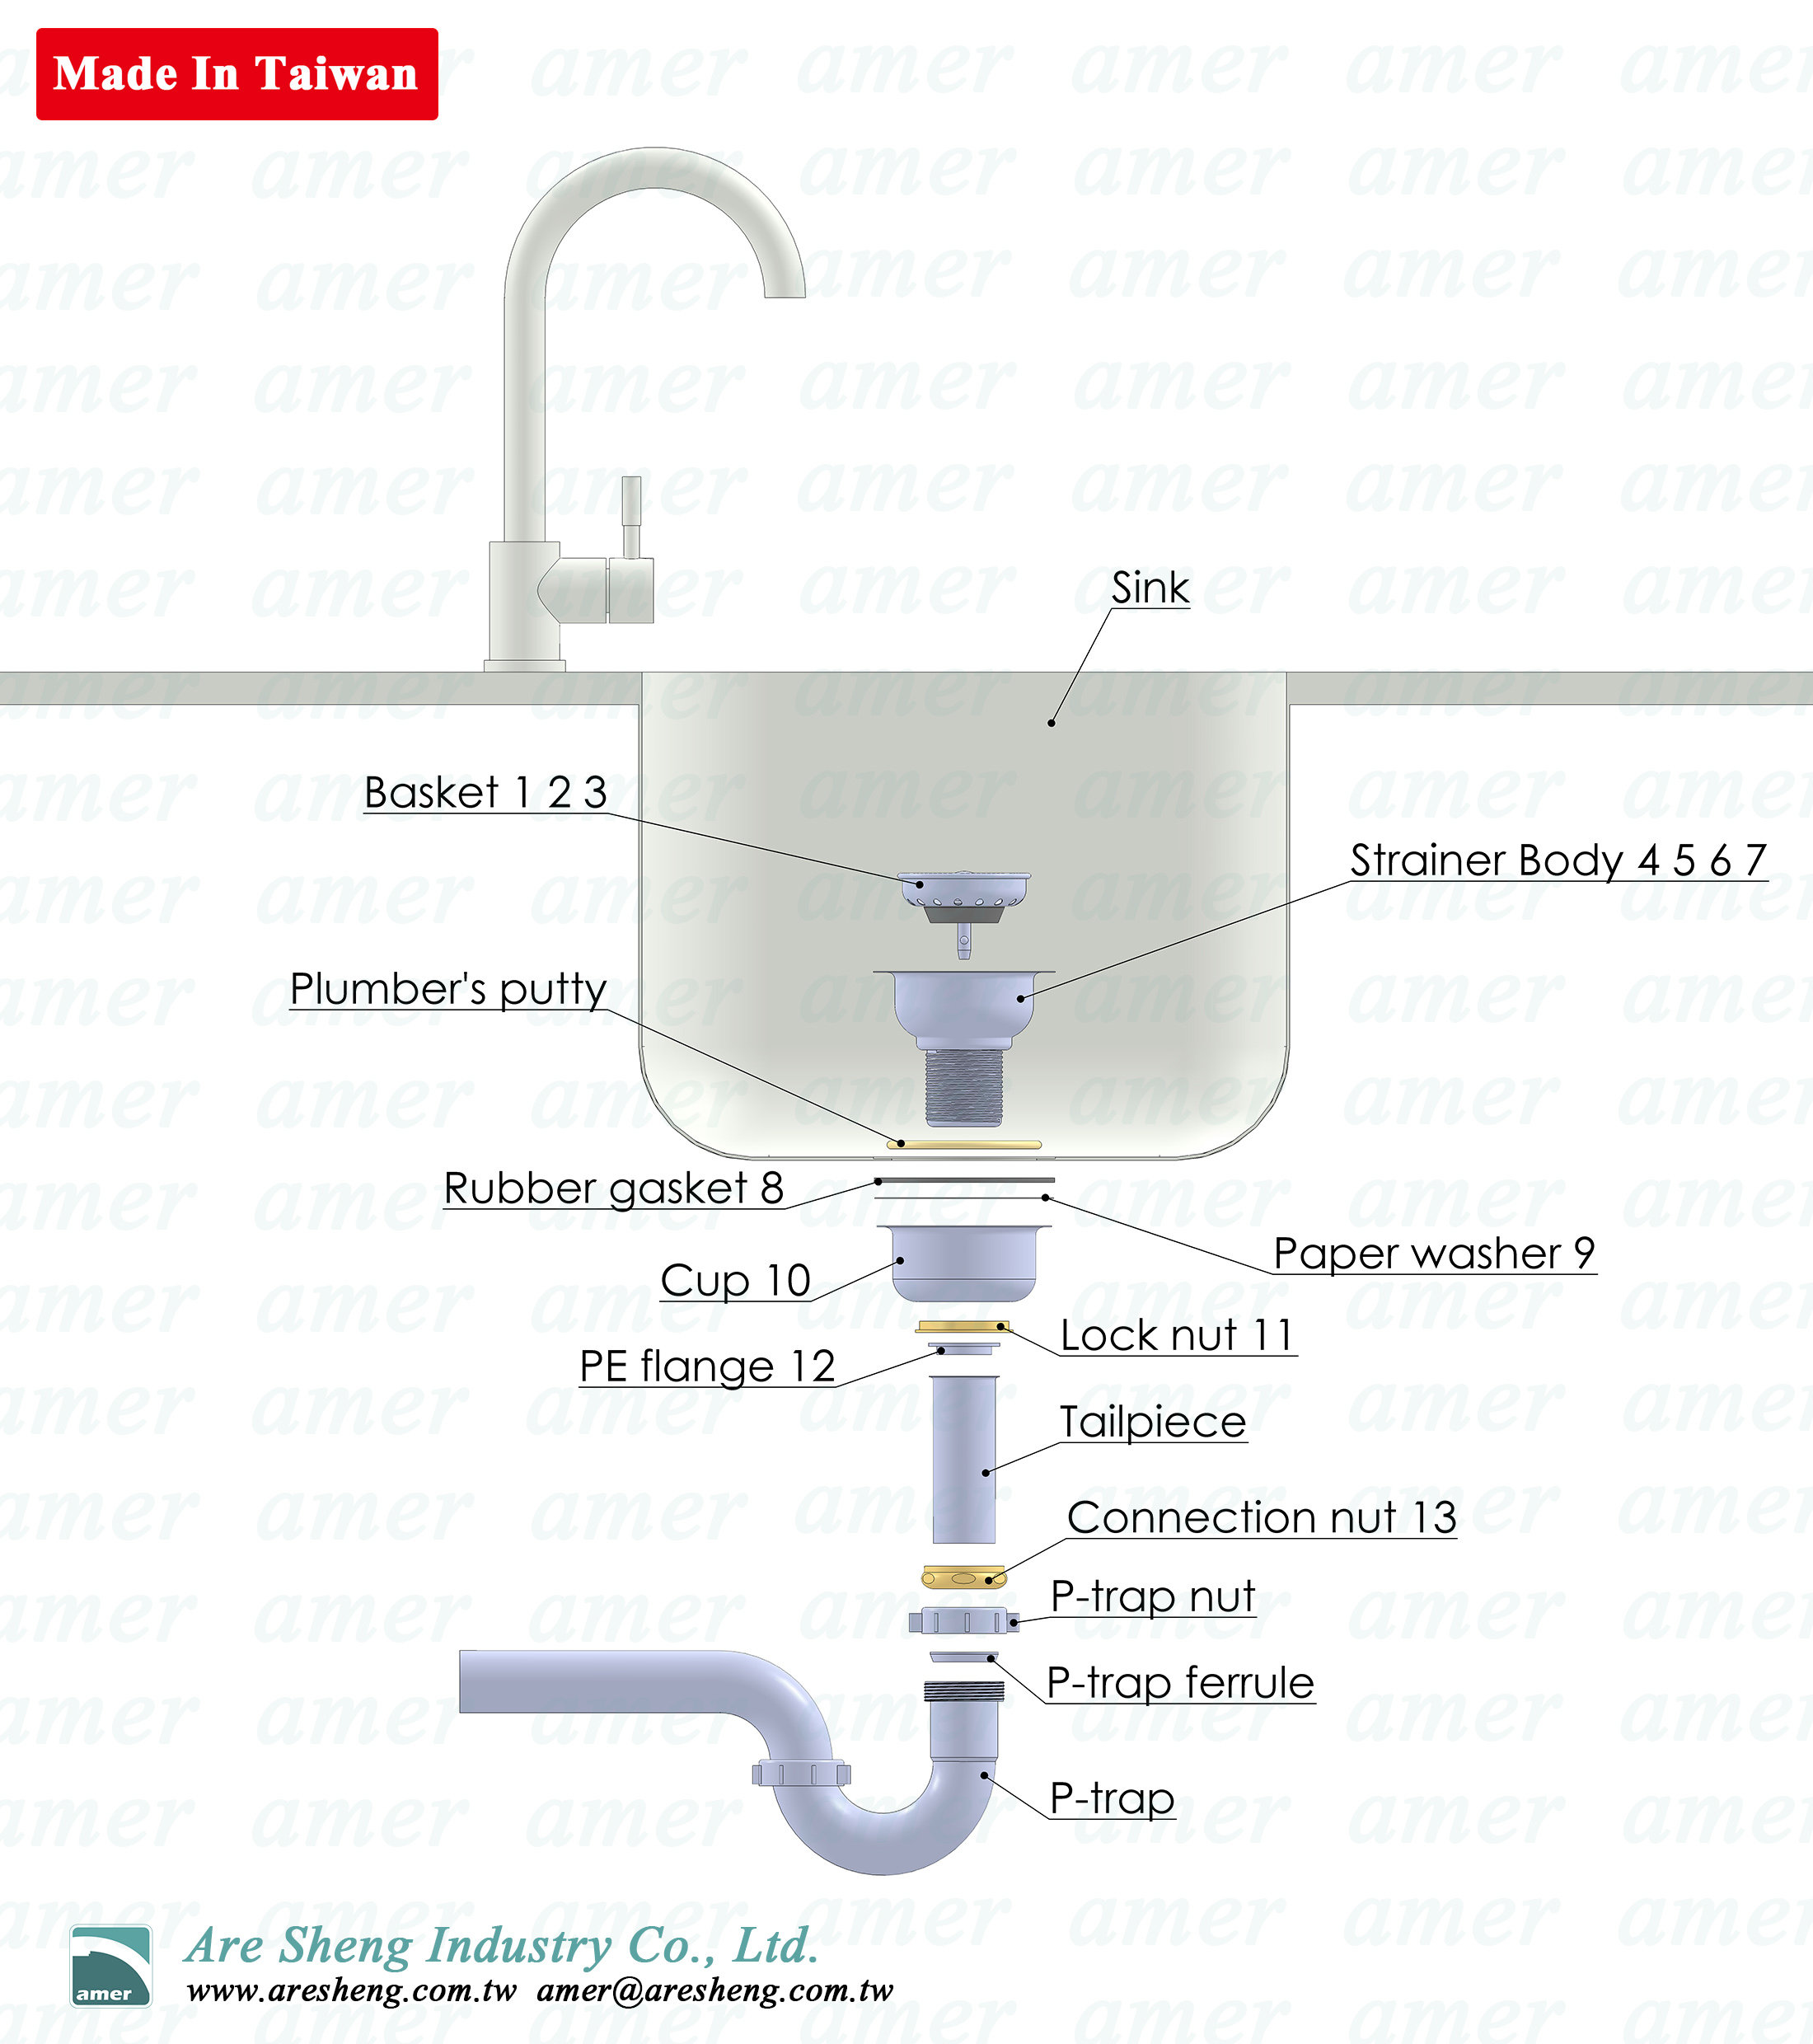
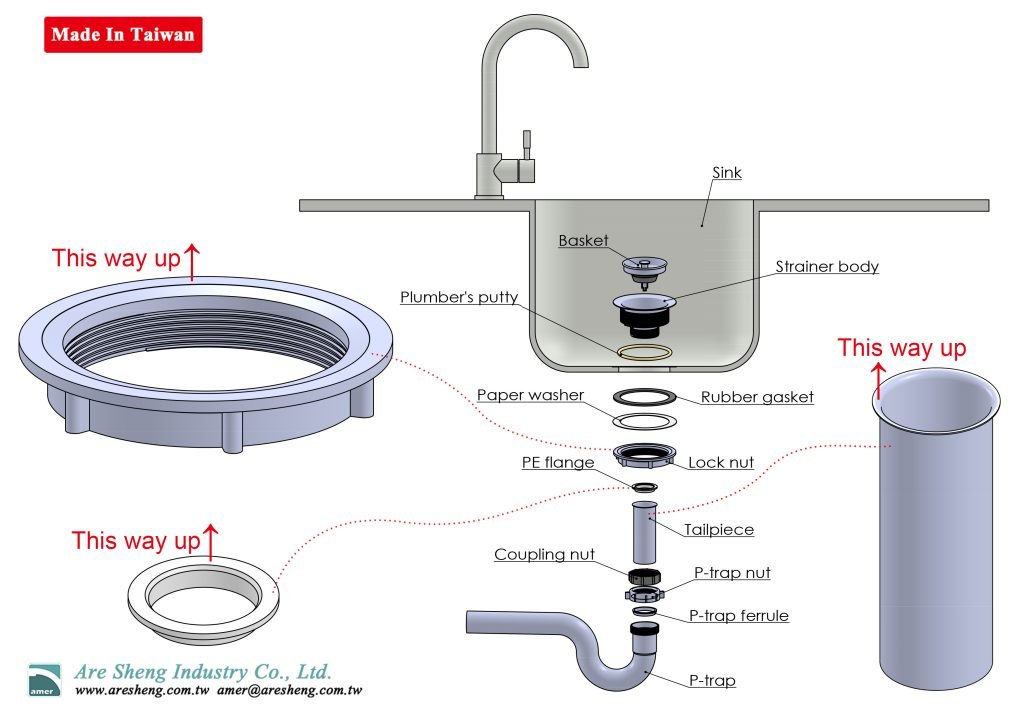
Credit: www.aresheng.com.tw
Preparing The Area
Clear the work area by removing any old parts and debris. Ensure the sink’s surface is clean and dry. Double-check that you have all necessary tools and materials before starting the installation.
Installing a new sink basket can breathe fresh life into your kitchen or bathroom. Before diving into the installation, it’s crucial to prepare the area properly. This ensures not only a smooth installation but also guarantees that your new sink basket functions without any hitches. Let’s dive into the essential steps for preparing your workspace.Clearing The Sink
Start by clearing out the sink area. Remove any dishes, soap dispensers, or clutter around and inside the sink. This will give you ample room to work and reduce the risk of anything falling into the drain. It might seem trivial, but a clear workspace is your first step to a successful installation. Have you ever tried working in a cramped space and ended up frustrated? Avoid that by ensuring your workspace is open and ready for action. Next, gather your tools. A wrench, screwdriver, and plumber’s putty are a good start. Having everything on hand saves you from scrambling midway through the task.Removing The Old Basket
Now, it’s time to remove the old basket. First, inspect the underside of the sink. You’ll likely find a large nut holding the basket in place. Use your wrench to carefully loosen and remove this nut. Be prepared for a bit of water to escape as you remove the old basket. Placing a small bucket or towel below can save you from unnecessary cleanup. Ever been caught off guard by a sudden splash of water? Taking this precaution keeps your workspace tidy and stress-free. Once the nut is off, push the old basket up and out of the sink. If it seems stuck, a gentle nudge should do the trick. If you’re replacing a particularly old basket, it might require a bit more elbow grease. But don’t worry, persistence pays off. Preparing the area might seem like a simple step, but it sets the foundation for a hassle-free installation. How do you feel now about tackling this project? With a clear workspace and the old basket removed, you’re ready to move on to the next phase.Installing The New Basket
Fitting a sink basket involves removing the old one and placing the new basket in the drain hole. Secure it with a plumber’s putty and tighten the locknut underneath for a snug fit. Ensure no leaks by testing with water.
Installing a new sink basket might seem daunting at first, but with the right guidance, it becomes a straightforward task. Whether you’re replacing an old, leaky basket or setting up a new sink, the process is mostly the same. By following these steps, you can ensure a leak-free and secure installation.Sealing The Basket
To begin, ensure the sink opening is clean and dry. Any debris or moisture can prevent a proper seal. Apply a thin bead of silicone sealant around the rim of the sink opening. This helps create a waterproof barrier. Press the basket into the opening, making sure it sits evenly. Wiggle it gently to spread the sealant evenly, ensuring no gaps are left.Securing With Plumber’s Putty
Plumber’s putty provides a second layer of security. It’s malleable and easy to work with, making it a favorite for many DIY enthusiasts. Roll a small amount of putty between your hands to form a long, thin rope. Wrap this rope around the underside edge of the sink basket. Press the basket firmly into place. The excess putty will squeeze out, which you can easily wipe away with a damp cloth. Remember, the key to a successful installation is patience and precision. Have you ever wondered why some installations leak despite following all the steps? Often, it’s because the sealant or putty wasn’t applied evenly. Taking the extra time to ensure a uniform application can save you from future headaches. Do you have any tips or tricks from your own DIY experiences that made a difference? Share them in the comments below!
Credit: www.youtube.com
Connecting The Drain Pipes
After placing the sink basket, connect the drain pipes. This step ensures proper drainage. Proper alignment and secure connections prevent leaks. Follow the steps for a hassle-free installation.
Aligning The Pipes
Ensure the pipes align correctly. Misalignment leads to leaks. Position the pipes under the sink. Check that each pipe fits snugly. Adjust as necessary to ensure a straight path. Proper alignment is crucial for efficient drainage.
Tightening Connections
Secure each connection firmly. Use a wrench for tight fittings. Hand-tighten first, then use the wrench. Avoid over-tightening to prevent damage. Check for any leaks by running water. Adjust as needed to eliminate drips.
Testing For Leaks
After installing a new sink basket, it’s crucial to test for leaks. This ensures everything works correctly. A leak can cause water damage. Testing helps prevent future problems. Follow these steps to check for leaks effectively.
Running The Water
Turn on the faucet. Allow the water to run for a few minutes. This helps simulate regular usage. Observe how the sink drains. Check if the water flows smoothly. Any pooling indicates a problem. Listen for unusual sounds. They might signal a leak.
Checking For Drips
Look under the sink. Inspect the area for drips or moisture. Use a flashlight for better visibility. Check the connections. Ensure they are tight and secure. Feel around the pipe joints. A damp spot might reveal a leak. Pay attention to the sink basket. Ensure it’s dry and sealed.
Final Touches
The final touches in installing a sink basket make your work shine. These small details ensure the sink functions well and looks great. Careful attention now can prevent future issues. Let’s dive into the necessary steps.
Cleaning The Area
First, clean the area around the sink basket. Use a damp cloth to wipe away dust and debris. Pay attention to the edges and corners. This prevents any grime build-up that can cause leaks later. Ensure everything is dry before proceeding.
Adding A Strainer
Next, add a strainer to your sink basket. Strainers keep unwanted particles from clogging the drain. Place it firmly into the basket opening. Check that it fits snugly without gaps. A secure fit ensures optimal water flow.
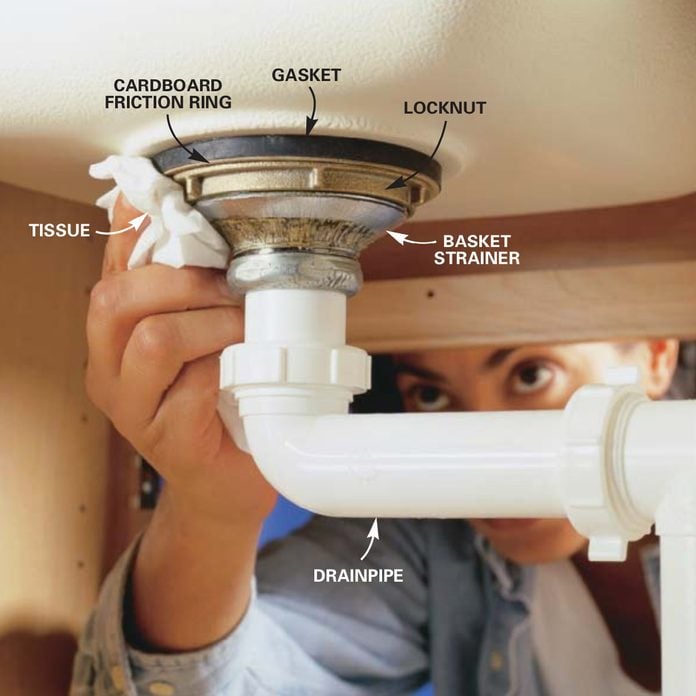
Credit: www.familyhandyman.com
Frequently Asked Questions
How To Install A Sink Waste Basket?
Remove the old basket by unscrewing it. Clean the sink area thoroughly. Place plumber’s putty around the new basket’s rim. Insert the new basket and tighten the locknut underneath. Ensure it is securely fitted. Test for leaks by running water to check the installation.
What Tool Do You Need To Install A Sink Strainer Basket?
You need a wrench, plumber’s putty, and a screwdriver to install a sink strainer basket. Ensure a watertight seal by applying the plumber’s putty correctly. Tighten the locknut with the wrench and secure any screws with the screwdriver. Proper tools ensure a leak-free installation.
How To Connect Sink Strainer To Plumbing?
First, insert the sink strainer through the sink hole. Apply plumber’s putty underneath the strainer rim. Secure it with a gasket and locking nut from below. Attach the tailpiece to the strainer’s bottom. Connect the tailpiece to the plumbing with a slip nut and washer.
How Do You Install Sink Clips For A Drop-in Sink?
To install sink clips for a drop-in sink, position the sink, insert clips underneath, and tighten screws. Ensure clips are evenly spaced and secure the sink firmly to the countertop. Check stability and adjust if needed. Follow manufacturer instructions for specific clip types and sink models for best results.
Conclusion
Installing a sink basket might seem tricky, but it’s manageable. With the right tools and steps, you can do it yourself. Remember to check the fit before tightening everything. This prevents leaks and future issues. A secure basket keeps your plumbing efficient.
Take your time during installation. Precision matters here. Enjoy the satisfaction of a job well done. Now you can confidently tackle similar DIY projects. Let your kitchen sink serve you better. A well-installed basket makes a big difference. You’ve got this! Keep your sink area clean and functional.
Your effort pays off.

I’m Abby Lu, a passionate home cook who loves simplifying everyday meals. At PlugChef.com, I share product reviews and cooking guides to help you find the best tools for your kitchen.
Related posts:
 What Type of Cooking Utensils are Safe: Expert Picks
 What Innovations Could Blenders Make: Unleashing Future Tech
 Smart Strategies to Organize a Small Kitchen: Maximize Space
 How to Organize a Kitchen Cabinet: Expert Tips & Tricks
 How to Organize Kitchen Drawers: Expert Tips and Tricks
 How to Organize a Corner Kitchen Cupboard: Expert Tips

