
Imagine opening your kitchen cabinet, only to find a chaotic mess in the blind corner space. It’s a struggle many face, but there’s a simple solution: a DIY blind corner cabinet organizer.
Have you ever felt frustrated trying to reach items lost in the depths of your cabinet? You’re not alone. This often-overlooked space can become a treasure trove of accessible storage with just a little creativity and effort. By tackling this DIY project, you not only enhance your kitchen’s functionality but also add a personal touch to your space.
Think about the satisfaction of transforming disorder into order, where every pot, pan, or gadget has its rightful place. With easy-to-follow steps and a bit of inspiration, you can conquer the clutter and reclaim your blind corner cabinet. Dive into this guide and discover how you can make the most out of every inch of your kitchen.

Credit: www.fromhousetohome.com
Benefits Of Blind Corner Cabinet Organizers
Blind corner cabinet organizers transform hidden spaces into accessible storage areas. These clever solutions maximize your kitchen’s potential. They also bring order to otherwise chaotic corners.
Improved Accessibility
Organizers make every inch of your cabinet accessible. No more digging through clutter to find items. With a simple pull, everything is within reach.
Space Optimization
These organizers efficiently use space that usually goes unused. They allow storage in areas that are hard to reach. Your kitchen becomes more functional and organized.
Enhanced Organization
They keep your kitchen items neatly arranged. Each item has a designated spot. This reduces time spent searching for things.
Cost-effective Solution
DIY organizers are budget-friendly. You save money by creating your own system. It’s a cost-effective way to improve your kitchen.
Customization Options
DIY projects allow for customization. Tailor the organizer to fit your specific needs. This ensures maximum efficiency and satisfaction.
Increased Home Value
Functional kitchens add value to homes. Potential buyers appreciate organized spaces. Blind corner organizers can make a positive impression.
Materials Needed
Gather plywood or MDF for sturdy shelves, along with screws and a drill for assembly. Add brackets and hinges for smooth movement.
Creating a DIY blind corner cabinet organizer can be an exciting project that enhances the functionality of your kitchen. However, before you dive into the construction process, you’ll need to gather the right materials. Having everything at hand not only saves time but also ensures a smoother assembly process. Understanding the materials required is crucial for a successful DIY endeavor. Whether you’re a seasoned DIY enthusiast or a novice, knowing exactly what you need will help you avoid unnecessary trips to the hardware store and keep your project on track.Wood And Plywood
Choosing the right wood is foundational for your organizer. Opt for sturdy plywood that can handle weight without bending. Use high-quality wood for parts that will be visible, ensuring it matches the aesthetic of your kitchen. Are you considering adding a splash of color or keeping a natural look?Brackets And Screws
Metal brackets and screws are essential for securing your organizer. Ensure they are rust-resistant, especially if they’re near the sink where moisture is prevalent. How will you ensure the organizer stays stable under the weight of pots and pans?Slides And Rails
Smooth operation is key for any cabinet organizer. Invest in slides and rails that allow easy access to items stored in the back. Look for ball-bearing slides for durability and ease of use. Have you thought about the impact of smooth sliding on your day-to-day kitchen activities?Measuring Tape And Level
Precision is everything. A measuring tape helps you cut materials to the exact dimensions needed. A level ensures your organizer is perfectly horizontal, preventing items from slipping or falling. How confident are you in your measuring skills?Saw And Drill
Power tools like a saw and drill will make cutting and assembling materials much easier. Ensure your saw is sharp and your drill has a variety of bits for different screw sizes. What precautions will you take to ensure safety during this process?Sandpaper And Paint
For a polished finish, sandpaper smooths rough edges, while paint or varnish adds a protective layer. Choose a paint that complements your kitchen décor. Are you going for a minimalist look or something more vibrant? With these materials, you’re well-equipped to start crafting your blind corner cabinet organizer. Are there any materials you might substitute based on personal preference or availability?Design Ideas
Transform your kitchen space with a DIY blind corner cabinet organizer. Maximize storage by creating accessible, organized shelves in hard-to-reach areas. This simple project enhances functionality and keeps essentials within easy reach.
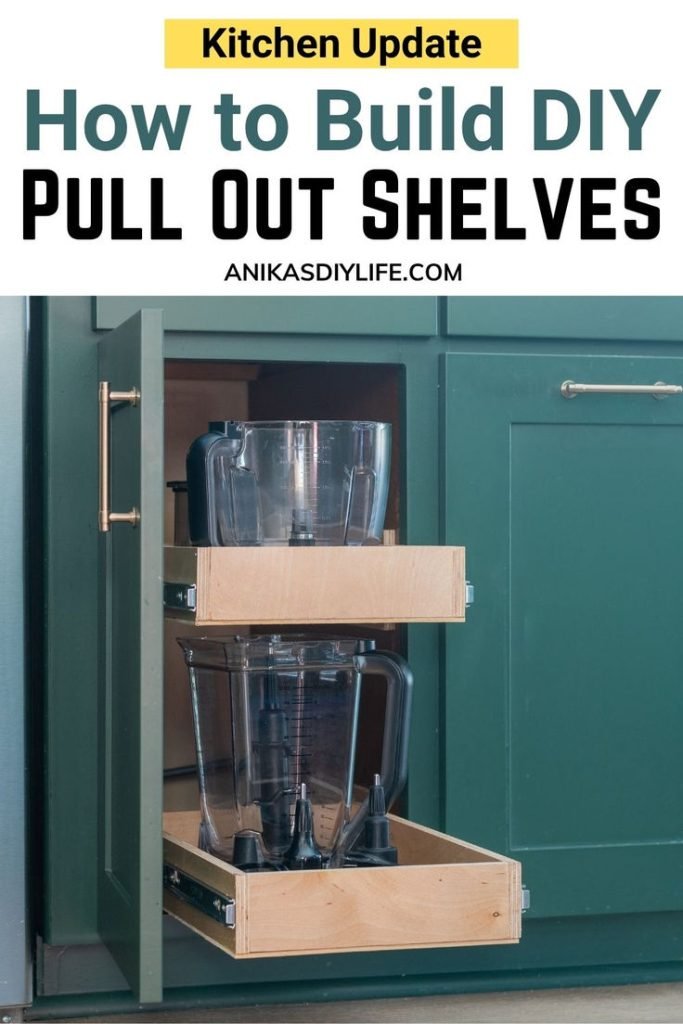
Designing a blind corner cabinet organizer yourself can be rewarding. It transforms a cluttered corner into a functional space. Explore creative ways to maximize this hidden area. Consider different options to suit your needs and style.Pull-out Shelves
Pull-out shelves offer easy access to stored items. They slide out smoothly, revealing everything inside. Use sturdy materials to hold pots, pans, and other heavy items. Adjustable shelves allow for customization. This flexibility caters to various kitchen tools and containers.Lazy Susan
A Lazy Susan provides a spinning platform for easy reach. It uses circular motion to bring items to the front. This design is perfect for canned goods and spices. It requires minimal effort to access all stored items. Choose a durable material to withstand daily use.Swing-out Storage
Swing-out storage features shelves that pivot outward. This design reveals stored items with a simple motion. It’s ideal for larger items like small appliances. Use it to store things that need easy access. It keeps the counter clutter-free and organized.
Credit: www.facebook.com
Step-by-step Guide
Transform your cluttered blind corner cabinet with a DIY organizer. Maximize space by crafting custom shelves and racks. Keep essentials within reach and enjoy a tidy kitchen.
Transforming your kitchen can be a rewarding project, especially when you tackle a blind corner cabinet organizer DIY. With a few tools and some patience, you can create a custom solution that maximizes your cabinet space. Ready to get started? Let’s dive into this step-by-step guide to crafting your own blind corner cabinet organizer.Measuring Your Cabinet
The first step in your DIY project is understanding the space you’re working with. Use a measuring tape to get the height, width, and depth of your cabinet. Double-check your measurements to ensure accuracy—precision is key here. Think about what you’ll be storing. Are you organizing pots and pans, or smaller items like spices? This will influence the design and size of your organizer shelves.Cutting And Preparing Materials
Once you have your measurements, it’s time to gather and prepare your materials. You’ll need plywood or another sturdy material for the shelves. Cut your materials according to the dimensions you’ve measured. Sand down the edges to make sure everything fits smoothly and safely. Do you have a favorite finish or paint? Now’s the time to apply it, giving your organizer a personal touch that matches your kitchen’s aesthetic.Assembly Instructions
Start by assembling the base of your organizer using screws and a drill for stability. Attach the vertical supports, ensuring they are evenly spaced and secure. Next, add your shelves. Make sure they are level and can hold the weight of the items you plan to store. Consider adding wheels to the bottom if you want your organizer to slide in and out easily. This little addition can make a big difference in accessibility. Building a blind corner cabinet organizer might sound challenging, but the satisfaction of a personalized solution makes it worthwhile. How will you feel when you open that cabinet and see everything neatly organized?Installation Tips
Installing a blind corner cabinet organizer can transform your kitchen space. It makes use of every inch effectively, providing more storage. This guide will help you install the organizer with ease.
Securing The Organizer
Start by ensuring your cabinet is clean and empty. Measure the space to confirm the fit. Position the organizer inside the cabinet, aligning it with the edges. Use screws to attach it to the cabinet walls. This keeps the organizer stable and secure. Double-check all screws are tight, preventing any wobbling.
Adjusting For Optimal Access
Once secured, test the organizer’s movement. Pull it out and push it back in. Adjust any parts that rub or catch. This ensures smooth operation. Check that you can easily reach items stored in it. If needed, adjust the shelves for better access. Consider the height and depth of items you’ll store. This helps maximize the use of space.
Maintenance And Care
Regularly clean and inspect your DIY blind corner cabinet organizer. Ensure smooth operation by lubricating hinges and tracks. Replace any worn or broken parts promptly to maintain functionality.
Maintaining your DIY blind corner cabinet organizer ensures long-lasting functionality. Regular care prevents wear and tear. This section offers practical tips for keeping your organizer in top shape. Simple tasks can extend the life of your creation.Regular Cleaning
Dust and debris accumulate quickly in corner spaces. Use a soft cloth to wipe surfaces weekly. Mild soap and water keep the organizer fresh. Avoid harsh chemicals that may damage materials.Inspecting Moving Parts
Check hinges and sliders monthly. Ensure they move smoothly. A drop of oil on joints can prevent squeaks. Tighten any loose screws to maintain stability.Preventing Moisture Damage
Moisture can warp wood over time. Place a dehumidifier nearby if humidity is high. Wipe spills immediately to avoid soaking. Consider using liners to protect surfaces.Reorganizing And Decluttering
Evaluate contents every few months. Remove items you no longer need. Rearrange for better access and efficiency. Keep your cabinet clutter-free for easy use.Handling Repairs
Address minor issues promptly. Replace worn-out parts with new ones. Repair small damages before they worsen. Keeping tools handy aids quick fixes.Applying Finishes
A fresh coat of varnish can enhance appearance. Use a brush to apply evenly. Let dry completely before use. This adds a layer of protection to the wood.Common Mistakes To Avoid
Blind corner cabinet organizers can be tricky. Incorrect measurements lead to wasted space. Choosing the wrong materials results in poor durability.
When diving into a DIY project, especially one as intricate as a blind corner cabinet organizer, it’s easy to get caught up in the excitement. But, without careful planning, mistakes can creep in that may affect the functionality and aesthetics of your project. Understanding the common pitfalls can save you time, money, and a lot of frustration.Neglecting Accurate Measurements
One of the most frequent errors is not taking precise measurements. Even a small miscalculation can result in an organizer that doesn’t fit properly. Ensure you measure not only the cabinet but also the items you’ll store. This way, you’ll avoid the disappointment of realizing your beautiful organizer is unusable.Choosing The Wrong Materials
Selecting the wrong materials can make or break your project. Consider the weight and durability of the materials you choose. Opt for sturdy materials that can handle daily wear and tear. It’s a lesson I learned the hard way when my first attempt with thin plywood resulted in a sagging organizer.Ignoring Ease Of Access
Your organizer’s design should prioritize accessibility. If items are difficult to reach, the organizer loses its purpose. Think about how often you’ll use the items and design around that. You don’t want to struggle every time you need a pot or pan.Overcomplicating The Design
A complex design might seem appealing, but it can lead to unnecessary headaches. Stick to straightforward designs that accomplish your storage goals. Overly intricate designs can be confusing to assemble and may not offer the functionality you imagined.Skipping The Finishing Touches
Don’t underestimate the importance of finishing touches. Sanding, painting, or sealing your organizer can enhance its look and longevity. These details might seem small but can significantly improve the final product. Remember, a well-finished project not only serves a purpose but also adds beauty to your space. By keeping these common mistakes in mind, your DIY blind corner cabinet organizer can become a functional masterpiece rather than a regrettable misstep. What lessons have you learned from your DIY experiences?Creative Uses For Extra Space
Transform your blind corner cabinet into a functional space with a DIY organizer. Maximize storage by installing custom shelves and pull-out racks, making every inch accessible and useful. This clever solution keeps your kitchen tidy and efficient.
Creating more space in your kitchen can make your daily tasks easier. Blind corner cabinets often hide valuable storage space. With a DIY organizer, you can turn this hidden area into useful storage. Let’s explore some creative ideas for maximizing this extra space.Utilize Vertical Space With Tiered Shelves
Install tiered shelves to make use of vertical space. This setup allows you to store pots, pans, and dishes efficiently. It keeps items organized and easy to access.Add Pull-out Drawers For Easy Access
Use pull-out drawers for a practical solution. They bring items to you without reaching deep into the cabinet. Perfect for storing spices, jars, or kitchen gadgets.Incorporate Lazy Susans For More Accessibility
Lazy Susans rotate, providing easy access to items. They are ideal for storing condiments or canned goods. This design minimizes wasted space and improves organization.Use Adjustable Dividers For Custom Storage
Adjustable dividers allow you to customize storage for your needs. They help organize baking sheets, cutting boards, or trays. Change the layout as your storage needs evolve.Install Wire Baskets For Extra Organization
Wire baskets provide additional storage for small items. Store utensils, napkins, or kitchen towels neatly. They maintain visibility, making it easy to find items.Create A Cleaning Supply Station
Transform the space into a cleaning supply hub. Store detergents, sponges, and brushes in a designated area. This keeps cleaning essentials within reach and organized.
Credit: www.youtube.com
Frequently Asked Questions
How To Organize An Awkward Corner Cabinet?
Utilize lazy Susan turntables for easy access. Install pull-out shelves to maximize space. Use stackable bins for organization. Categorize items by frequency of use. Consider vertical storage solutions to optimize every inch. Keep frequently used items at the front for convenience.
What To Do With Dead Space In A Corner Cabinet?
Use a lazy Susan or pull-out shelves to optimize corner cabinet space. Install vertical dividers for trays or baking sheets. Consider corner drawers for easy access. Decorate with stylish baskets or turn it into a wine rack. Bright lighting enhances functionality.
How To Organize A Corner Cabinet Without A Lazy Susan?
Use stackable shelves to maximize vertical space. Store items by category in labeled baskets. Place less-used items at the back. Use tension rods or dividers for organization. Install pull-out trays for easy access to deep corners.
What Is A Blind Corner Optimizer?
A blind corner optimizer improves visibility and safety in areas with obstructed views. It uses mirrors or cameras to show hidden angles, preventing accidents and enhancing navigation. Ideal for driveways, warehouses, and intersections, it boosts efficiency and reduces risks in tricky spaces.
Conclusion
Organizing a blind corner cabinet is now simple with DIY tips. Save space and find items easily. No more digging through cluttered shelves. DIY organizers are cost-effective and creative. They fit any style or kitchen size. Spend less time searching and more time enjoying your space.
Make your kitchen efficient and tidy. Try these solutions today and see the difference. Happy organizing! A neat kitchen is within reach. Enjoy the benefits of a clutter-free corner cabinet. Your kitchen will thank you for it.

I’m Abby Lu, a passionate home cook who loves simplifying everyday meals. At PlugChef.com, I share product reviews and cooking guides to help you find the best tools for your kitchen.
Related posts:
 What Type of Cooking Utensils are Safe: Expert Picks
 What Innovations Could Blenders Make: Unleashing Future Tech
 Smart Strategies to Organize a Small Kitchen: Maximize Space
 How to Organize a Kitchen Cabinet: Expert Tips & Tricks
 How to Organize Kitchen Drawers: Expert Tips and Tricks
 How to Organize a Corner Kitchen Cupboard: Expert Tips

