
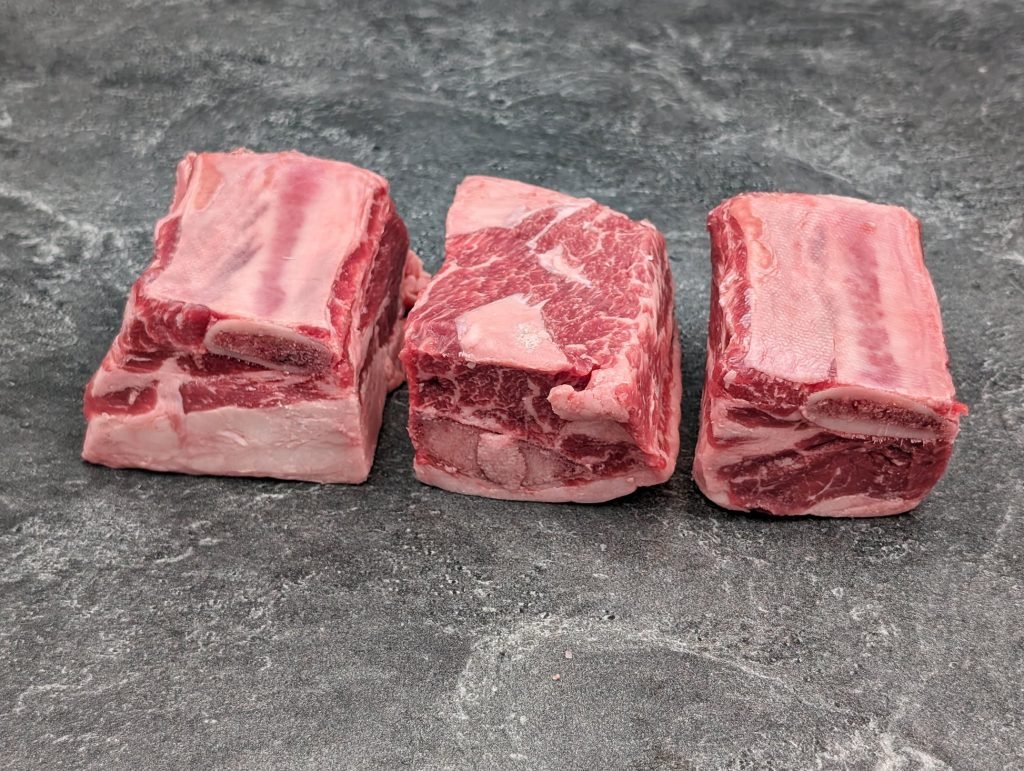
If you’ve ever ordered braised short ribs at a restaurant and wondered how to replicate that melt-in-your-mouth, rich beef flavor at home, English cut beef short ribs are your answer. Unlike thinner, cross-cut short rib variations, this thick, bone-in cut is forgiving for home cooks, packed with marbled fat and connective tissue that transforms into silky, flavorful meat when cooked low and slow. Whether you’re planning a weeknight dinner, meal prep for the week, or a special occasion feast, this guide covers everything you need to know to choose, prep, cook, and serve perfect English cut short ribs every time, no restaurant-grade equipment required.
What Are English Cut Beef Short Ribs, Exactly?
English cut beef short ribs (sometimes called English-style short ribs or plate short ribs) come from the beef plate primal, the section of the cow located directly below the ribeye roast and above the brisket. They are cut perpendicular to the spine, between individual rib bones, resulting in thick, rectangular portions with a single long bone running through the center of each piece. This cut has a high meat-to-bone ratio, with generous intramuscular marbling and connective tissue that breaks down into rich, unctuous gelatin during slow cooking.
Origin and Primal Cut
The plate primal is a well-exercised muscle that supports the cow’s weight and movement, which is why it has far more connective tissue and marbling than tender, lightly used cuts like the ribeye. This high collagen content is exactly what makes English cut short ribs so flavorful: when cooked low and slow, the collagen melts into gelatin, giving the meat its signature juicy, fall-apart texture and deep, beefy taste.
How English Cut Differs From Other Short Rib Styles
The core difference between English cut and other short rib styles is cut direction and thickness, which drastically changes how you cook them:
| Cut Style | Bone Structure | Best Cooking Methods | Ideal Use Cases |
|---|---|---|---|
| English Cut | Single long bone per portion, thick 1.5-2.5 inch rectangular pieces | Braising, slow roasting, sous vide, smoking | Hearty braised dishes, special occasion meals, meal prep |
| Flanken Cut | 2-3 small bone cross-sections per portion, thin 0.5-1 inch slices | Quick grilling, stir-frying, Korean-style BBQ | Fast weeknight meals, marinated quick cooks |
| Boneless Short Ribs | No bone, cut from the chuck or plate | Braising, grinding for burgers, slow cooking | Dishes where you want only meat, no bone to work around |
The long bone in English cut ribs also renders gelatin during cooking, adding extra depth of flavor to braising liquids and sauces that you won’t get from boneless cuts.
What Makes This Cut Unique for Home Cooking
English cut short ribs are far more forgiving than lean cuts like sirloin or strip steak: even if you overcook them slightly, their high fat and collagen content keep them juicy, not dry. They also work for a huge range of cooking methods, from hands-off slow cooker meals to fancy smoker recipes for backyard gatherings.
How to Select Premium English Cut Short Ribs
Choosing the right cut is the first step to perfect results. Focus on four key factors to avoid tough, bland ribs:
USDA Grading and Marbling
USDA Prime short ribs have the highest marbling score, with fine, even fat streaks throughout the meat that result in the richest, most tender final product. USDA Choice is a more budget-friendly alternative with good marbling, suitable for most cooking methods. Avoid USDA Select short ribs for braising, as their low fat content can lead to dry, tough meat even with long cooking times. Look for fat that is white and firm, not yellow or soft, which are signs of lower quality or an older animal.
Ideal Thickness and Portion Size
Opt for ribs that are 1.5 to 2.5 inches thick: cuts thinner than 1.5 inches will dry out during long cooks, while cuts thicker than 3 inches may require extended cooking time to break down connective tissue in the center. For serving, plan for 1 pound of bone-in short ribs per person for a main course.
Fresh vs. Frozen: What to Expect
Fresh short ribs have superior texture and flavor, as freezing can cause ice crystals to form in the meat, damaging cell structure and leading to moisture loss when thawed. If buying frozen, opt for vacuum-sealed cuts with no visible ice crystals or freezer burn (dry, grayish patches). Thaw frozen ribs in the refrigerator for 24 hours before cooking, never at room temperature, to avoid bacterial growth.
Quality Red Flags to Avoid
Skip any ribs with pale, grayish meat (a sign of age or improper storage), a strong sour or ammonia-like smell, loose or discolored fat, or large, hard fat caps that do not render when cooked. These are signs the cut is past its prime and will not cook to tender, flavorful results.
Prep Steps for Perfect, Tender Results
Proper prep takes 10-15 minutes, but it makes a massive difference in the final texture and flavor of your ribs.
Trimming for Optimal Texture
Use a sharp, flexible boning knife to trim large, hard excess fat caps from the edges of the ribs, but leave all intramuscular marbling intact, as this fat renders during cooking to add flavor and moisture. Remove the silvery, tough membrane (silver skin) from the bone side of the ribs, as it does not render and will remain chewy even after long cooking. Pat ribs completely dry with paper towels before seasoning, as moisture will prevent a good sear if you choose to brown them first. If you have young children in the home, use no-drill cabinet locks to store sharp prep tools like boning knives out of reach while you work.
Dry Brining for Better Moisture Retention
For even juicier results, dry brine ribs 1-2 hours before cooking (or overnight in the refrigerator). Rub 1 teaspoon of kosher salt per pound of ribs all over the meat, then place on a wire rack set over a baking sheet in the fridge. The salt breaks down surface proteins, helping the meat retain more moisture during cooking, and seasons the meat evenly all the way through.
Seasoning and Marinating Best Practices
For basic seasoning, a mix of kosher salt, freshly ground black pepper, garlic powder, and smoked paprika works for almost any cooking method. For marinades, avoid highly acidic ingredients (lemon juice, vinegar) for longer than 4 hours, as they can toughen the surface of the meat. Non-acidic marinades (soy sauce, Worcestershire sauce, olive oil, herbs, garlic) can be left on for up to 24 hours in the refrigerator for deeper flavor. Always marinate in a resealable plastic bag or airtight container, never on a plate, to ensure even coverage.
Proven Cooking Methods for Fall-Apart Tender Ribs
English cut short ribs require low, slow heat to break down their connective tissue into gelatin. Choose the method that fits your schedule and equipment:
Slow Braising (Most Reliable for Beginners)
Braising is the most foolproof method for English cut short ribs, as the low, moist heat breaks down all connective tissue into gelatin, resulting in meat that pulls apart with a fork. Pro tip: sear all sides of the ribs first in a hot Dutch oven with a little oil, 2-3 minutes per side, until deep golden brown, to build a rich, caramelized flavor base (this step is non-negotiable for deep flavor, a common mistake many home cooks skip). Add aromatics like diced onion, carrot, celery, garlic, bay leaves, and thyme to the pot after searing, then deglaze with red wine, beef broth, or a mix of both, scraping up all the browned bits from the bottom of the pot (this is the fond, which adds massive flavor). Add the ribs back to the pot, cover halfway with liquid, put the lid on, and cook in a 275°F (135°C) oven for 3 to 4 hours, until the meat is completely tender and pulls away from the bone easily. You can also cook on low in a slow cooker for 6-8 hours for a hands-off option. The University of Minnesota Extension confirms that braising is ideal for tough, well-marbled cuts like short ribs, as the gentle, sustained heat converts collagen into gelatin without drying out the meat UMN Extension Braising Guide.
Oven Roasting
This is a simpler method for when you don’t want to use a Dutch oven. Preheat oven to 300°F (150°C), sear the ribs first if possible, then place in a roasting pan, cover tightly with foil, and roast for 2.5 to 3 hours. Uncover for the last 15 minutes of cooking to brown the surface and crisp up any remaining fat. For extra moisture, add a splash of beef broth or water to the bottom of the pan before covering.
Smoking and Grilling
For smoking, set your smoker to 225°F (107°C), use hardwoods like oak, hickory, or cherry for mild, sweet smoke flavor, and cook for 6 to 8 hours, until the internal temperature hits 200°F (93°C). Wrap the ribs in butcher paper (not foil, to keep the bark crisp) at the "stall" (when internal temp hits 160°F and stops rising) to push through the cook faster. For grilling, set up a two-zone fire with indirect heat at 250-275°F, place ribs on the cool side of the grill, and cook for 4-5 hours, adding wood chips for smoke if desired. Spritz ribs with apple cider vinegar every hour to keep them moist.
Sous Vide (Precision Control for Consistent Results)
Sous vide cooking guarantees perfectly tender ribs every time, with zero risk of overcooking. Season ribs, place in a vacuum-sealed bag with a splash of beef broth and aromatics, and cook at 167°F (75°C) for 24 to 48 hours. The long, low temperature breaks down all connective tissue without shrinking the meat. After cooking, remove ribs from the bag, pat dry, and sear in a hot cast iron skillet for 2 minutes per side to get a crispy, caramelized crust. This method is ideal for meal prep, as you can cook ribs days in advance and reheat them quickly before serving.
Flavor Pairings, Sauces, and Serving Ideas
English cut short ribs have a rich, deep beef flavor that pairs well with a huge range of herbs, sauces, sides, and drinks:
Herb and Spice Blends for Every Taste
Mix these rubs and apply them to ribs 30 minutes before cooking for extra flavor:
- Classic Savory Rub: 2 tbsp kosher salt, 1 tbsp black pepper, 1 tbsp smoked paprika, 1 tsp garlic powder, 1 tsp onion powder, 1 tsp dried thyme
- Sweet and Smoky BBQ Rub: 2 tbsp brown sugar, 1 tbsp smoked paprika, 1 tbsp kosher salt, 1 tsp garlic powder, 1 tsp cumin, 1/2 tsp cayenne pepper
- Herb-Forward French Rub: 1 tbsp kosher salt, 1 tsp black pepper, 1 tsp dried rosemary, 1 tsp dried thyme, 1 tsp garlic powder, 1/2 tsp ground bay leaf
Homemade Sauce Recipes
- Red Wine Reduction: After braising, remove ribs from the pot, strain the braising liquid, and simmer over medium heat until reduced by half. Whisk in 2 tbsp cold butter for a glossy, rich sauce.
- Horseradish Cream: Mix 1/2 cup sour cream, 2 tbsp prepared horseradish, 1 tsp lemon juice, 1 tsp kosher salt, and 1/4 tsp black pepper. Chill for 30 minutes before serving for a cool, spicy contrast to rich ribs.
- Chimichurri: Blend 1 cup fresh parsley, 1/4 cup fresh oregano, 4 cloves garlic, 2 tbsp red wine vinegar, 1/2 cup olive oil, 1 tsp kosher salt, and 1/2 tsp red pepper flakes. Drizzle over grilled or smoked ribs for a bright, zesty finish.
Side Dish Pairings
Pair ribs with flavors that cut their richness for a balanced meal:
- Creamy mashed potatoes or polenta: Their mild, starchy base balances the rich, fatty flavor of the ribs, and soaks up extra sauce.
- Acidic sides like apple slaw or pickled red onions: The bright acidity cuts through the fat of the meat, refreshing your palate between bites.
- Roasted bitter greens (broccolini, Brussels sprouts, kale): Their earthy, slightly bitter flavor contrasts the sweetness of the braising liquid or glaze.
- Crusty bread or garlic bread: Perfect for mopping up leftover sauce from the plate or braising pot.
Presentation and Leftover Makeovers
For restaurant-quality presentation, stack ribs on a wooden serving board, garnish with fresh thyme or rosemary, drizzle sauce over the top, and serve sides in small ramekins on the side. For leftovers, shredded short rib meat works perfectly for tacos with pickled onion and cilantro, short rib ramen with a soft-boiled egg, short rib hash with fried eggs for breakfast, or mixed into pasta with a tomato cream sauce. Cooked ribs will keep in an airtight container in the refrigerator for up to 4 days, or frozen for 3 months. After cooking, scrub your Dutch oven or grill grates with a sturdy handled scrub brush to remove stuck-on bits without scratching non-stick or seasoned surfaces. For side dishes, scrub root vegetables like carrots and potatoes with a textured veggie brush to remove dirt and debris before roasting.
Common Mistakes That Ruin Short Ribs (And How to Fix Them)
Even experienced cooks make these errors, but they’re easy to avoid with a few simple adjustments:
Undercooking or Overcooking Without Moisture
English cut short ribs need to reach an internal temperature of 190-205°F (88-96°C) to fully break down collagen. If you pull them out at 170°F, the connective tissue will still be tough and chewy. If you cook them at high heat without liquid or a cover, they will dry out and become tough. In practice, many home cooks under-braise short ribs, pulling them out at 3 hours when they still have a tough, chewy texture. The meat should pull away from the bone with zero resistance when it’s perfectly cooked. For food safety, the USDA recommends cooking all beef to a minimum internal temperature of 145°F (63°C) with a 3-minute rest time USDA Safe Cooking Guidelines, but short ribs require longer cooking to achieve their signature tender texture.
Skipping the Pre-Cook Sear
Searing the ribs before braising or roasting triggers the Maillard reaction, creating hundreds of complex flavor compounds that you can’t get from liquid alone. It also creates a golden, crispy crust that contrasts with the tender interior. The fix: pat ribs completely dry, season with salt and pepper, and sear in a hot cast iron skillet or Dutch oven with a little high-smoke-point oil (like avocado oil) for 2-3 minutes per side, until deep golden brown all over.
Confusing English Cut With Flanken Cut
If you use flanken cooking times for English cut, you will end up with tough, undercooked meat, as English cut needs 30-40% longer cook time to break down its thick connective tissue. The fix: check the cut label when buying, and adjust cooking times accordingly.
Cutting Into Ribs Too Soon After Cooking
When you cook meat, the juices redistribute to the center. If you cut into it immediately, all the juices run out, leaving the meat dry. The fix: let ribs rest, tented with foil, for 10-15 minutes after cooking before serving or shredding.
Over-Marinating With Acid
Acidic marinades (lemon juice, vinegar, wine) can denature the proteins on the surface of the meat, turning it mushy and tough. The fix: limit acid-based marinades to 4 hours or less in the refrigerator, and use non-acidic marinades for longer soaks.
Frequently Asked Questions
What are English cut beef short ribs?
English cut beef short ribs are a bone-in cut from the beef plate primal (the section of the cow below the ribeye and above the brisket). They are cut between individual rib bones, resulting in thick, rectangular portions with a single long bone running through the center of each piece. This cut has a high meat-to-bone ratio, with generous intramuscular marbling and connective tissue that breaks down into rich, silky gelatin during slow cooking.
What's the difference between English cut and flanken short ribs?
The core difference is cut direction and thickness: English cut ribs are cut between the bones, resulting in thick, 1.5-2.5 inch portions with a single long bone per piece. Flanken cut ribs are sliced across the bones, resulting in thin, 0.5-1 inch slices with 2-3 small bone cross-sections per piece. English cut is best for slow, moist cooking methods, while flanken works well for quick grilling or stir-frying.
What internal temperature do English cut short ribs need?
For food safety, the USDA recommends cooking all beef to a minimum internal temperature of 145°F (63°C) with a 3-minute rest time. However, English cut short ribs need to reach 190-205°F (88-96°C) to fully break down their connective tissue into gelatin, resulting in the fall-apart tender texture most people prefer.
Can English cut short ribs be cooked in an Instant Pot or slow cooker?
Yes! Both appliances work perfectly for braising English cut short ribs. For an Instant Pot, sear the ribs first using the sauté function, add liquid and aromatics, then cook on high pressure for 45-60 minutes, followed by a 15-minute natural pressure release. For a slow cooker, cook on low for 6-8 hours or on high for 4-5 hours, until the meat is tender.
Are English cut short ribs expensive?
English cut short ribs typically cost $8 to $12 per pound, depending on quality grade and region. They are more affordable than premium steak cuts like ribeye or filet, but more expensive than chuck roast or brisket, making them a great mid-range option for special occasion meals or weekend meal prep.
Conclusion
English cut beef short ribs are a versatile, flavorful cut that delivers restaurant-quality results with minimal hands-on effort, as long as you follow a few key rules: choose well-marbled, thick cuts, prep them properly, cook low and slow with moisture, and let them rest before serving. Whether you braise them in red wine for a cozy winter dinner, smoke them for a summer backyard feast, or sous vide them for a weeknight meal prep hack, this cut is guaranteed to impress.
Ready to test your skills? Try a simple red wine braise this weekend: sear 2 pounds of English cut short ribs, add aromatics, 1 cup of red wine, and 2 cups of beef broth, and braise at 275°F for 3.5 hours for foolproof, tender results. For more easy, flavorful beef recipes, check out our blog for weekly cooking tips and ideas. Wipe down countertops and cutting boards with a multi-surface cleaning brush to tackle grease and meat residue quickly after cooking, and clean greasy pots and pans with a long-handled dish brush to avoid scrubbing with abrasive sponges that damage non-stick cookware.
 Fresh, well-marbled English cut short ribs ready for trimming and seasoning
Image source: sousvideways.com
Fresh, well-marbled English cut short ribs ready for trimming and seasoning
Image source: sousvideways.com
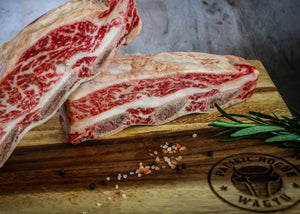 Searing ribs first builds a deep, caramelized flavor base for braising
Image source: www.pacificroguewagyu.com
Searing ribs first builds a deep, caramelized flavor base for braising
Image source: www.pacificroguewagyu.com
 Glazed short ribs served with charred broccolini and creamy polenta
Image source: www.cherryonmysundae.com
Glazed short ribs served with charred broccolini and creamy polenta
Image source: www.cherryonmysundae.com
Oven Roasting
This is a simpler, hands-off method for when you don’t want to monitor a stovetop braise. Preheat your oven to 300°F (150°C), and if you have time, sear the ribs first in a hot skillet to build a flavorful crust. Place the ribs in a rimmed roasting pan, add a splash of beef broth or red wine to the bottom of the pan to create steam, and cover tightly with aluminum foil. Roast for 2.5 to 3 hours, then uncover for the final 15 minutes to let the fat render and the surface caramelize. The result is tender, juicy ribs with a lightlylightly crisp, caramelized crust, and the meat pulls cleanly away from the bone with no chewy resistance. For extra depth, scatter a few smashed garlic cloves and fresh rosemary sprigs over the ribs before covering with foil, so their fragrant oils infuse the meat as it cooks. If you prefer a saucy finish, brush the ribs with your chosen barbecue or red wine reduction during the final 10 minutes of uncovered roasting to let the glaze set without burning.
Smoking and Grilling
Smoking and grilling infuse English cut short ribs with a savory, wood-fired crust and subtle smoky depth that braising can’t replicate, but they require careful temperature control to avoid drying out the thick, marbled cut. For smoking, set your smoker to a steady 225°F (107°C) and use mild hardwoods like oak, cherry, or apple to avoid overpowering the beef’s natural flavor. Cook the ribs for 6 to 8 hours, spritzing them with apple cider vinegar or beef broth every 45 minutes to keep the surface moist, until the internal temperature reaches 200°F (93°C) and the meat pulls cleanly from the bone. If you hit the “stall” (when internal temperature plateaus around 160°F for several hours), wrap the ribs in peach or butcher paper to push through the cook faster while preserving the crisp bark, rather than foil which will steam the crust soft.
For grilling, set up a two-zone fire with indirect heat on one side of the grill, aiming for a temperature of 250–275°F. Place the ribs on the cool side of the grill, away from direct flame, and cook with the lid closed for 4 to 5 hours, adding wood chips to the hot side for smoke if your grill allows. Test for doneness the same way: the meat should pull away from the bone with zero resistance, and the internal temp should hit 200°F. A common mistake here is placing ribs over direct heat too early, which burns the exterior before the connective tissue breaks down in the center—always stick to indirect heat for the full cook.
Sous Vide Precision Cooking
Sous vide cooking eliminates the guesswork from short rib prep, delivering perfectly tender, evenly cooked meat every single time, with zero risk of drying out the cut. Season the ribs as desired, place them in a vacuum-sealed bag with a splash of beef broth and a few aromatics (like garlic, thyme, and a bay leaf), and cook in a water bath set to 167°F (75°C) for 24 to 48 hours. This low, steady temperature breaks down all connective tissue into gelatin without shrinking or toughening the meat, even if you leave it in the bath for an extra few hours. After cooking, remove the ribs from the bag, pat them completely dry, and sear in a screaming-hot cast iron skillet for 1–2 minutes per side to get a crisp, caramelized crust. This method is ideal for meal prep: you can cook the ribs days in advance, refrigerate them, and reheat them gently before serving without losing any texture. If you’re new to sous vide, our blog has step-by-step guides to precision beef cooking for foolproof results.
Flavor Pairings, Sauces, and Serving Ideas
English cut short ribs have a rich, deep beef flavor that pairs well with a huge range of herbs, sauces, sides, and drinks. The key to a balanced dish is pairing the meat’s richness with bright, acidic, or starchy elements to cut through the fat and refresh your palate between bites.
Herb and Spice Blends for Every Taste
Mix these rubs and apply them to ribs 30 minutes before cooking for extra flavor, or add them to braising liquids for infused taste:
- Classic Savory Rub: 2 tbsp kosher salt, 1 tbsp black pepper, 1 tbsp smoked paprika, 1 tsp garlic powder, 1 tsp onion powder, 1 tsp dried thyme
- Sweet and Smoky BBQ Rub: 2 tbsp brown sugar, 1 tbsp smoked paprika, 1 tbsp kosher salt, 1 tsp garlic powder, 1 tsp cumin, 1/2 tsp cayenne pepper
- Herb-Forward French Rub: 1 tbsp kosher salt, 1 tsp black pepper, 1 tsp dried rosemary, 1 tsp dried thyme, 1 tsp garlic powder, 1/2 tsp ground bay leaf
Homemade Sauce Recipes
- Red Wine Reduction: After braising, remove ribs from the pot, strain the braising liquid, and simmer over medium heat until reduced by half. Whisk in 2 tbsp cold butter for a glossy, rich sauce that clings to the meat.
- Horseradish Cream: Mix 1/2 cup sour cream, 2 tbsp prepared horseradish, 1 tsp lemon juice, 1 tsp kosher salt, and 1/4 tsp black pepper. Chill for 30 minutes before serving for a cool, spicy contrast to rich ribs.
- Chimichurri: Blend 1 cup fresh parsley, 1/4 cup fresh oregano, 4 cloves garlic, 2 tbsp red wine vinegar, 1/2 cup olive oil, 1 tsp kosher salt, and 1/2 tsp red pepper flakes. Drizzle over grilled or smoked ribs for a bright, zesty finish that cuts through fat.
Side Dish Pairings
Pair ribs with flavors that balance their richness for a well-rounded meal:
- Creamy mashed potatoes or polenta: Their mild, starchy base balances the rich, fatty flavor of the ribs, and soaks up extra sauce effortlessly.
- Acidic sides like apple slaw or quick-pickled red onions: The bright acidity cuts through the fat of the meat, refreshing your palate between bites.
- Roasted bitter greens (broccolini, Brussels sprouts, kale): Their earthy, slightly bitter flavor contrasts the sweetness of the braising liquid or glaze.
- Crusty bread or garlic bread: Perfect for mopping up leftover sauce from the plate or braising pot. For even cooking, scrub root vegetables like carrots and potatoes with a textured veggie brush to remove dirt and debris before roasting.
Presentation and Leftover Makeovers
For restaurant-quality presentation, stack ribs on a wooden serving board, garnish with fresh thyme or rosemary, drizzle sauce over the top, and serve sides in small ramekins on the side. For leftovers, shredded short rib meat works perfectly for tacos with pickled onion and cilantro, short rib ramen with a soft-boiled egg, short rib hash with fried eggs for breakfast, or mixed into pasta with a tomato cream sauce. Cooked ribs will keep in an airtight container in the refrigerator for up to 4 days, or frozen for 3 months. After cooking, scrub your Dutch oven or grill grates with a sturdy handled scrub brush to remove stuck-on bits without scratching non-stick or seasoned surfaces.
Common Mistakes That Ruin Short Ribs (And How to Fix Them)
Even experienced cooks make these errors, but they’re easy to avoid with a few simple adjustments:
Undercooking or Overcooking Without Moisture
English cut short ribs need to reach an internal temperature of 190–205°F (88–96°C) to fully break down collagen into gelatin. If you pull them out at 170°F, the connective tissue will still be tough and chewy. If you cook them at high heat without liquid or a cover, they will dry out and become tough. In practice, many home cooks under-braise short ribs, pulling them out at 3 hours when they still have a tough, chewy texture. The meat should pull away from the bone with zero resistance when it’s perfectly cooked. For food safety, the USDA recommends cooking all beef to a minimum internal temperature of 145°F (63°C) with a 3-minute rest time USDA Safe Cooking Guidelines, but short ribs require longer cooking to achieve their signature tender texture.
Skipping the Pre-Cook Sear
Searing the ribs before braising or roasting triggers the Maillard reaction, creating hundreds of complex flavor compounds that you can’t get from liquid alone. It also creates a golden, crispy crust that contrasts with the tender interior. The fix: pat ribs completely dry, season with salt and pepper, and sear in a hot cast iron skillet or Dutch oven with a little high-smoke-point oil (like avocado oil) for 2–3 minutes per side, until deep golden brown all over.
Confusing English Cut With Flanken Cut
If you use flanken cooking times for English cut, you will end up with tough, undercooked meat, as English cut needs 30–40% longer cook time to break down its thick connective tissue. The fix: check the cut label when buying, and adjust cooking times accordingly.
Cutting Into Ribs Too Soon After Cooking
When you cook meat, the juices redistribute to the center. If you cut into it immediately, all the juices run out, leaving the meat dry. The fix: let ribs rest, tented with foil, for 10–15 minutes after cooking before serving or shredding.
Over-Marinating With Acid
Acidic marinades (lemon juice, vinegar, wine) can denature the proteins on the surface of the meat, turning it mushy and tough. The fix: limit acid-based marinades to 4 hours or less in the refrigerator, and use non-acidic marinades for longer soaks.
Frequently Asked Questions
What are English cut beef short ribs?
English cut beef short ribs are a bone-in cut from the beef plate primal (the section of the cow below the ribeye and above the brisket). They are cut between individual rib bones, resulting in thick, rectangular portions with a single long bone running through the center of each piece. This cut has a high meat-to-bone ratio, with generous intramuscular marbling and connective tissue that breaks down into rich, silky gelatin during slow cooking.
What's the difference between English cut and flanken short ribs?
The core difference is cut direction and thickness: English cut ribs are cut between the bones, resulting in thick, 1.5–2.5 inch portions with a single long bone per piece. Flanken cut ribs are sliced across the bones, resulting in thin, 0.5–1 inch slices with 2–3 small bone cross-sections per piece. English cut is best for slow, moist cooking methods, while flanken works well for quick grilling or stir-frying.
What internal temperature do English cut short ribs need?
For food safety, the USDA recommends cooking all beef to a minimum internal temperature of 145°F (63°C) with a 3-minute rest time. However, English cut short ribs need to reach 190–205°F (88–96°C) to fully break down their connective tissue into gelatin, resulting in the fall-apart tender texture most people prefer.
Can English cut short ribs be cooked in an Instant Pot or slow cooker?
Yes! Both appliances work perfectly for braising English cut short ribs. For an Instant Pot, sear the ribs first using the sauté function, add liquid and aromatics, then cook on high pressure for 45–60 minutes, followed by a 15-minute natural pressure release. For a slow cooker, cook on low for 6–8 hours or on high for 4–5 hours, until the meat is tender.
Are English cut short ribs expensive?
English cut short ribs typically cost $8 to $12 per pound, depending on quality grade and region. They are more affordable than premium steak cuts like ribeye or filet, but more expensive than chuck roast or brisket, making them a great mid-range option for special occasion meals or weekend meal prep.
Conclusion
English cut beef short ribs are a versatile, flavorful cut that delivers restaurant-quality results with minimal hands-on effort, as long as you follow a few key rules: choose well-marbled, thick cuts, prep them properly, cook low and slow with moisture, and let them rest before serving. Whether you braise them in red wine for a cozy winter dinner, smoke them for a summer backyard feast, or sous vide them for a weeknight meal prep hack, this cut is guaranteed to impress.
Ready to test your skills? Try a simple red wine braise this weekend: sear 2 pounds of English cut short ribs, add aromatics, 1 cup of red wine, and 2 cups of beef broth, and braise at 275°F for 3.5 hours for foolproof, tender results. For more easy, flavorful beef recipes, check out our blog for weekly cooking tips and ideas. After cooking, scrub countertops and cutting boards with a multi-surface cleaning brush to tackle grease and meat residue quickly, and clean greasy pots and pans with a long-handled dish brush to avoid scrubbing with abrasive sponges that damage non-stick cookware.

I’m Abby Lu, a passionate home cook who loves simplifying everyday meals. At PlugChef.com, I share product reviews and cooking guides to help you find the best tools for your kitchen.
Related posts:
 How to Make a Fruit Basket for a Gift: Easy DIY Guide
 Mesh Desk Organizer With Sliding Drawer: Maximize Efficiency
 Decorative Woven Baskets for Wall: Transform Your Space
 Rubbermaid Large Dish Drying Rack: Ultimate Kitchen Solution
 Gray Kitchen With Stainless Steel Appliances: Modern Elegance
 Appliance Play Food Kitchen Toys: Ignite Imaginative Play

