
Have you ever found yourself frustrated with a leaking sink or a clogged drain? You’re not alone, and there’s a simple fix that can save you from those annoying kitchen nightmares: replacing your sink basket.
Whether you’re dealing with a persistent drip or just want to give your kitchen a quick refresh, knowing how to replace a sink basket can be a game-changer. Imagine the satisfaction of saying goodbye to pesky leaks and hello to a smoothly running kitchen.
This guide is tailored just for you, making it easy and straightforward to tackle this home improvement task. So, if you’re ready to roll up your sleeves and get your hands a little dirty, read on for clear, step-by-step instructions that will empower you to take control of your sink situation. Your kitchen deserves the best, and with just a bit of effort, you can make it happen. Don’t let plumbing woes hold you back; discover how easy it can be to replace a sink basket and transform your kitchen experience.
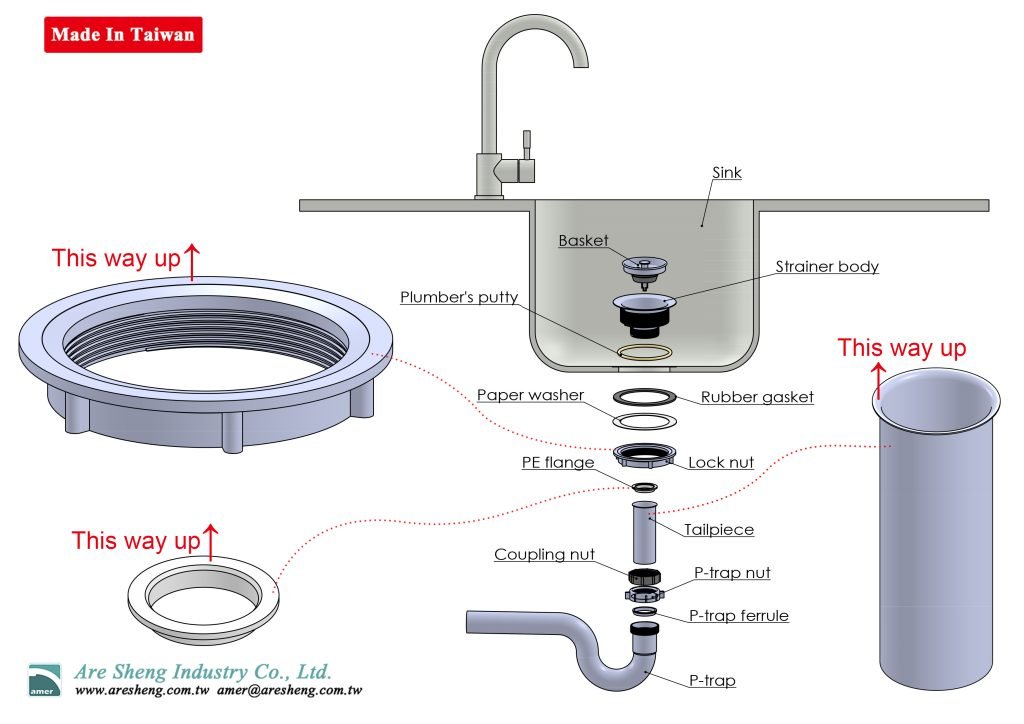
Tools And Materials Needed
Gather essential tools like a wrench, pliers, and plumber’s putty. You’ll also need a new sink basket. Ensure you have a bucket to catch any water during the process.
Replacing a sink basket might seem daunting at first, but with the right tools and materials, you can tackle this project with confidence. Whether you’re fixing a leak or updating your kitchen’s look, knowing precisely what you need will streamline the process and save you time. Imagine finishing the job without multiple trips to the hardware store—that’s the goal!Essential Tools For The Job
To start, gather a few basic tools. A wrench or pliers are crucial for loosening and tightening the nuts. You might already have these in your toolbox, but if not, they’re easy to find at any hardware store. A screwdriver is also handy for removing any screws securing the sink basket. A bucket or pan will be your lifesaver. Placing it under the sink catches any water that might spill when you disconnect the plumbing. This simple step prevents unnecessary mess and makes cleanup a breeze.Materials You’ll Need
First and foremost, you’ll need a new sink basket. Choose one that fits your existing sink and suits your style. Look for options made from durable materials like stainless steel to ensure longevity. Don’t forget the plumber’s putty, a staple for sealing the sink basket and preventing leaks. Additionally, having a rubber gasket on hand is wise. It helps create a watertight seal between the sink basket and the sink itself. Skipping this could lead to annoying leaks down the road.Optional Extras
Consider adding a new tailpiece or drainpipe if your current setup looks worn. While this isn’t mandatory, it can enhance the overall appearance and functionality of your sink. This might be the perfect time to make those small updates you’ve been contemplating. A pipe wrench can offer more control than regular pliers, especially if you encounter stubborn nuts. Investing in one could simplify future plumbing projects, making it a worthy addition to your toolkit. Now, think about why you want to replace your sink basket. Is it for aesthetic reasons, or does your current basket leak and cause frustration? Identifying your motivation can guide your choices and ensure you’re fully prepared.Preparation Steps
Before diving into replacing a sink basket, prepare carefully for the task. Proper preparation saves time and prevents unwanted messes. Gather all necessary tools and materials beforehand. A little planning goes a long way in ensuring a smooth process.
Shut Off Water Supply
Locate the shut-off valves under the sink. Turn them clockwise to stop the water flow. If valves are stuck, use a wrench gently. Ensuring no water runs prevents accidental spills. Check the faucets to confirm water is off completely.
Clear The Area
Remove all items from under the sink. This includes cleaning supplies and personal items. Clear access makes work easier and more efficient. Place a towel or bucket underneath to catch any drips. This simple step keeps the workspace tidy and dry.
Removing The Old Sink Basket
Removing the old sink basket is the first step in replacement. This process requires careful attention to detail. A sink basket connects the sink to the drain. Over time, it may become worn or damaged. Replacing it ensures a leak-free and efficient drainage system.
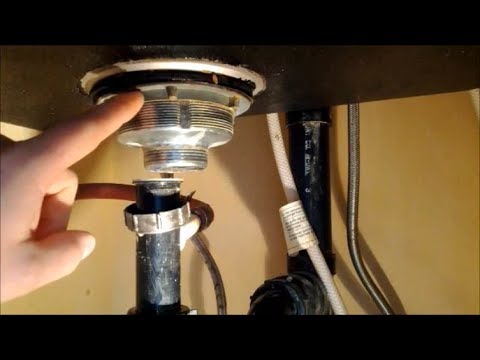
Loosen The Locknut
Begin by accessing the area under the sink. Locate the locknut holding the basket in place. Use pliers or a wrench to grip the locknut. Turn it counterclockwise to loosen. This may require some effort if it’s tight.
Be patient while loosening the locknut. A steady hand ensures you don’t damage surrounding parts. Once it’s loose, continue turning until it’s completely removed. Ensure you have a bucket to catch any water that might spill.
Detach The Basket
With the locknut removed, the basket is ready for detachment. Push up from beneath the sink to dislodge it. If it’s stubborn, gently tap the edges with a rubber mallet. Avoid using excessive force to prevent sink damage.
Once loose, lift the basket out from the sink. Clean any residue or old putty from the sink’s opening. This prepares it for the new basket installation. Ensure the area is dry and free of debris.
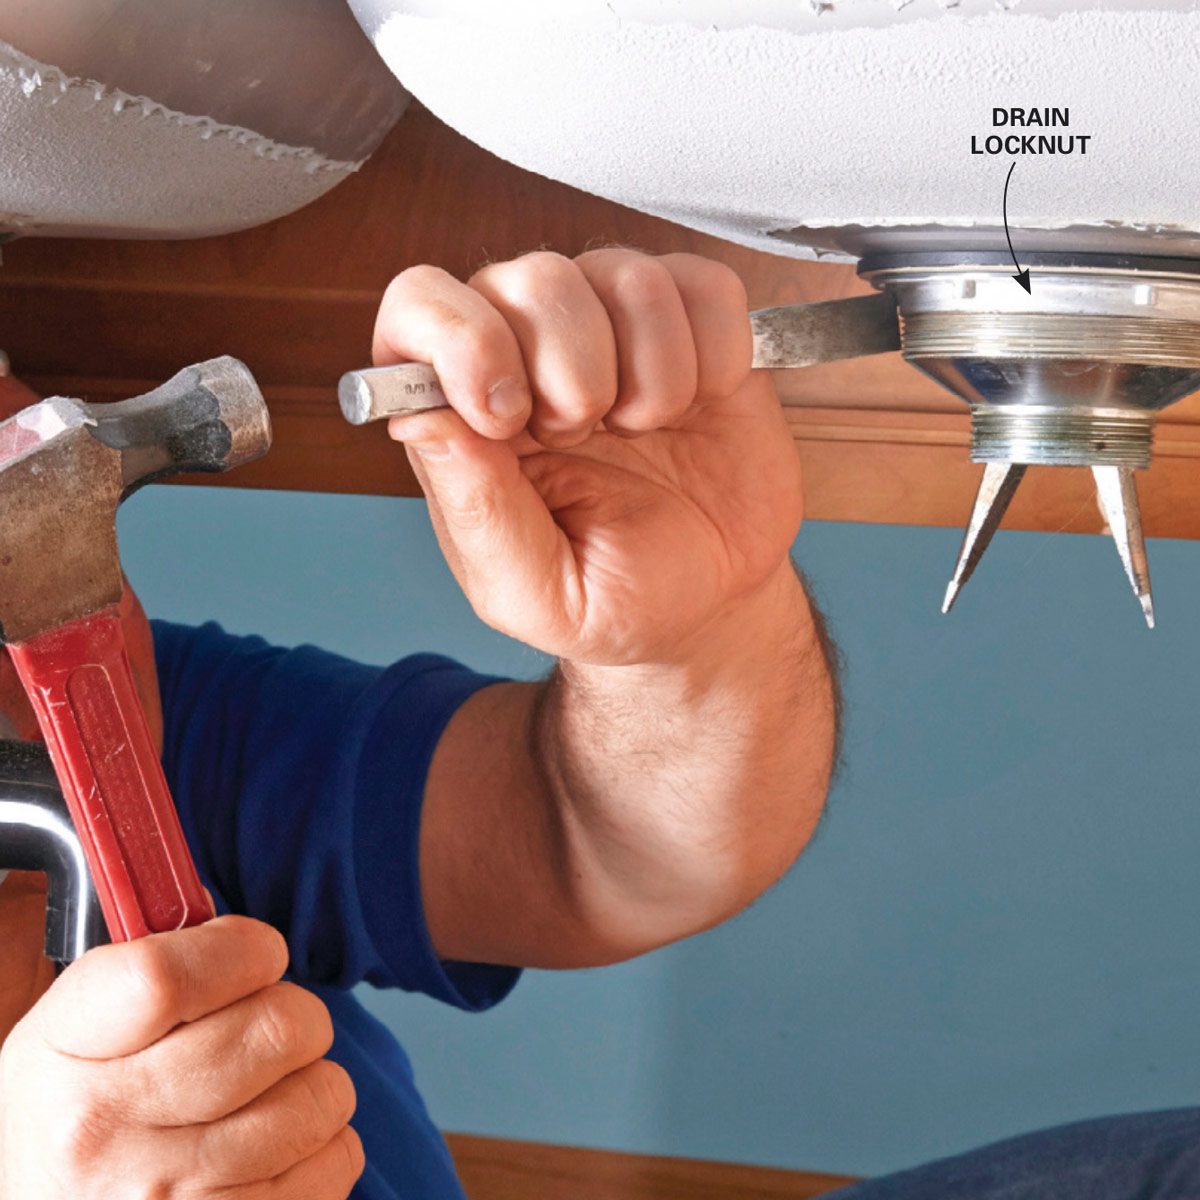
Credit: www.youtube.com
Cleaning The Sink Area
Replacing a sink basket can refresh your sink area quickly. Start by removing the old basket with a wrench. Ensure a snug fit with a new basket to prevent leaks.
Cleaning the sink area is a crucial step when replacing a sink basket. It ensures a clean surface for a secure and leak-free installation. Plus, a tidy workspace can make the task smoother and less frustrating. Have you ever noticed how much easier it is to work in a clean kitchen? The same applies here. Let’s dive into the steps to prepare your sink for its new basket.Scrape Off Old Putty
Begin by removing any old plumber’s putty around the sink drain. Use a flat tool like a putty knife or even a plastic scraper. Be gentle to avoid scratching the sink surface. Old putty can be stubborn, so patience is key. Scrape carefully until all residue is gone. If you’ve ever painted a wall, you know the importance of a clean, smooth base. The same principle applies here.Wipe Clean The Surface
Once the old putty is removed, wipe the area clean. Use a damp cloth and some mild detergent. This will remove any remaining debris or grease. A clean surface ensures that the new basket sits flush. This helps prevent future leaks. Have you ever tried sticking a sticker on a dusty surface? It doesn’t hold well. Similarly, a clean sink area helps secure the basket effectively. By following these steps, you’ll set a solid foundation for your sink basket replacement. What other cleaning tricks do you use in your DIY projects?Installing The New Sink Basket
Replacing a sink basket might seem daunting at first, but with the right steps, you can have it done in no time. Installing the new sink basket is a crucial part of this DIY task. It involves preparing the area, positioning the basket, and securing it to prevent leaks. Whether you’re a seasoned DIYer or a first-timer, these steps will guide you through the process smoothly.
Apply Plumber’s Putty
Start by rolling a small amount of plumber’s putty into a rope shape. Think of it as playdough but for adults who love fixing things! The putty acts as a sealant, preventing water from seeping under the basket.
Place the putty around the underside of the sink basket’s lip. If you’re wondering why plumber’s putty and not silicone, it’s because plumber’s putty allows for a better seal and is easier to remove if you need to replace the basket again.
Position The Basket
Now, carefully lower the sink basket into the drain opening. Ensure it’s centered and sitting snugly in the putty. You might need to press down slightly to make sure it adheres well.
Take a moment to appreciate your handiwork. Have you centered it correctly? A simple misalignment can lead to leaks, which no one wants to deal with.
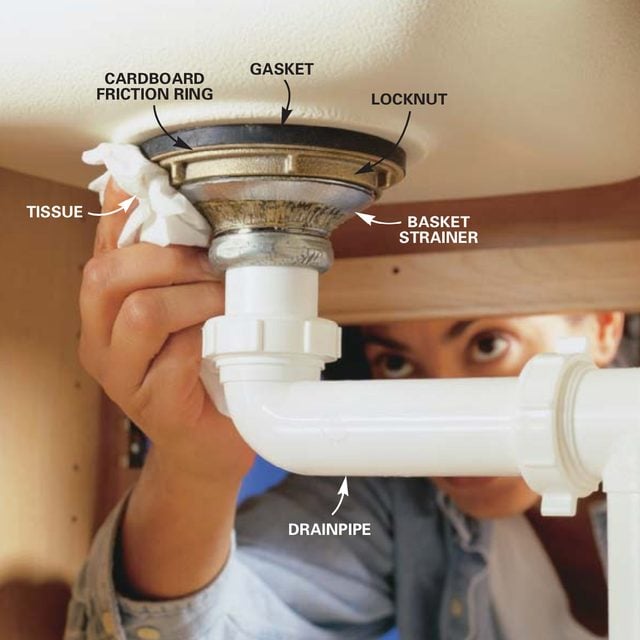
Secure With Locknut
Underneath the sink, it’s time to secure the basket using a locknut. Thread the locknut onto the sink basket’s tailpiece. Tighten it using your hand first, then a wrench for a firm hold.
Remember, over-tightening can cause damage. Think of it like fastening a jar lid; it should be tight but not strained. A secure locknut ensures a leak-free connection, saving you from unexpected drips later on.
As you tighten, check if any putty has squeezed out. If so, clean the excess with a damp cloth. This is a sign of a good seal, and you’re almost done! Do you feel like a sink basket pro yet?
Credit: www.familyhandyman.com
Testing The Installation
Congratulations on replacing your sink basket! The final step is crucial: testing the installation. This ensures everything functions correctly. You don’t want surprises later. Follow these steps to confirm your work is solid. Proper testing avoids leaks and ensures a smooth operation.
Restore Water Supply
First, restore the water supply to your sink. Turn the water valves back on. These are usually under the sink. Open the faucet to let the water flow. Listen for any unusual noises. Watch for any sputtering or irregular flow. This can indicate trapped air or further issues.
Check For Leaks
Next, carefully inspect for any leaks around the sink basket. Use a dry cloth to wipe the area. Then observe for moisture. If you spot water, tighten connections gently. Avoid over-tightening. It could damage the seals or fittings. Run the faucet and drain water. Check for leaks again.
Take your time with these steps. A leak-free sink ensures peace of mind. If all looks good, your job is complete. You now have a fully functional sink. Enjoy your handiwork!
Maintenance Tips
Regular maintenance of your sink basket ensures it functions properly. It prevents leaks and clogs, saving you time and money. Following simple tips can extend its lifespan. Here are some essential maintenance tips for your sink basket.
Regular Inspections
Inspect your sink basket once a month. Look for any signs of wear or damage. Check the seals and gaskets for cracks. Tighten any loose screws or bolts. This prevents leaks and costly repairs.
Cleaning Suggestions
Clean your sink basket weekly. Remove any food particles or debris. Use a mild soap and warm water. Avoid harsh chemicals that can damage the basket. Use a soft brush to clean hard-to-reach areas. This keeps your sink basket fresh and odor-free.
Credit: www.familyhandyman.com
Frequently Asked Questions
How To Change Sink Basket Waste?
To change a sink basket waste, unscrew the old basket. Remove the sealant and clean the area. Insert the new basket with a fresh sealant. Tighten the screws securely to prevent leaks. Check for leaks by running water.
Are All Sink Baskets The Same Size?
No, sink baskets are not all the same size. They vary based on sink type and manufacturer. Measure your sink’s drain to ensure a proper fit. Standard sizes exist, but always check specifications for compatibility. Custom sinks might require unique basket sizes.
Does A Sink Basket Need Plumbers Putty?
A sink basket often requires plumber’s putty to create a watertight seal. Plumber’s putty prevents leaks and ensures stability. It’s commonly used during installation to fill gaps and secure the basket. Always check if your sink model recommends plumber’s putty for optimal performance and longevity.
What Tool Is Recommended For Installing A Sink Strainer Basket?
Use a sink strainer wrench for installing a sink strainer basket. It ensures a tight and secure fit. The wrench grips the strainer basket, making installation easier and preventing leaks. This tool is essential for both DIY enthusiasts and professionals aiming for efficient plumbing work.
Conclusion
Replacing a sink basket is easy with the right steps. Follow the guide carefully to ensure a smooth process. Gather all necessary tools before starting. Be patient and take your time. Check for any leaks when finished. Proper maintenance prevents future issues.
A well-installed basket keeps your sink working well. Feel confident in your DIY skills. Share your success with friends and family. They might need help too! Regular checks keep your sink in top shape. Enjoy your well-functioning sink. Keep learning and improving your home repair skills.

I’m Abby Lu, a passionate home cook who loves simplifying everyday meals. At PlugChef.com, I share product reviews and cooking guides to help you find the best tools for your kitchen.
Related posts:
 What Type of Cooking Utensils are Safe: Expert Picks
 What Innovations Could Blenders Make: Unleashing Future Tech
 Smart Strategies to Organize a Small Kitchen: Maximize Space
 How to Organize a Kitchen Cabinet: Expert Tips & Tricks
 How to Organize Kitchen Drawers: Expert Tips and Tricks
 How to Organize a Corner Kitchen Cupboard: Expert Tips

